
The Line Item Upgrades feature allows users to offer optional upgrades for one or more line items, including items with Sub Assemblies. This offers an easy way to upsell to a better product and profit margin. Users can configure one-for-one upgrades, where a single line item has a single upgrade option, or more complex upgrades offering multiple options or replacing multiple items. The feature can even be used to upgrade entire packages, allowing users to offer a cellulose material upgrade on a fiberglass bid, for example. While generally intended to offer a more premium item as an upgrade, Line Item Upgrades can be used to off less expensive options for budget conscious customers and Line Item Upgrades can be suppressed individually on a case-by-case basis.
Simple Line Item Upgrades can be configured in both Item Details and the Estimate form, while more complex Line Item Upgrades can only be configured on the Estimate form. Those configured in Item Details will be offered every time the line item is added to an estimate, whereas those configured on the Estimate form will appear only on that particular estimate. Quick Insert and Plan Templates can be configured with complex upgrades to minimize the amount of entry and setup required for frequently offered options.
We’ll cover Line Item Upgrades in two sections: simple upgrades and “complex” upgrades. Simple upgrades refer to a single upgrade option replacing a single, “original” item on the estimate. Complex upgrades refer to those that offer more than upgrade option, replace more than one line item, and/or offer more than one item as part of the upgrade. We’ll start with simple upgrades before covering more complex ones.
- Note that complex Line Item Upgrades will only be displayed correctly on the following Estimate reports, with those reports labelled “WLB” including line breaks around upgrade items.
Estimate Description
Estimate Description – WLB
Estimate Description – Options on Page 2
Estimate Description – Options on Page 2 – WLB.
Simple Upgrades
Simple Line Item Upgrades may be configured on Item Details or individual estimates, but those configured in Item Details will be offered every time the item is added to an estimate unless manually suppressed. Whether on Item Details or the Estimate form, the process of setting up the upgrade is the same.
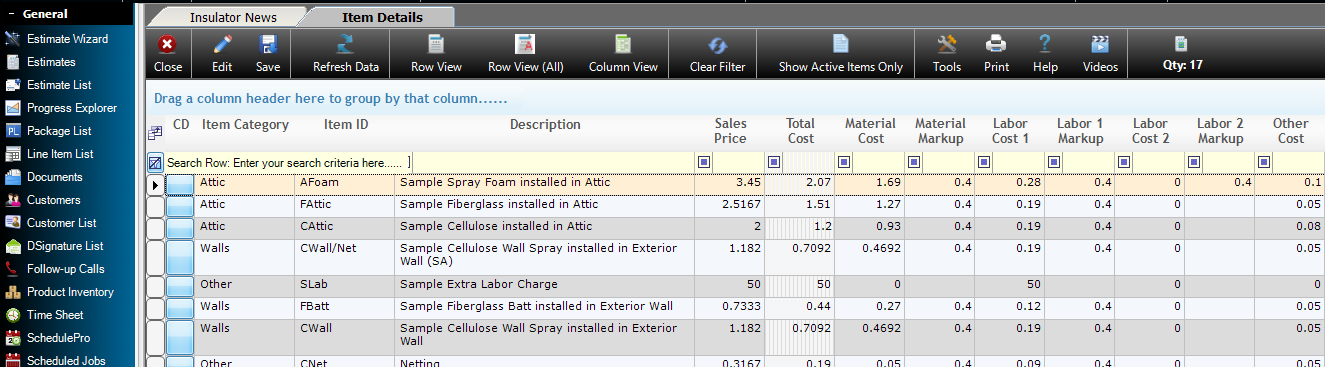
1. Start by clicking Edit towards the top left of the Item Details form.
2. Select the item to offer an upgrade for in the main Item Details grid.
3. Select the Display Item Upgrades radial menu near the bottom of the form.
4. Select the desired Item in the Item Upgrades grid at the bottom of the form.
5. Adjust pricing and costing of the upgrade item if needed. (Note that it will not modify the original entry.)
6. Click Save at the top of the form to retain changes.
When working on the Estimate form, users will select the item to offer an upgrade for in the Full Details Tab, the select the Upgrades tab at the bottom of the form to configure the upgrade. The process is otherwise identical to that in Item Details.
Complex Upgrades
Complex upgrades allow more flexibility in the configuration of upgrades by using the Upgrade Set field. Upgrade items assigned to the same upgrade set will be grouped together and treated as a single option in the upgrade. This is also true of line items in the full details grid, if multiple items are assigned the same upgrade letter, they will all be replaced by the upgrade. If upgrade items are assigned different Upgrade Sets, they will be treated as separate options within the upgrade. Last, Item with Sub-Assemblies can now be utilized in Line Item Upgrades as well
Note that each Upgrade Set letter, A-J, can only be used once on each Estimate, though it can be assigned to multiple items to group them together.
Replacing a Single Line Item with More than One Upgrade Item
Let’s start by looking at how to offer more than one item as an upgrade, where two upgrade items will replace a single “original” line item. We’ll start on the Full Details tab of the Estimate form.
1. Ensure you are in Edit mode.
2. Select the entry in Full Details you would like to offer an upgrade for.
3. Select the Upgrades tab at the bottom of the form.
4. In the Upgrades grid, select the first Item you want to include in the upgrade and assign it an Upgrade Set and make any desired modifications.
5. Select the next item to include in the upgrade and assign it the same Upgrade Set letter. Repeat this process for any additional Items.
6. When the Estimate is produced using one of the compatible reports, the Upgrade items will be offered as a group against the original item.
7. If the customer selects the upgrade, clicking the Insert button at the left of the upgrade options will replace the original line item with all of the upgrade items.
Upgrading Multiple Line Items
Now let’s look at the reverse, where more than one item in the Full Details grid will be replaced by an upgrade. The upgrade itself may include one or more line items, even allowing all the items in a package to be upgraded in a single upgrade option.
1. Ensure you are in Edit mode
2. Select the first entry to be replaced by an upgrade in the Full Details grid.
3. Assign it an Upgrade Set,
4. Assign the same upgrade set to any other items in Full Details that will be replaced as part of the upgrade.
5. Select the Upgrades Tab at the bottom of the Estimate form.
6. Configure the desired upgrade item or items, using an Upgrade Set to group entries as needed.
7. Any configured upgrades will be offered against the group of line items created using the same Upgrade Set letter on produced estimates.
8. If the customer selects the upgrade, clicking the Insert button in the upgrades grid will replace the grouped line items with the desired upgrade.
Offering more than One Upgrade Option for a Line Item
Let’s look over how to create an upgrade that offers multiple options for the customer to select from. This can allow users to offer multiple material and/or price point options.
1. Ensure you are in Edit mode.
2. Select the Full Details entry you would like to offer upgrades for.
3. Select the Upgrades tab at the bottom of the Estimate form.
4. Select the first option to offer in the Upgrades grid and assign it an unused Upgrade Set letter.
5. Users can group together Upgrade options as a single offering by assigning them the same letter.
6. Select the next separate option to offer and assign it a different unused Upgrade Set Letter.
7. Repeat this process of each separate option to be offered.
8. All of the upgrades configured in the is manner will be offered as separate options against the original item on produced estimates. If the customer selects one of the upgrade options, clicking the Insert button to the left of it will replace the original line item with the option.
Line Item Upgrades with Sub-Assemblies
Upgrade sets allow the use of items with Sub Assemblies by grouping the Master Item with its sub assembly items. The process is the same whether the Item with Sub Assemblies is being upgraded or offered as an upgrade.
1. Ensure you are in Edit mode.
2. Whether in Upgrades or Full Details, select an upgrade set letter before selecting your item with Sub Assemblies.
3. Select the item with Sub Assemblies.
4. When the sub assemblies are added, they should be assigned the same Upgrade Set.
If the Sub Assembly Item is selected before the Upgrade Set, the Upgrade Set letter will not be applied automatically to the sub assembly items. Ins such instances, users will need to manually assign the same Upgrade set letter to the master item and sub assemblies.