
| Opening Customers | Filtering Records |
| Grouping Records | Archive and Restore Feature |
Opening Customers from the Customer List Form
The Customer List form allows you to easily locate customers and jobs. When the form is first opened all the customers and jobs that do not have a status of “Closed” are loaded into the grid. You can use the toolbar on the top of the form do easily filter the list to display Customers and Jobs, only Customers, only Jobs, or all Jobs including inactive jobs.
They are sorted by the full Customer/Job name (Customer Name: Job Name). You can change the way the records are sorted by clicking on one of the grey column headers.
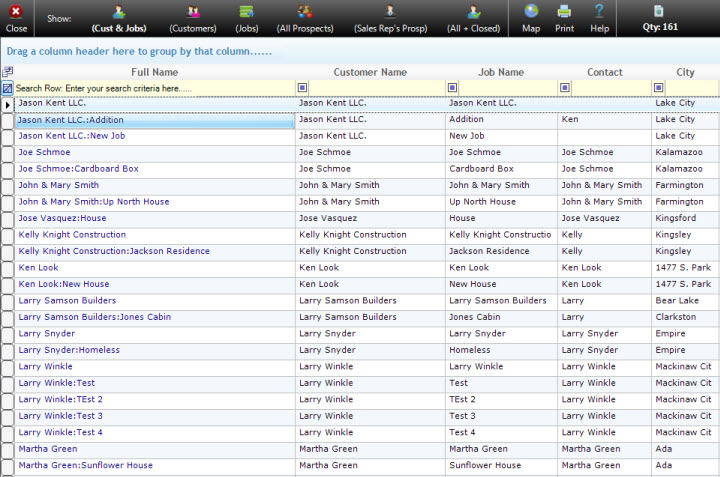
You will also notice that the Full Name column text is dark blue and all the other column’s text is black. Blue text in a grid indicates that when selected the text is a link. When you hover your mouse over the Full Name column, a button will be displayed. If you selected the button the current customer will be opened in the Customers form.
The Email Button column which is located to the far right of the grid allows you to easily send emails to your customers. If you click on this button Microsoft Outlook or Outlook Express will open and a new email message will be created with the Customer’s email address entered into the “To” field. Note that this feature only works if you are using Microsoft Outlook or Microsoft Outlook Express.
Filtering Records
You can filter the records, so they only show the records you are looking for by typing information in the blank yellow row near the top of the grid. For example, if you want to look for a customer but you don’t remember their last name you could type their first name in the Full Name column. In the grid below, the user entered “Brenda” in the search row and then pressed the Enter key on their keyboard. Notice that only records with the name “Brenda” are displayed.

You can also change the type of filter you want to apply by changing the Filter Type value which is located in the first row of the grid. In the image above you can see that all of the columns are using the “Contains” Filter Type. This is the default Filter Type and is what you will likely use most of the time. To change the Filter Type you simply select the drop-down arrow in the first row and select the desired Filter Type.
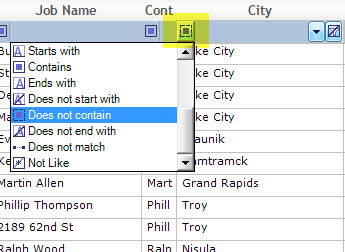
For example, say you want to see a list of all the Customer/Jobs that are not located in the city “Petoskey”. You could scroll over to the City column and then change the Filter Type from “Contains” to “Does not contain”. You could then type in “Petoskey” in the Search Row and select the Enter key on your keyboard. The records will then be filtered and all of the records that do not contain the word “Petoskey” in the City column will be displayed.
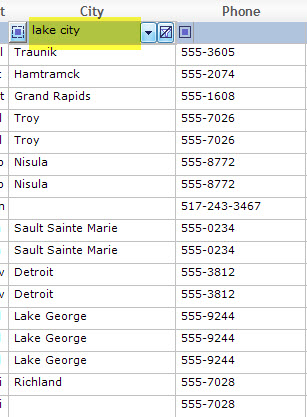
To remove the filter and display all of the records again select the Clear Filter button which is located to the far left of the Filter Row.

The top buttons of the customer list utility each have different filter options.
Cust & Jobs – This is used to show the customers and jobs in the grid below. This is what shows up by default in the customer list form.
Customers – Shows only the customers in the grid below.
Jobs – Shows only the jobs in the grid below.
All Prospects – This will display all the prospects whether there is sales rep or not. The contact type will be setup in the customers form. A prospect is a person that could become a customer.
Sales Rep’s Prosp – This will only show the current users’ prospects in the grid below. Prospects are associated with Sales Reps on the Customers form. Sales Reps are associated with Users on the Sales Reps form. This allows the grid to automatically be filtered to only display the prospects that are relevant to the current user.
All + Closed – This will show all your customers and jobs, it will also show jobs that have status set to closed.
Maps – There are three options when viewing Google Maps. The first option will display a map to the customer’s Address 1. The second option will display a map to the customer’s Address 2. The third option will display a map to the job’s address.
Grouping Records
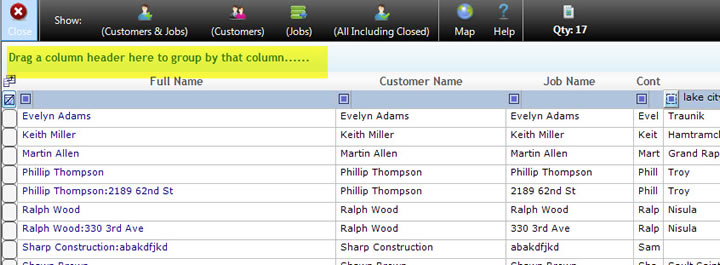
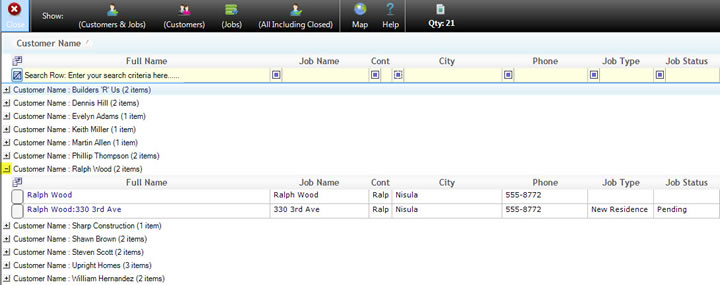
You can also group the records in the grid by dragging one of the blue column headers into the Group By panel which is the blank blue area at the top of the grid. In the image below the user dragged the Customer Name column into the Group By panel. Notice that all of the records are now grouped by Customer Name. There is also an item quantity displayed which tells you how many records are in each group. For example, if you look to the right of Best Builders you will notice that there are ten records in the Best Builders group.
If you select the “+” sign located to the left of a group all of the records in the group will be displayed. In the image above you will notice that the “+” sign next to “Custom Homes by Randall” was selected.
To remove the grouping simply drag the field that you placed in the Group By panel back down into the grid and all of the records will be displayed as they were before the grouping.
Note: All of the grids located throughout Allpro Insulator provide you with a wealth of power and features. We highly encourage you to take some time to become familiar with versatile tools.
Using the Archive and Restore Feature
The archive and restore feature allows users of Allpro Insulator to archive Estimates that are not in use anymore and not needed for reporting or access within Allpro Insulator. Any Estimate that is archived can be restored, which will re-add the Estimate for reporting or access within Allpro Insulator.
NOTE: It is important to understand, once an estimate or job is archived using the Archive Feature, the Estimate will not be able to be opened, will not exist in the Estimate List and the job will not longer be listed on the Customers Form – Job Tab. The purpose of this function is to reduce database size and clutter from within a companies database. By default, the User Permission is set to No Access for the the Archive and Restore features. To block Users from utilizing the Archive Restore Feature, please verify that the Users Permission is set to No Access.
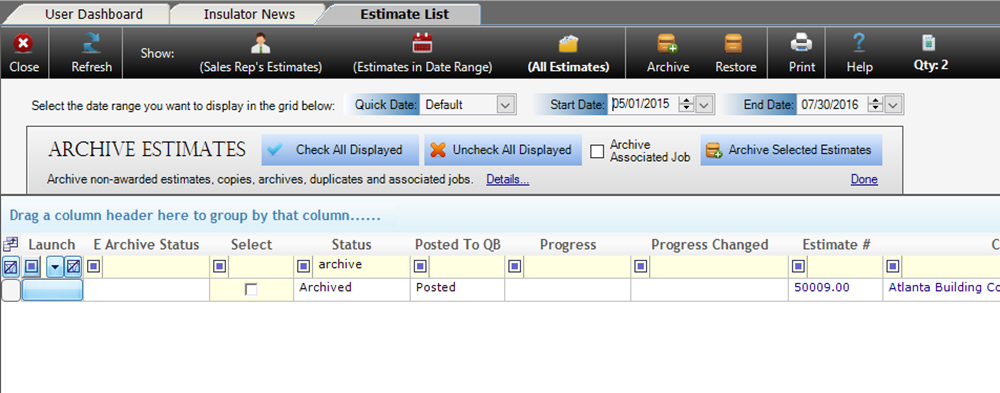
Using the Archive Function from within the Estimate List or the Customer List is simple. By pressing the Archive button at the top of the Estimate List or the Customer List, two new columns will be added to the Estimate or Customer List as shown below:

To Archive an Estimate, place a checkbox in the Select column for any Estimate that needs to be archived OR you can filter the grid for a specific set of data and press the “Check All Displayed” button to check all of the displayed records.
For Example: You could filter the grid to show any Estimate with the Status of Archived and then press the “Check All Displayed” button to check all of the displayed records as shown below:
Once the data is filtered and the Select check box is checked, you can then press, Archive Selected Estimates to archive the selected Estimates. During this process the Estimates are moved to a separate table which can increase data acquisition times over a network connection for larger companies. At any time the Estimate can be Restores by using the Restore button at the top of the Estimate List or Customer List.
NOTE: From the Estimate List, you can also choose to Archive the Associated Job for any Estimate. It is important to understand that if you have a Job that has additional Invoices/Estimates/Archives assocaited with it, Archiving the Job is not recommended. Only Archive the Job for an Estimate if only that Job is associated with the single Estimate and the 1:1 ratio exists between the Estimate and Job. If you have any questions regarding this area of concern, please contact Allpro Technology.
NOTE: When using the Archive feature from the Customer List, it is important to understand that any Customer that is Archived will no longer be accessible from Allpro Insulator, unless Restored. If any Estimates or Jobs exist for the specific Customer, it is not recommended that the Customer be archived. Only Archive Customers that have no Jobs or Estimates associated with them OR the associated Estimates and Jobs are also being Archived.
Automation Menu Options
The Automation Menu includes features that allow users to mass update Job Statuses, Send Batch Emails, Create Mailing Lists and Archive and Restores records from within the Estimate and Customer Lists. The Estimate and Customer Lists both have specific features that are directly related to the content included in the form.
Please review the information here for Archive and Restore assistance.
Update Job Status: This feature allows users to quickly and easily update the Job Status on multiple selections from within the Estimate and Customer Lists. To mass update the Job Status field on each specific Job from within the Estimate or Customer Lists, simply select the “Update Job Status” option from the Estimate or Customer List, Automation Menus. Once the Update Job Status panel is opened, you can check the specific boxes of the records that you want to update or you can press the Check All Displayed button at the top of the form.
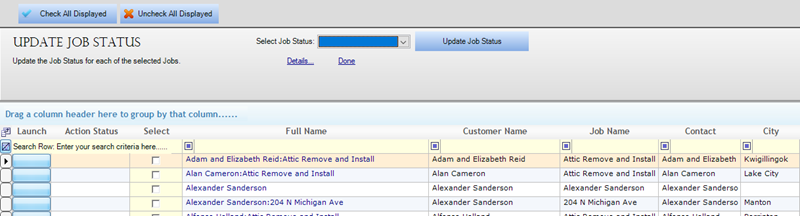
Once the records are selected, you can select the Job Status from the Select Job Status as shown below.

Once the specific Job Status is selected, press the Update Job Status button. You will received two prompts once the button is pressed, the first confirming that you do in fact want to update the selected records.
The second prompt is confirming that you want to Refresh the grid, which will perform the actual update on the Estimate or Customer List. Note, if you receive any errors, the Error will be displayed in the Action Status column.
Update Job Start, Projected End and End Dates: This feature allows users to quickly and easily update the Job Start, Projected End and End Dates for multiple records from within the Estimate and Customer Lists. To mass update the Job Start, Projected End and End Dates fields on each specific Job from within the Estimate or Customer Lists, simply select the “Update Job Start, Projected End and End Dates” option from the Estimate or Customer List, Automation Menus.
Once the Update Job Dates panel is opened, you can check the specific boxes of the records that you want to update or you can press the Check All Displayed button at the top of the form.
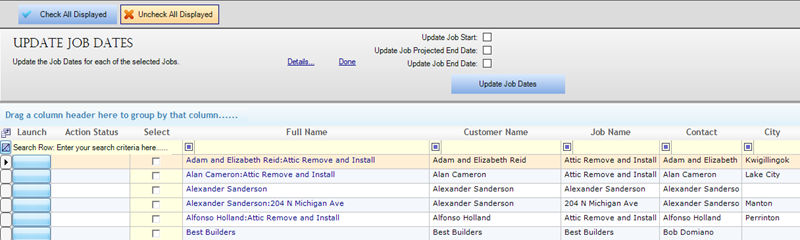
Once the records are selected, you can check the box for the specific date that you want to update, once the box is checked, a date box will appear for selections as shown below.


Once the specific date is selected, press the Update Job Dates button. You will received two prompts once the button is pressed, the first confirming that you do in fact want to update the selected records.
The second prompt is confirming that you want to Refresh the grid, which will perform the actual update on the Estimate or Customer List. Note, if you receive any errors, the Error will be displayed in the Action Status column.
Send Batch Emails: The ability to send Batch Emails directly from the Estimate and Customers Lists gives users another method of reaching their customers and sending emails from within Allpro Insulator. The Estimate and Customer Lists can be filtered for relevant information and mass email can be accomplished and be used for reminders, prospect follow-ups or a number of other reasons.
To send Batch Emails, select the “Send Batch Email” option from the Automation menu on the Estimate and Customer Lists, once this is completed the Create Batch Email panel will appear as shown below. Once the Create Batch Email panel is opened, you can check the specific boxes of the email addresses that you want to send to or you can press the Check All Displayed button at the top of the form.
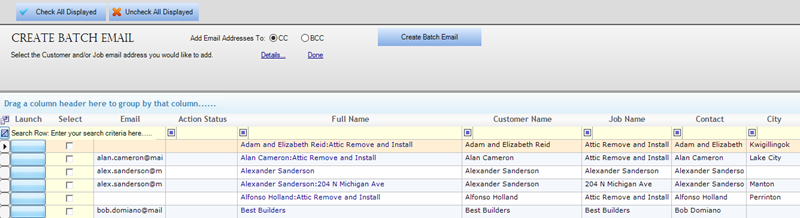
The option exists at the top of the Create Batch Email panel to add the emails to the CC or BCC of the outgoing email. Keep in mind, if the email is going out to multiple specific customers, it is recommended to utilize the BCC feature so that specific customers do not see each other’s email addresses. Once the recipients are selected and the CC or BCC is selected as needed, press the Create Batch Email button and the Create Batch Email dialog box will open as shown below.
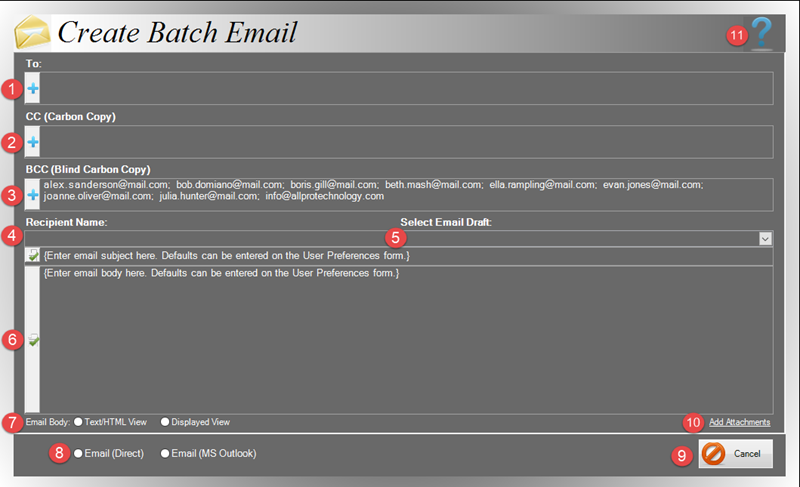
The Create Batch Email dialogue is similar to the other email dialogues that are through-out the program. The dialogue allows users to send and create the Batch Emails, based on the email addresses selected in the Estimate or Customer List.
1. To: This field allows users to add an email address by typing, copying or pressing the “+” button and choosing email addresses from within the database. For more information on the Add Email Recipients window when the “+” button is pressed, click here.
2. CC: This field allows users to add an email address by typing, copying or pressing the “+” button and choosing email addresses from within the database. For more information on the Add Email Recipients window, click here.
3. BCC: This field allows users to add an email address by typing, copying or pressing the “+” button and choosing email addresses from within the database. For more information on the Add Email Recipients window, click here.
4. Recipient Email:
5. Select Email Draft:
6. Email Body:
7. Email Body Style:
8. Send Options:
9. Cancel:
| Opening Customers | Filtering Records | Grouping Records |