Item Details
v14
The Item Details form builds on the entries from the Product Details form. While Products are what is purchased from suppliers and manufacturers, the entries on the Item Details form are what is sold to customers.
For example, a bag of cellulose purchased from a supplier is not generally sold “as is” directly to a customer. However, it might be sold as a specific coverage installed in a specific location, 6″ of Blown Cellulose in an Exterior Wall, for instance.
The purpose of the Item Details form is to set pricing values, costing values and configure options regarding how the items will appear or behave when added to an estimate. Each Item Details entry will be linked to a specific product, include a coverage per unit, the work area where it will be installed, and any related costing and pricing information. Loose fill and sprayed products will also generally include a specific thickness or R value at which they will be installed.
Note: Starting with Allpro Insulator v14, the Item Builder can be used to generate the basic framework for Item Details entries, but costing values, pricing, and additional information will still need to be entered to complete them.
The Item Category, Item ID, Description, Sales Price, Material Cost, Labor Cost, Coverage/Unit and Product ID are mandatory fields that will need to be addressed during the setup of Item Details entries. Other fields on the Item Details Form can be used in certain specific scenarios. For a more in-depth conversation regarding the specific uses of items or assistance with the setting up of items, please contact Allpro Technology at (231) 839-7928.
Directions for completing each step of the Item Details setup process can be found on this page, click the desired topic or scroll down to the relevant section.
| Entering Item Details | Tiered Pricing |
| Sub Assemblies | Line Item Upgrades |
| Update $ | Item Details Reports |
| Calculated Pricing | Backup Item Details |
| Restore Item Details |
Entering Item Details
Before users can start creating estimates, the Item Details entries that will comprise the line items on the estimate must be created. All item information is managed on the Item Details form, though it can be adjusted on an estimate-by-estimate basis. Changes made on the estimate level will not modify Item Details entries. Similarly, changes made to Item Details will not modify existing estimates, unless an update is triggered by the user.
Allpro Insulator QBE (QuickBooks Edition) users have the option of importing items automatically from QuickBooks. Thereafter, new items can be created in QuickBooks and then imported into Allpro Insulator or be created on the Item Details form in Allpro Insulator and sent to QuickBooks. Entries imported from QuickBooks will require additional costing information be entered in Allpro Insulator before they will be ready to use. While QuickBooks provides numerous accounting features, it does not provide an easy way to calculate estimate pricing and costs; that’s where Allpro Insulator takes over.
Important Notes:
- It is very important that users complete this form correctly before using most other portions of the program.
- Users cannot enter “0.00” for the Coverage Per Unit quantity because it is used as a devisor in many calculations. Attempting to divide by “0.00” will result in calculation errors.
- Allpro Insulator checks Item Details entries before they are saved. If there are incompatible values or missing mandatory data, the user will be prompted to make the necessary change or, for some fields, corrections will be made automatically.
- Pricing, description, and other values can be modified on the estimate as needed without changing the original Item Details entry. Changes made on the Estimate level impact only that Estimate
The field descriptions below are provided in the order they appear from left to right on the Item Details form. Users will need to scroll to the right to view or modify some fields
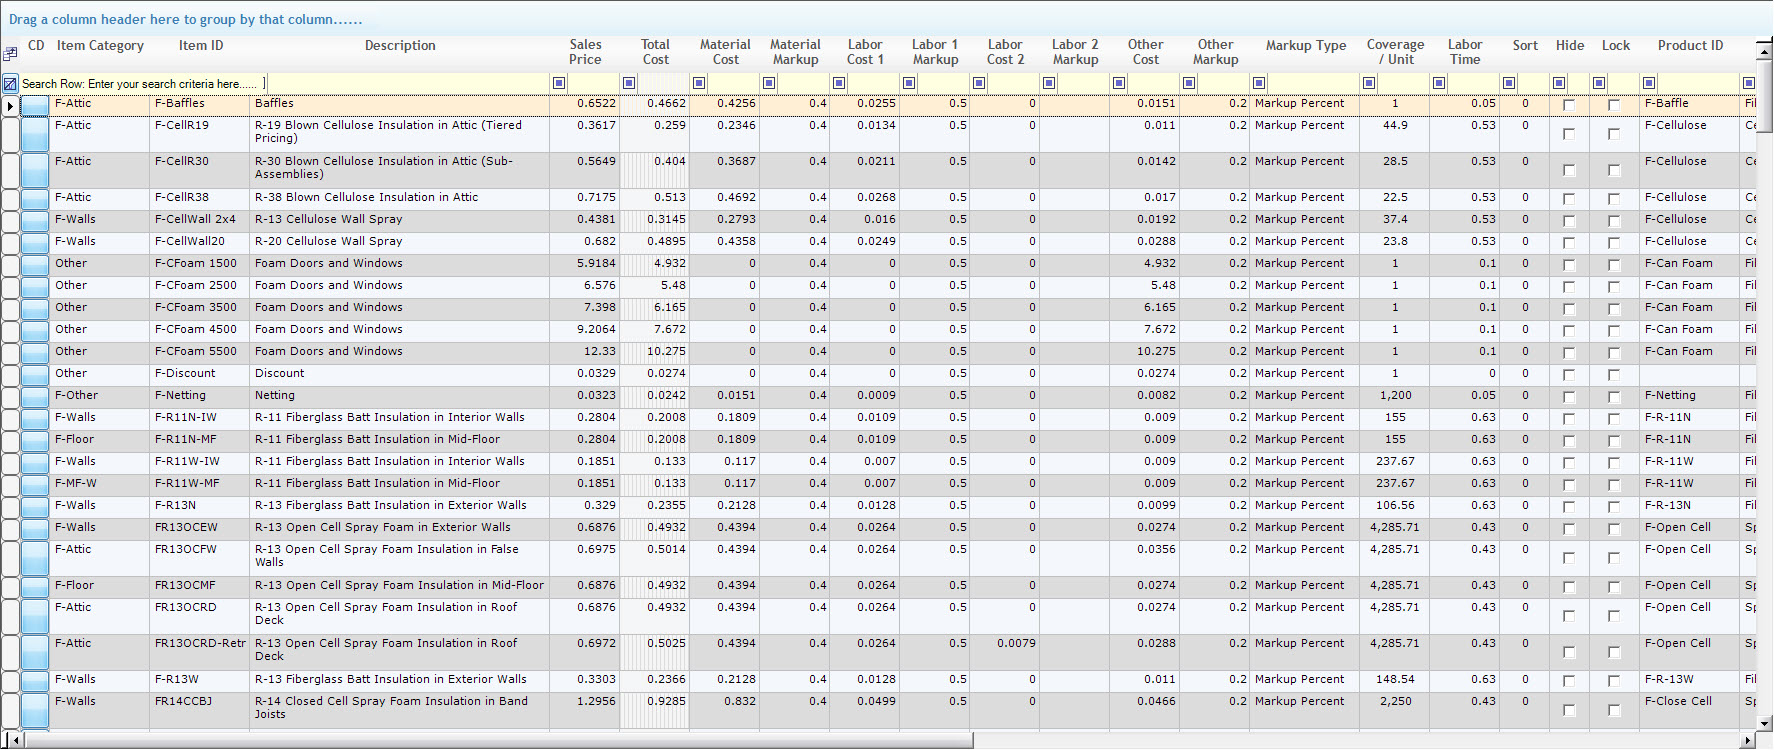
CD (Copy Down) – The CD column contains a button designed to help users generate entries for similar items. When the CD button is clicked, it creates a copy of the item in the row that it was clicked in. This process will copy all the item’s values except the Item ID, because the Item ID must be unique. Users can then make any necessary changes to the copy, such as a different work area or R value, without the need to reenter each value.
Item Category – The Item Category serves as a filter for Item Details entries when working on the Estimate form. Because users will generally have many Item Details entries to choose from, the Item Category is used to filter those options down so the desired item can be selected more easily. Users can configure the Item Category options as needed, but common options include the location the item will be installed in (Attic, Exterior Wall, etc.) or the type of material (Spray Foam, Cellulose, Fiberglass, etc.).
Item ID – A unique identifier for the Item Details entry, used to select the entry as a line item when creating estimates. While virtually any value can be used, a systematic approach will help users locate items when building new estimates.
Description – A description for the Item Details entry, which will appear on finished Estimates. These entries typically include the product being installed, the work area it will be installed in, and an R value or thickness, if applicable.
Material Price (Hidden by default) – Optional – The Material Price column is for the material price per square foot customers will be charged for the current item. The Material Price column is especially useful when working with weatherization estimates because the Material Price and the Labor Price must often be listed separately.
Labor Price (Hidden by default) – Optional – The Labor Price column is for the labor price per square foot customers will be charged for the current item. The Labor Price column is especially useful when working with weatherization estimates because the Material Price and the Labor Price must often be listed separately.
Sales Price – The Sales Price column is used to enter the price per square foot customers will be charged for the selected item. By default, this value is entered manually. When using calculated pricing (Allpro Insulator V14 and newer) the Sales Price will be populated automatically once costing and markup data are entered, unless No Markup is selected from the Markup Type options. If no other Markup Type is selected by the user, the Markup Type will be set to No Markup by default.
Total Cost – Values in the Total Cost column are automatically calculated based on the values entered in the Material Cost, Labor Cost (1 and 2), and Other Cost columns. This value indicates the full cost per square foot to install the item. This value is also used as the base price when the Markup Price Style is selected, and a markup percent is later specified by the user on the Estimate form.
Material Cost – The Material Cost column is used to specify the cost of raw materials per square foot for the current item. This refers to what is paid for a square foot of the material when buying it from a supplier before any markup.
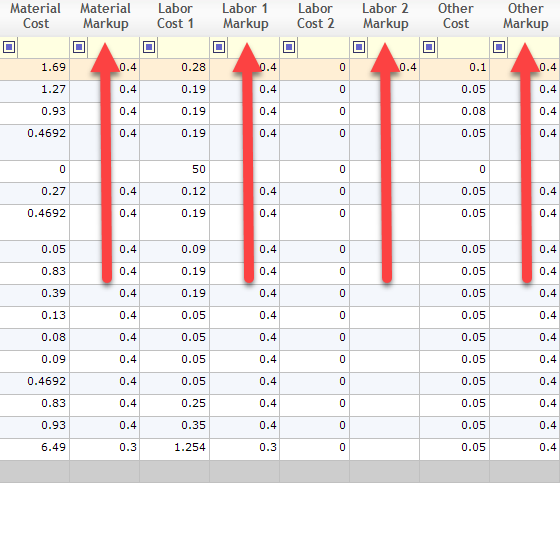
Material Markup (New in V14) – Part of Markup Type calculated pricing. Markup Percent applies this value as a markup percentage for the material cost. For instance, entering 0.2 would mark the material cost up by 20%. In Profit Margin Markup Type, it works similarly but calculates based on profit margin rather than markup. In Markup Amount pricing, the value serves as a dollar amount that will be added to material cost. Entering 0.2 using Markup Amount would add $0.20 to the material cost when calculating pricing.
Labor Cost 1/Labor Cost 2 – The Labor Cost columns are used to specify the estimated cost of labor to install one square foot of the selected line item. Labor Cost 2 is intended to track labor burden or expenses that are part of payroll, but not wages paid to employees. If paying by piecework, Labor 1 will be equal to the piecework pay per square foot.
Labor 1 Markup/Labor 2 Markup (New in V14) – Part of Markup Type calculated pricing. Markup Percent applies this value as a markup percentage for the labor cost. For instance, entering 0.2 would mark the labor cost up by 20%. For Profit Margin Markup Type, it works similarly but calculates based on profit margin rather than markup. In Markup Amount pricing, the value serves as a dollar amount that will be added to labor cost. Entering 0.2 using Markup Amount would add $0.20 to the labor cost when calculating pricing.
Other Cost – The Other Cost column is used to specify any additional cost (per square foot) associated with the item. This field is intended to help track overhead costs, which might include the cost of equipment maintenance, office staff, utilities and other expenses related to business operations.
Other Markup (New in v14) – Part of Markup Type calculated pricing. Markup Percent applies this value as a markup percentage for the Other Cost. For instance, entering 0.2 would mark the other cost up by 20%. For Profit Margin Markup Type, it works similarly but calculates based on profit margin rather than markup. In Markup Amount pricing, the value serves as a dollar amount that will be added to other cost. Entering 0.2 using Markup Amount would add $0.20 to the other cost when calculating pricing.
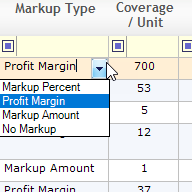
Markup Type (New in v14) – Allows the user to select a calculated pricing style based on markup percentages, profit margins, or fixed amounts. Material Cost, Labor Cost 1, Labor Cost 2, and Other Cost can be managed independently, allowing users to fine tune pricing. If no value is entered, “No Markup” will be selected automatically, allowing the user to set pricing manually. The options for this setting are listed below:
- Markup Percent – Independent markup percentages can be set for Material Cost, Labor cost 1, Labor Cost 2 and Other Cost.
- Profit Margin – Independent profit margins can be set for Material Cost, Labor cost 1, Labor Cost 2 and Other Cost.
- Markup Amount – Allows users to specify a fixed amount to markup Material Cost, Labor cost 1, Labor Cost 2 and Other Cost individually.
- No Markup – Manually enter sales price.
Coverage Per Unit – The total number of square feet covered by a single product unit when installed in the manner or location specified in the current Item Details entry. To clarify, the product unit refers to the way the product is purchased from suppliers: full rolls, bags, sheets, drums, etc. It is used to convert square feet on an estimate into units of product on Job Sheets, to help update Material Costs from the Product Details Update Utility and is utilized in Costing Reports. If this value is blank (or zero) Allpro Insulator will not function correctly.
For example, if a bag of loose fill averages 70 square feet of installed material when spraying a 4” wall, enter 70 in the Coverage Per Unit field for that item.
Labor Time – This optional field allows users to enter the average time it takes to install one square foot of the item. This value is used to project how long installing that item will take, and can be used to help plan onsite time for scheduling.
Sort Order – The Sort Order is an optional value used to determine the order that items will be displayed on the printed estimate. Lower values will appear first with the highest sort order value appearing last. Sort order can also be set on the Estimate Form as needed.
Hide – The Hide column allows users to create items that will not be displayed on the produced Estimate. When a check is placed in the box in this column, it will be visible to users during the estimating process, but will show up on the finished printed (or exported) estimates. For instance, users may want to add labor charges for a difficult install, but not show them as a line item on the Estimate.
Lock – The Lock column locks the Sales Price and Total for the selected item on the Estimate form when checked.
Product ID – This field ties the item details to the related material that will be used. The drop-down menu contains all of the entries from Product Details, and is used for inventory management, Job Sheets (a material list for a job), and some Material Cost updates.
Crew 1/Crew 2 – This optional field allows users to specify a default crew or crews to Item Details entries to help organize staff and resources when scheduling a job. This value can also be used to filter Job Sheets (the material list for a job) and are required to utilize Projected Inventory levels
Unit Rounding
This field allows users to determine how many decimal places will be displayed for Product Units on Job Sheets and other forms. Note that the software will always round to the nearest number, rather than rounding up. If set to “1”, 20.4 units of product would be rounded down to 20, 20.5 would be rounded up to 21.
Profit Amount – This value is automatically calculated by subtracting the Total Cost from the current Sales Price, to provide a dollar value of profit per square foot.
Profit Margin – This value is automatically calculated by dividing the Sales Price by the Total Cost and indicates the Profit Margin per square foot.
Markup Percent – This value is automatically calculated by dividing the Profit Amount by the Total Cost.
Notes – The notes column is for entering any additional comments for the current item. These notes are for internal reference and will not be visible on estimates or invoices produced for the customer.
Active – The checkbox in the Active field allows users to determine rather or not the Item Details entry will be selectable when generating new estimates. Items that are out of stock or no longer offered can be marked inactive by checking this box without the need to delete the entry.
Exclude From % – Users can define percentages for things such as commission and/or sales tax on the Percentages form. Items with this box checked will not be included in percentage calculations.
Fixed Values – Checking this box will prevent the item from having its sales price adjusted when users apply a Markup percent, Discount percent, or Target Profit Margin on the Estimate form.
QA (Quantity of Assemblies) – This field lists the number of Sub Assemblies associated with the selected item. Item details entries can be linked together using the Sub Assembly feature on Item Details form. Instructions for creating Sub Assembly items can be found on the this (Item Details) help page, here.
Date/Time Created – This field contains log data for the date and time that the Item Details entry was created.
Date/Time Updated – This field contains log data for the last time the Item Details entry was modified.
Updated By – This field contains log indicating the software username of the person who last modified the entry. If the entry is new and has not been modified, it will contain the name of the person who created it.

Calculated Pricing (Allpro Insulator V14 and later)
Starting in Allpro Insulator v14, users can now select a Markup Type and have pricing calculated for them. Each Markup Type will calculate the Sales Price differently, using the values entered in the markup fields by the user (Material Markup, Labor 1 Markup, Labor 2 Markup, and Other Markup) to calculate the price of the Item Details entry. As with other pricing methods, the calculated price will serve as a starting point when line items are added to an estimate and can be adjusted as needed from there. The primary advantage to calculated pricing is that it will adjust your price automatically if costs are updated, maintaining the desired margin.
Note: If a sales price was already entered, it will not be retained when a Markup Type is selected. Consider backing up Item Details before making adjustments.
- Markup Percent – Independent markup percentages can be set for Material Cost, Labor cost 1, Labor Cost 2 and Other Cost. Calculated as cost multiplied by the markup value plus one, or C x (1 + M), where C is Cost and M is the markup value.
- Profit Margin – Independent profit margins can be set for Material Cost, Labor cost 1, Labor Cost 2 and Other Cost. Calculated as cost divided by one minus the markup value, or C/(1-M), where C is Cost and M is the markup value.
- Markup Amount – Allows users to specify a fixed amount to add to Material Cost, Labor cost 1, Labor Cost 2 and Other Cost individually. Calculated as cost plus markup, C+M, where C is Cost and M is the markup value.
- No Markup – Manually enter sales price with no price calculations taking place.
Once a Markup Type has been decided on, users will need to decide how much markup to apply and enter it in the markup fields: Material Markup, Labor 1 Markup, Labor 2 Markup, and Other Markup. Each cost field (Material, Labor 1, Labor 2, and Other Cost) can be assigned a different markup value, allowing users to fine tune their margins. For example, Labor Cost 1 can be marked up 40% while Material Cost is marked up 25%. The Update $ utility can be used to enter Calculated Pricing values as a batch function instead of individually.
- For Markup Percent and Profit Margin pricing style, markup value percentages will be entered as decimals. For example, 30% would be entered as 0.3.
- For the Markup Amount pricing style, the Markup Value will be treated as a dollar amount and added to the cost.
- Under No Markup, the Markup Value fields are not used, regardless of whether a value has been entered.
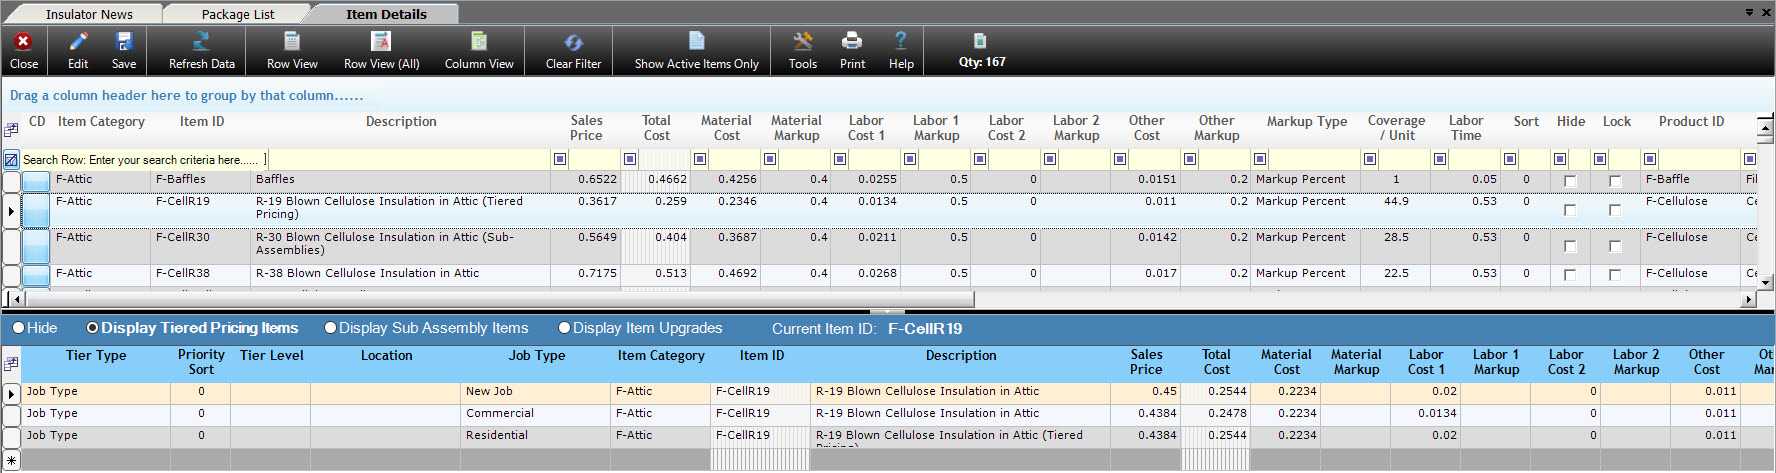
Tiered Pricing (Advanced Features Module)
Tiered Pricing allows different pricing to be set for an item or items based on several factors. For example, if different rates are charged for commercial versus residential work, pricing can be set independently for residential tier and commercial tier jobs. After selecting the Display Tiered Pricing Items option near the bottom of the Item Details form, Tiered pricing Items can be configured in the new grid that opens below.
On this new grid, users can set up tiered pricing for each line item. There are several tier types users can choose from.
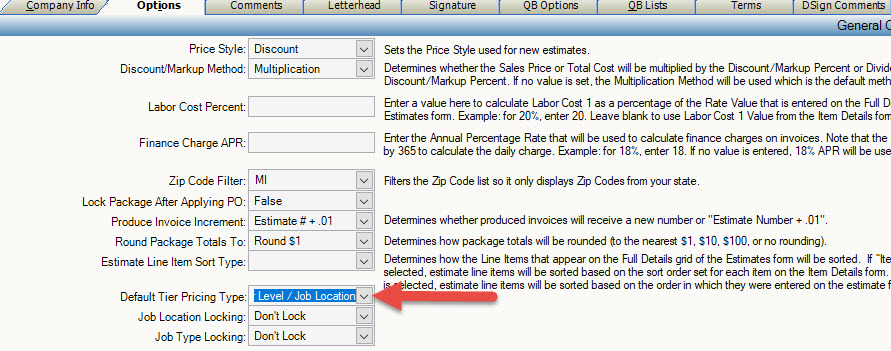
If using Tiered pricing, users can set a Default Tier Pricing Type on the Options tab of the Company Setup form. Note that the Tiered Pricing style can still be modified on an estimate-by-estimate basis, even after a default is specified. This option menu is pictured below.
Sub Assemblies
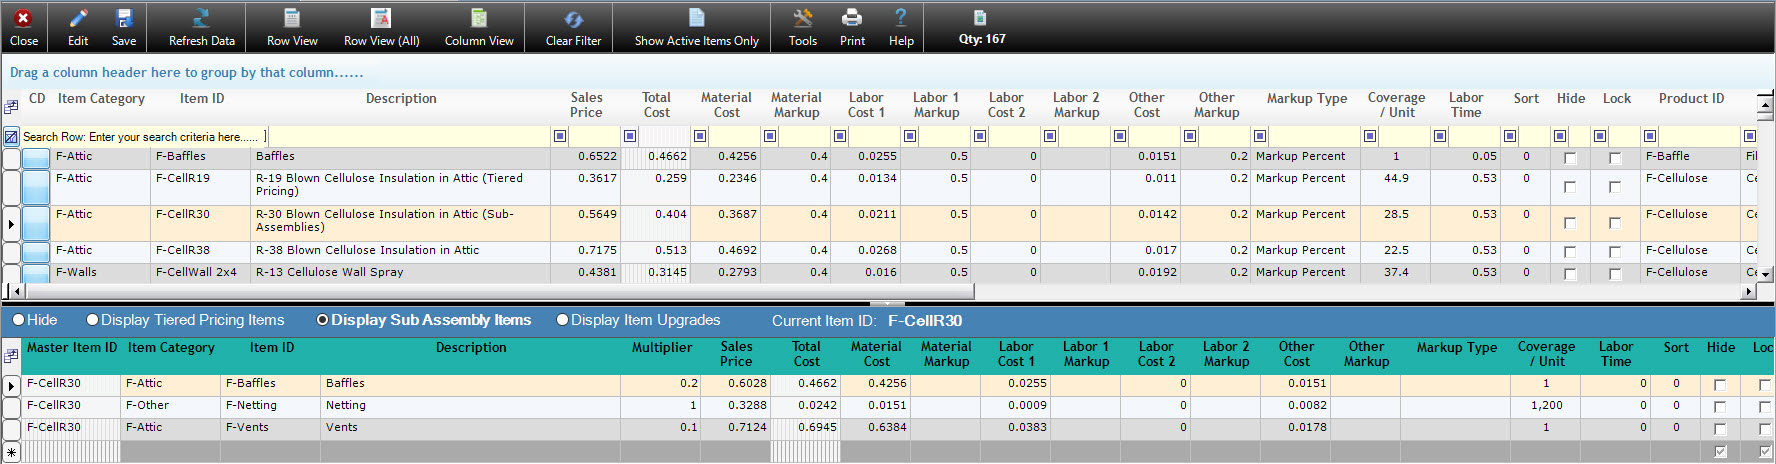
Sub Assembly items allow users to link additional Item Details entries to a Master Item, adding each to the estimate when the Master Item is selected. Users may specify a multiplier to set a ratio between that Master Item and each Sub Assembly item.
Once Sub Assembly items are setup, they will look like the image below when added to an estimate by selecting the Master Item. When the W4 item was added and a quantity (square feet) was entered for it, the sub assembly items were added automatically, and their quantity was set based on the multipliers found in the Sub Assembly Item.
Item Upgrades (Simple)
Item Upgrades in Allpro Insulator allow users to up-sell and potentially increase profits for any Estimate. An Item Upgrade can be added to any item in Item Details entry and will be offered to customers whenever the item it is associated with is added to an estimate. The creation of automatic Line Item Upgrades, allows administrators to have the control over the usage of Line Item Upgrades, by removing human error. Click here for more detailed instruction on Line Item Upgrades
To create an Automatic Line Item Upgrade, simply select the entry that the Automatic Upgrade will get created for and select the “Display Item Upgrade” bullet at the bottom of the Item Details Form. In the lower grid, the Current Item ID is displayed, ensuring that the correct item is selected. To create the appropriate Automatic Line Item Upgrade, select the Item Category and Item ID of the upgrade, as shown below:
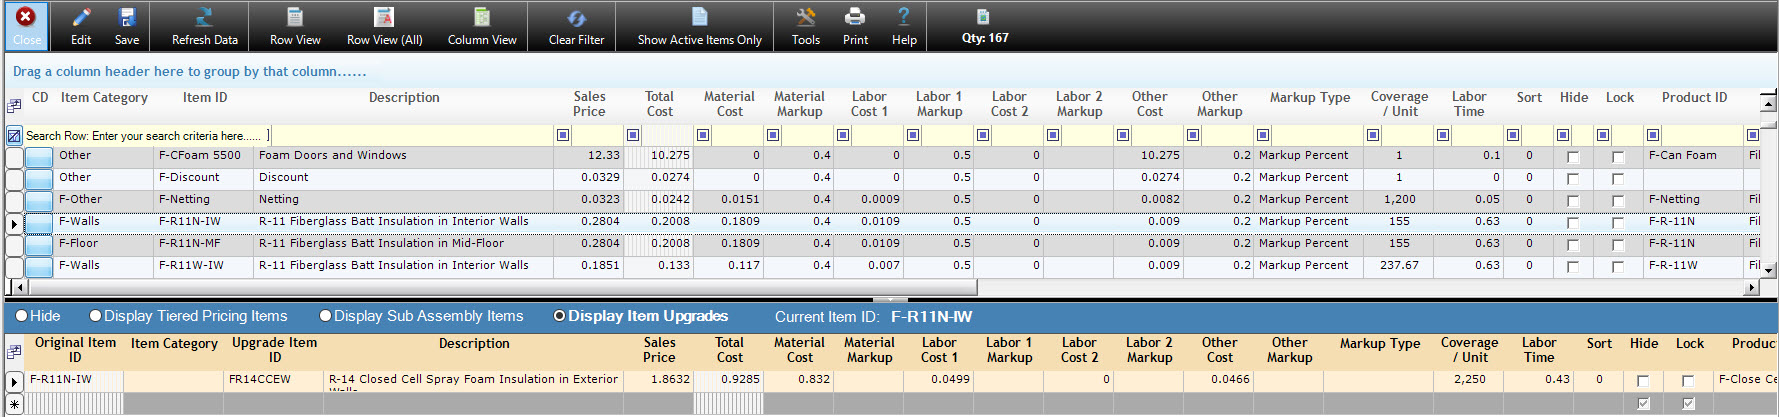
As can be seen in the above image, the appropriate Description, Sales Price and Costs will automatically be inserted into the row and can be edited if needed. Once the appropriate upgrade or upgrades have been chosen, press Save at the top of the screen. Any time the main line item is used the Automatic Line Item Upgrade will automatically be inserted, as shown below:

Using the Item Details Update $ Utility
The Update $ utility allows users to quickly update pricing, costs, profit amount, profit margins and other values on the Item Details form. With this utility, users can set base pricing and costs based on other values as a batch function, removing the need for piecemeal adjustments.
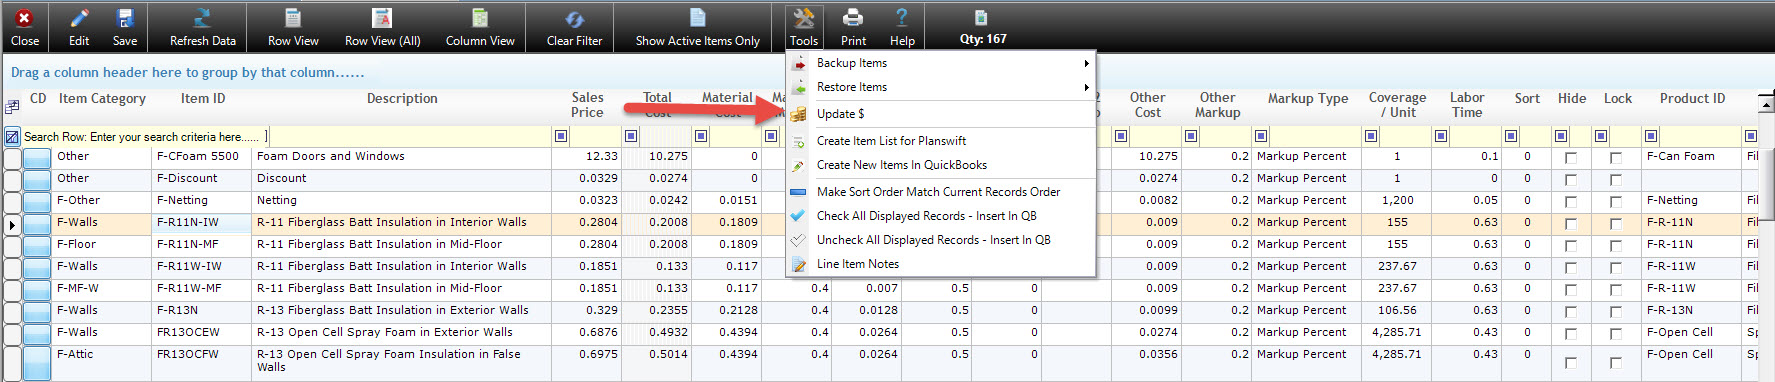
Users can access the Update $ utility by clicking on the Tools icon at the top of Item Details and selecting Update $ from the dropdown menu. Once the Update $ tool has been selected, a utility panel will open at the top of the form, as pictured below. From this panel, users can choose from a variety of options for updating prices and costs. When applying updates, users can select individual items to update by scrolling through the Item Details list and placing individual checks in the Update box for the items they wish to adjust. Alternatively, the Item list can be filtered to perform bulk updates with the “Update $”. For example, if updating all items that use a specific Product ID, users can filter for that product by Product ID.
Users will start by choosing which column will be updated. Users can choose from the following fields to update: Material Price, Labor Price, Sales Price, Material Cost, Material Markup, Labor Cost 1, Labor 1 Markup, Labor Cost 2, Labor 2 Markup, Other Cost, Other Markup, Markup Type, Coverage Per Unit, Labor Time, Product ID, Item Category, Crew 1, and Crew 2.
- Note that in Allpro Insulator v14 and later versions, users have the option to maintain profit margins when adjusting Labor Cost 1, Labor Cost 2, Material Cost or Other Cost by simply checking the box directly below the first dropdown menu, labelled Maintain Profit Margin.

Once the column to receive the update has been selected, users will need to select how the update will be applied. There are several options:
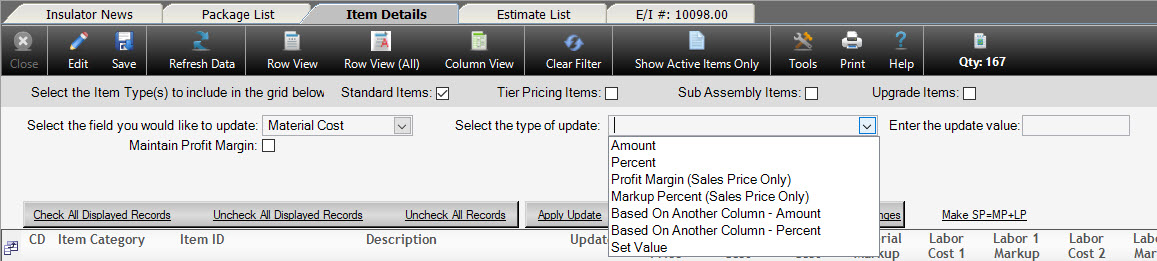
Amount– This will change the value of the selected column by the amount entered into the update value cell. Users can increase or decrease the values to be updated, depending on whether a positive or negative update value is entered.
Percent– This will change the value of the selected column by the percentage entered into the update value cell. Users can increase or decrease the values to be updated, depending on whether a positive or negative update value is entered.
Profit Margin– This applies only to the Sales Price column, and calculates a new Sales Price based on the profit margin entered in the update value field.
Markup Percent– This applies only to the Sales Price column, and calculates a new Sales Price based on the Markup Percent entered in the update value field.
Based on Another Column– Amount – Use this option to adjust values for the selected column by adding or subtracting the whole amount of the value(s) found in the column selected for the Column to Base On field.
Based on Another Column – Percent– Using this option will allow you to adjust the value of the selected column by increasing or decreasing the value by a percentage of the “to be based on” column that you select.
Set Value – Sets the entries in the selected column equal to the specified value rather than adjusting them.
When using Based On Other Column – Amount or Based On Another Column – Percent update types, users will select another column of data to base the update on, as pictured below.

Once the update has been configured, users will need to select the entries to update. Items can be selected individually by placing a check in the Update column (pictured below), or they can be filtered using the Filter Row found at the top of the grid and clicking Check All Displayed Records.
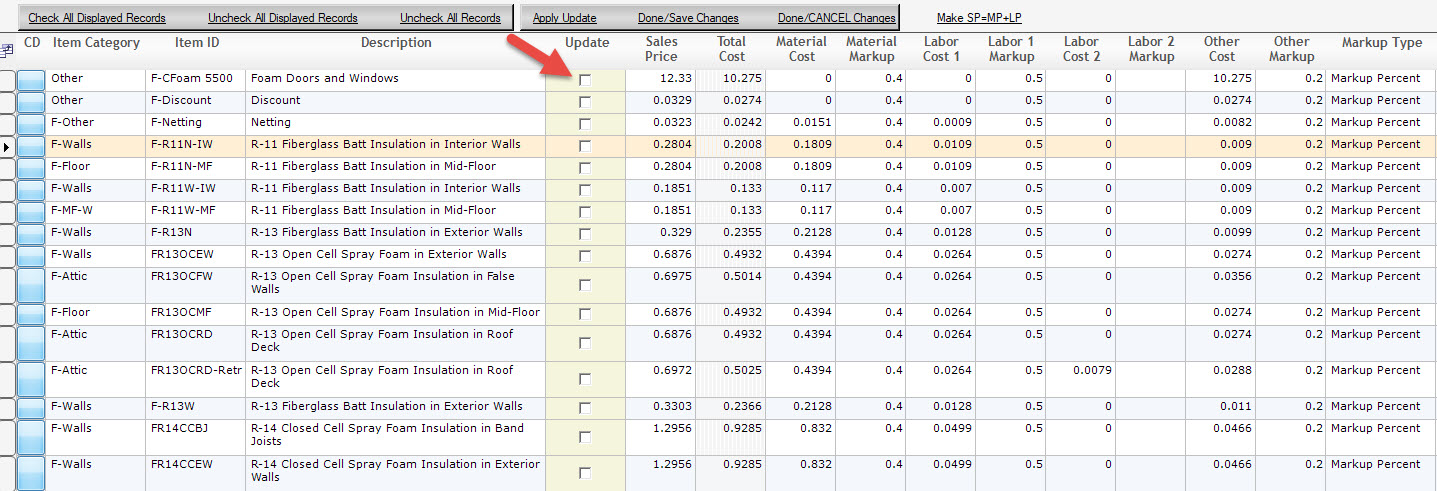
After selecting the desired records, users will click Apply Update to preview the changes to be made. If the changes are appropriate, simply click Done/Save changes to save the updates and close the Update $ utility.. If the changes are not working as desired, clicking Done/CANCEL Changes will close the Update $ utility without making any changes to the Item Details entries.
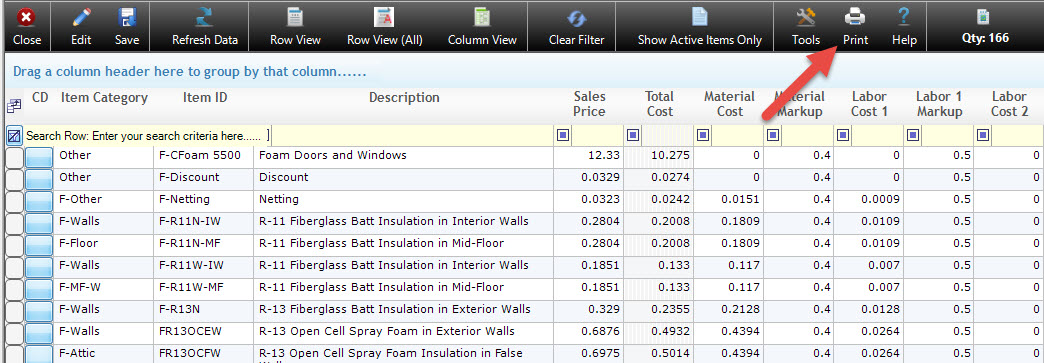
Printing Item Details Reports
There are several Item Details reports available from the Print menu. The Item List reports display Item Details sorted by several different fields. These reports are useful when adjusting pricing. The Hilti Cheat Sheet reports display both the Item ID and Hilti ID. These reports are sized to be taped to the Hilti PD 28 Laser measuring device. These reports make it easier for you to lookup the Hilti ID for each Item ID when you are taking measurements. The Item Details Backups report displays all your previous Item Details. Each backup will be printed on a separate page. This report is useful if you want to compare previous prices or try to decide which backup you want to restore from.
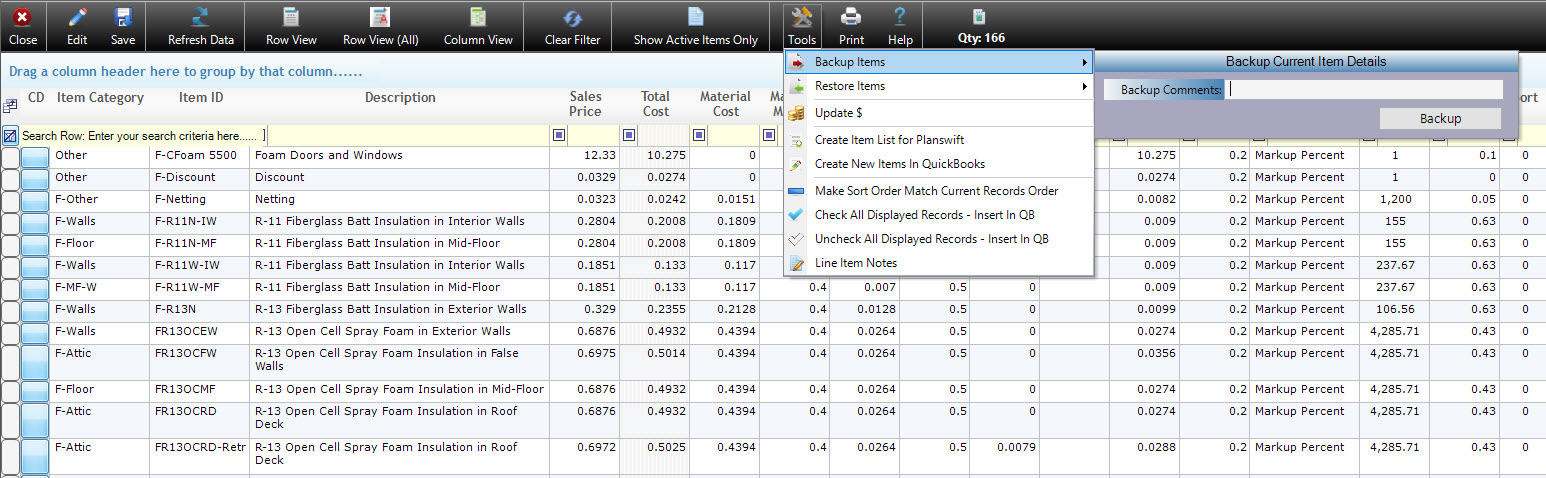
Backup Item Details
When users select the Backup Item Details button on the tool-bar, the Backup panel will be displayed. This feature allows users to create a complete backup of the Item Details List. When making changes to the item list, it is a good idea to create a backup before doing so. This allows users to look back at previous prices later. Simply enter a brief comment and then select the Backup button. The backup comments and the current date and time will be saved with the backup.
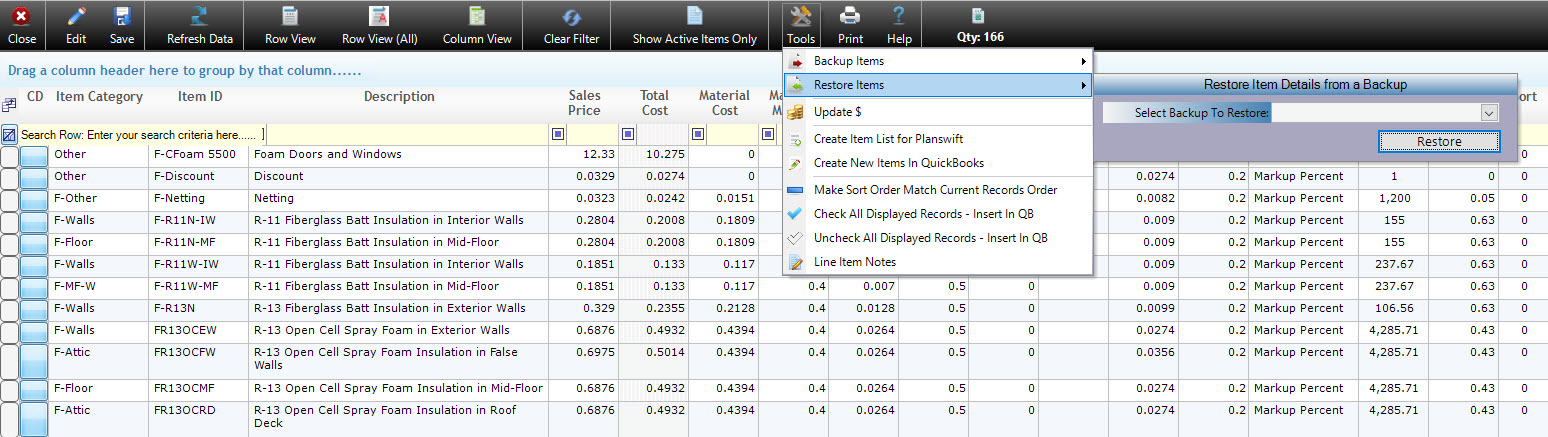
Restore Item Details
When users select the Restore Item Details button on the toolbar, the Restore panel will be displayed. The Restore Item Details function is useful if undesirable changes are made to the item list, allowing the user to restore the item list from a backup. When users select the drop-down arrow on the Restore panel the Date/Time and Backup Comments will be displayed in the list. Simply select the desired backup, then click the Restore button. The current item list will automatically be backed up and the selected backup will be restored.
| Entering Item Details | Backup Item Details |
| Printing Item Details Reports | Restore Item Details |