The initial setup of the Product Inventory consists of the verification and entry of the current inventory. If Allpro Insulator has been used over a period of time, Actual or Projected Inventory values may be present for Products. If this is the case, these values will need to be adjusted using the Adjust Warehouse Inventory Tab.
To enter initial inventory values, use the Adjust Warehouse Inventory Tab of the Product Inventory Form. It is not recommended to enter in the starting Inventory values until you are starting to enter Actual Material Unit Quantities. For more information on this process, check out the Progressing from Estimate to Inventory section located on this page.
The product inventory form of Allpro Insulator allows users to monitor inventory in a simple and efficient manner. This help page will help you in understanding the inventory functions of Allpro Insulator. To skip to the steps needed to progress from Estimate to Inventory, click here.
Directions to complete each step of the setup process can be found on this page. Please scroll down and locate the section where you have a question.
Once complete, you can move on to the Final Phase of the setup process, if you have any questions, please call (231) 839-7928.
Product Inventory – Warehouse Inventory Balances
Managing your inventory is one of the most important aspects of your business that cannot be overlooked. With Allpro Insulator we give you the ability to track your current inventory, and the ability to select a date in the future to see a projected inventory. Keeping your eye on inventory balances on future dates will allow you to plan ordering, make adjustments to your scheduled jobs, and help you predict your month to month ordering expenses.
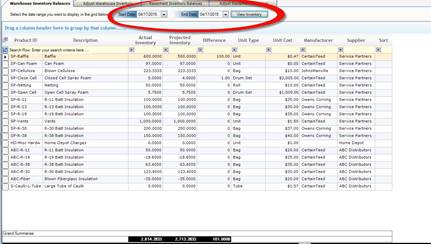
Taking a look at this form, at the top you will notice a start date and an end date. The start date will represent your Actual Inventory amount. This is most commonly set to current date so you are aware of what is currently in stock. The end date will represent a date of your choosing in the future. Setting this date out an extra day, a week, or a month, may make a huge difference in how you schedule and order your product.
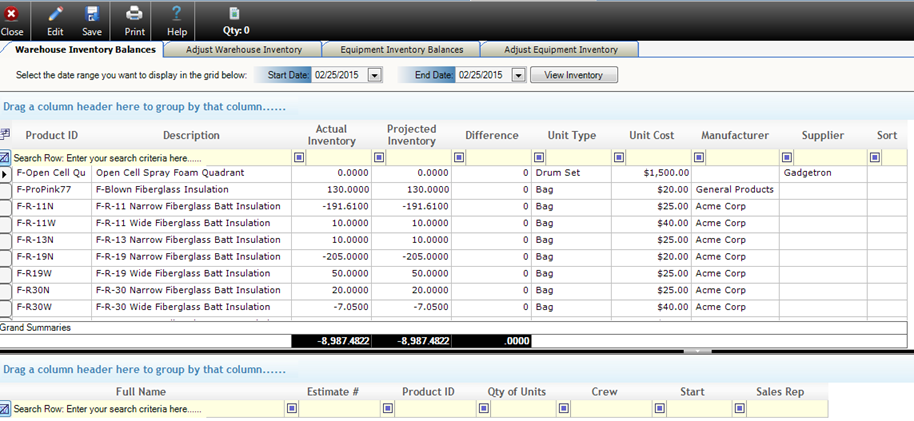
Once you have selected your date range, the grid will populate the data for the specific dates selected for all of your products. All of the information for those products will be display, not just the quantity. You will want to keep a close watch on the difference column when selecting a future date. If this value ends up being a negative amount, you know that you need to either rearrange the way jobs are scheduled, or you will need to order product.
- Date – is automatically set to today when you enter into that row but you can change it if needed.
- PO # – is Optional you enter this here if you have a PO#
- Product ID – is required you need to select the Product ID for what you need to adjust in inventory.
- Description – should be left alone, as it’s brought in automatically from the item details form.
- Unit Type – should be left alone, as it’s brought in automatically from the item details form.
- Unit Qty – is the amount of product that you have ordered.
- Current Unit Cost – is the price that you are paying per unit enter price but the next column tells you your default unit cost.
- Default Unit Cost – should be left alone, as it’s brought in automatically from the item details form.
- Manufacturer – is a drop-down of the manufacturers you have setup, choose the manufacturer you purchased this from.
- Supplier – is a drop-down of what suppliers you have setup, choose the supplier you purchased this from.
- Comments – is for you to enter comments about this product.
- Sort – is where you can put the item in a sort order this is optional.
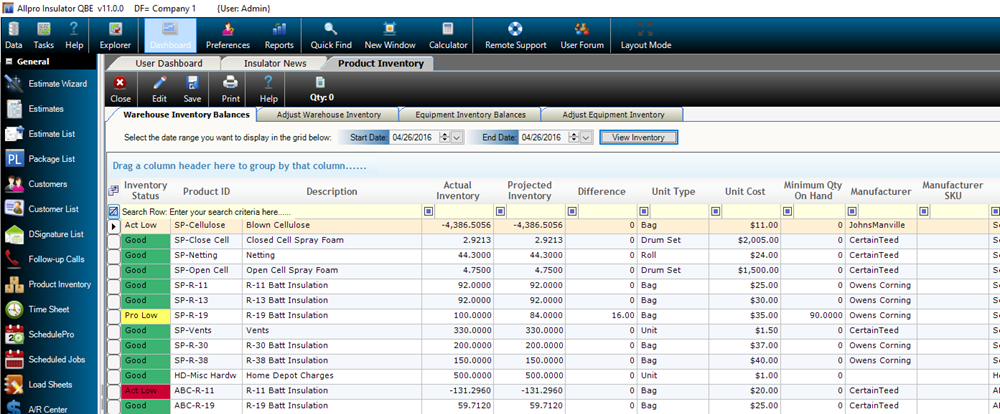
- Minimum Qty On Hand – The field shows the minimum quantity on hand for any product in the Product Inventory Form. This field is linked with the Inventory Status to show inventory statuses.
- Inventory Status – This field displays a color coded status indicating the inventory levels, based on the Minimum Qty on Hand field, compared to the Actual and Projected Inventory fields. When the color is green, the inventory level is good. When the color is yellow, the projected inventory (scheduled jobs) will bring the inventory levels below the Minimum Qty on Hand. When the color is red, the inventory level is below the Minimum Qty on Hand.
- Manufacturer and Supplier SKUs – These fields are present so separation can be made from Product IDs and the SKUs given by the manufacturers and suppliers. The fields transfer to the Product Inventory form and allow for the ability to use SKUs, however, not have them be represented on Job Sheets or other reporting.
- Warehouse Location – This field can be used to denote products located in different warehouse locations. This field is optional.
- Product Location – This field can be used to denote products located in specific locations within a warehouse. This field is optional.
Inventory Status (Inventory Level Warning System)
When setting up Products in the Product Details Form, users can now determine a Minimum Qty on Hand, which can be used to create an early indication system for inventory levels. When the color is green, the inventory level is good. When the color is yellow, the projected inventory (scheduled jobs) will bring the inventory levels below the Minimum Qty on Hand. When the color is red, the inventory level is below the Minimum Qty on Hand. An example of the form with Inventory Status Enabled is shown below:
Adjust Warehouse Inventory
Once you have ordered and received your inventory you go to the Adjust Warehouse Inventory tab this will allow you to enter the items into inventory so you show that you have enough for the jobs that you need to do.

- Date – is automatically set to today when you enter into that row but you can change it if needed.
- PO # – is Optional you enter this here if you have a PO#
- Product ID – is required you need to select the Product ID for what you need to adjust in inventory.
- Description – should be left alone, as it’s brought in automatically from the item details form.
- Unit Type – should be left alone, as it’s brought in automatically from the item details form.
- Unit Qty – is the amount of product that you have ordered.
- Current Unit Cost – is the price that you are paying per unit enter price but the next column tells you your default unit cost.
- Default Unit Cost – should be left alone, as it’s brought in automatically from the item details form.
- Manufacturer – is a drop-down of the manufacturers you have setup, choose the manufacturer you purchased this from.
- Supplier – is a drop-down of what suppliers you have setup, choose the supplier you purchased this from.
- Comments – is for you to enter comments about this product.
- Sort – is where you can put the item in a sort order this is optional.
- Minimum Qty On Hand – The field shows the minimum quantity on hand for any product in the Product Inventory Form. This field is linked with the Inventory Status to show inventory statuses.
- Inventory Status – This field displays a color coded status indicating the inventory levels, based on the Minimum Qty on Hand field, compared to the Actual and Projected Inventory fields. When the color is green, the inventory level is good. When the color is yellow, the projected inventory (scheduled jobs) will bring the inventory levels below the Minimum Qty on Hand. When the color is red, the inventory level is below the Minimum Qty on Hand.
- Manufacturer and Supplier SKUs – These fields are present so separation can be made from Product IDs and the SKUs given by the manufacturers and suppliers. The fields transfer to the Product Inventory form and allow for the ability to use SKUs, however, not have them be represented on Job Sheets or other reporting.
- Warehouse Location – This field can be used to denote products located in different warehouse locations. This field is optional.
- Product Location – This field can be used to denote products located in specific locations within a warehouse. This field is optional.
When you are finished making the changes and you’re happy with it hit the “Save Changes” button to permanently save those changes.
Equipment Inventory Balances
Once you have selected your date range, the grid will populate the data for the specific dates selected for all of your products that is on the Equipment. All of the information for those products on each piece of equipment will be display, not just the quantity. You will want to keep a close watch on the difference column when selecting a future date. If this value ends up being a negative amount, you know that you need to either rearrange the way jobs are scheduled, or you will need to order product.
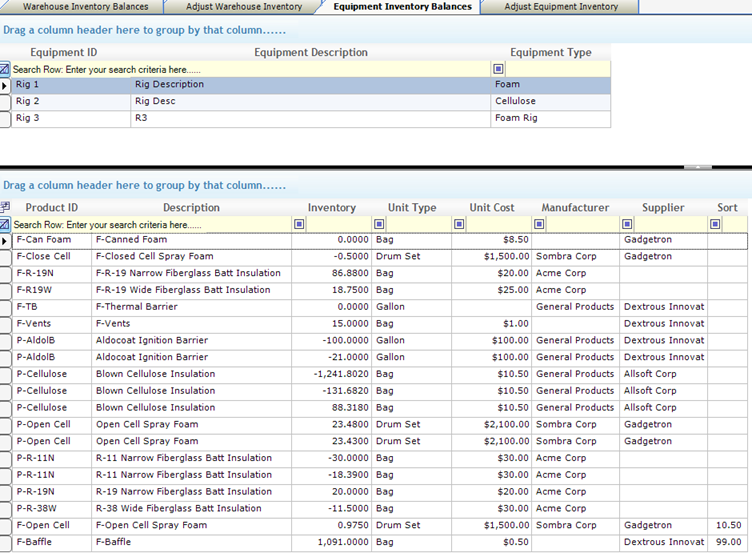
The top gird is where you select what piece of equipment you are working with in this example we used Rig 1. In the bottom grid is where you can see all the products that are currently on that piece of equipment.
- Product ID – Displays the Product ID for that product.
- Description – Displays a Description for that product.
- Inventory – Field shows you how much product you currently have loaded or that you are going to need.
- Unit Type – is where you select the Type of unit that this is.
- Unit Cost – is the price per unit in inventory.
- Manufacturer – is where you can see who the manufacturer of this product.
- Supplier – is where you can select the supplier that you purchased this from.
- Sort – is where you can set the sort order for the items to be displayed as. This is optional.
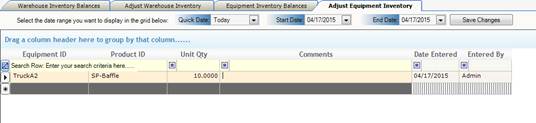
Adjust Equipment Inventory
The Adjust Equipment Inventory works pretty much the same as the Adjust Warehouse Inventory except it takes it out of warehouse inventory instead of entering it when you purchase or is delivered.
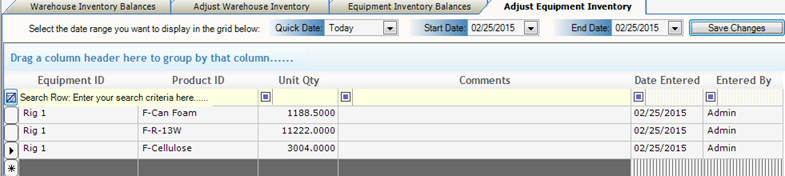
- Equipment ID – is where you select the piece of equipment you would like to add inventory to.
- Product ID – is where you select the product to be loaded onto the piece of equipment.
- Unit Qty – is where you enter the amount of product to be loaded onto the piece of equipment.
- Comments – is where you can enter comments about this product.
- Date Entered – is where you set the day that it is to be loaded onto the piece of equipment. Default is the current day.
- Entered By – is filled in automatically by the login name that entered this into inventory for the piece of equipment.
When you are finished making the changes and you’re happy with it hit the “Save Changes” button to permanently save those changes.
Progressing from Estimate to Inventory
This document will provide a step-by-step approach to using Allpro Insulator for inventory tracking purposes. This includes using equipment and warehouse inventory and the steps needed to be taken in order to have inventory display properly.
Product Details Form:
Products must be setup in order to use the inventory portion of Allpro Insulator
Here is an example of a minimal setup for a product:
![]()
Item Details Form:
Items must be setup in the Item Details Form with proper coverage per units and associated with a product that exists on the Product Details Form.
As you will see in the Estimates Section, you will need to schedule the job and the items must have a crew displayed in Crew 1. If possible, for as many items as possible, you may want to select a crew for each specific item. The crew will automatically be displayed on the estimate and therefore save you time when estimating.
Here is an example of the setup of an item for inventory purposes:
![]()
Estimates Form:
On the estimate form there are many ways to compile an estimate, however when certain aspects of the estimate are used properly projected inventory can be seen from the warehouse inventory balances tab.
In order for this information to display properly you will need to do the following:
- The items used on the estimate must be properly associated with a Product ID.
- In order for the items to properly show on the Job Costing, for inventory usage entries, the DOJ check box must be checked for the specific packages.
- A crew must be displayed in the Crew 1 column for any items you want to be projected
- The job must be scheduled using a crew as shown below. The crew must be the same crew used on the items that need to be projected.

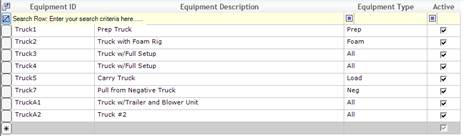
Equipment:
In order to load equipment with inventory and use Load sheets properly, equipment must be created in the Equipment Form.
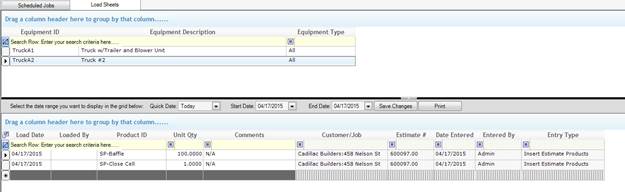
Load Sheets Form:
In order for inventory that is leaving your warehouse to be properly tracked, you must use Equipment IDs to store the inventory. It is important to know that the Equipment ID does not have to be a piece of equipment or vehicle, it can be a place or job name. The Equipment ID is a method of tracking your inventory that leaves the job site.
Inventory is entered into a piece of equipment when you:

You will notice the piece of equipment referenced in the Select Equipment ID pull down menu and the amounts Loaded in the Load Unit Quantity Column. The Load Unit Quantity is taken from the quantity entered on the Estimate Form and then converted to a unit, in the case displayed above a unit and drum set were used. The Load Unit Quantity can be any amount that you want to enter, if you want to enter a different number simply enter that number as the Load Unit Quantity.
A summary of the items loaded into the piece of Equipment can be viewed here:
The summary of all products loaded into the specific piece of equipment can be viewed in the Load Sheets tab and by selecting the piece of equipment. The Load Sheet can also be printed by selecting a date range and pressing print.
Job Costing Form:
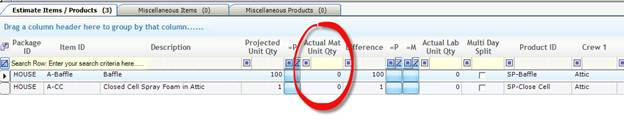
The Job Costing Form is where inventory comes out of your warehouse or the piece of equipment. Any amount entered into an Actual Material Unit Quantity Column will be subtracted from your inventory.
To subtract inventory used from the warehouse, you can enter quantities in three places:
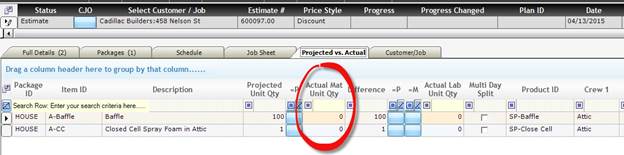
1. Projected vs. Actual Tab on Estimates Form:
2. Job Costing Form
3. Job Costing Form as a Multi-Day split (with or without a piece of Equipment selected)
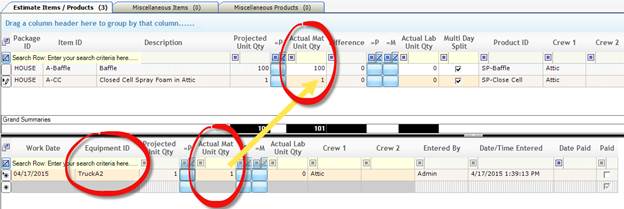
Note that Inventory must be removed from equipment from the Job Costing Form as a Multi Day Split and you must enter the specific Equipment ID
Product Inventory Form:
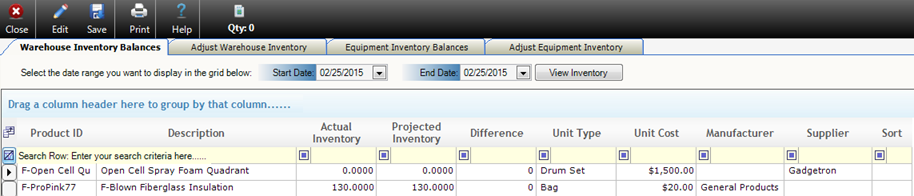
You can view your current inventory by pressing the view inventory button:
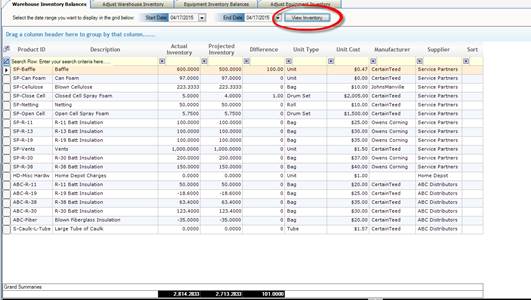
You can view projected inventory for a specific period of time by selecting a date range and pressing view inventory:
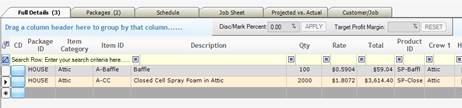
The project inventory can be viewed specifically by selecting an item and viewing the bottom grid. The bottom grid will show any estimates that are scheduled during the selected date range. This will give you an idea of what products need to be ordered at any given time.
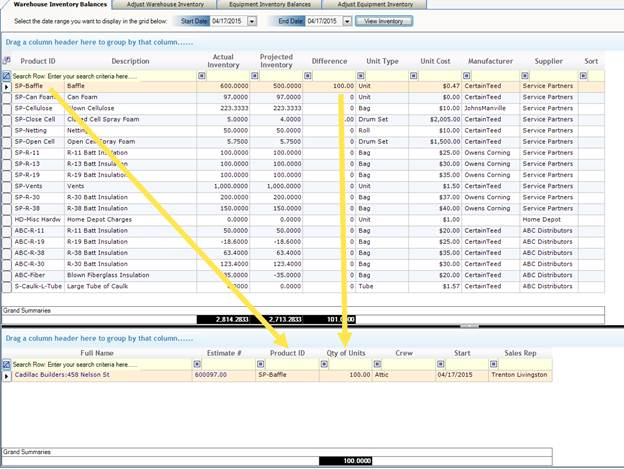
The above screen shot shows you the job that was scheduled in the screen shot above under Estimates Form, #4 above. The 100 baffles are showing as projected and you will therefore have the ability to project usage and order inventory accordingly.
Product Inventory Adjustments:
Inventory adjustments can be made to the inventory at any time. When product is received enter it as a warehouse adjustment, for example:
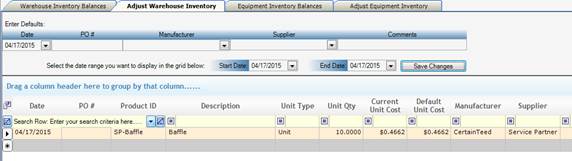
The above screen shot shows a product being adjusted, notice the change being displayed in the screenshot below:

The actual inventory balance above increased by the 10 units entered in the previous adjustment. Adjustments can be entered as negative quantities.
Inventory adjustments can be made to the equipment inventory at any time also. When you place inventory in an Equipment ID, all of the inventory may not be used. In some cases (which should not occur) crews may use more than entered into the equipment, and the inventory balance may be in the negative. You can make adjustments for both of these scenarios at any time as needed. The equipment inventory balance can be viewed by selecting the specific piece of equipment.

An adjustment can be made via the adjust equipment inventory tab.