
Introducing Allpro SchedulePro
Allpro Insulator also provides you with complete appointment scheduling capabilities. You simply select the Allpro SchedulePro button from the main menu bar and Allpro SchedulePro will be opened in a new window. This comprehensive scheduling control allows you to:
- Create detailed job schedules
- View your schedule in the Day, Work Week, Week, Month, or Timeline View
- Create recurring appointments
- Maintain multiple calendars (Prep Crew, Wall Crew, Office, etc.)
- View the schedule for each crew or merge all schedules into one calendar
- Set Alarm/Reminders so you never miss an appointment
- Drag appointments from one calendar to another
- Print calendars in any view to take on the road
Creating Employee Entries
Allpro SchedulePro allows you to manage an unlimited quantity of calendars. If you run a large company with multiple crews you have likely found it difficult and time consuming to schedule all of your jobs. Scheduling your crews is much easier if you maintain a separate calendar for each crew. For example, you could create a separate calendar for: Prep Crew 1, Wall Crew 1, Wall Crew 2, Attic Crew 1, Attic Crew 2, Cleanup Crew 1, Office, etc.
Before you can start entering information on the Time Sheet form you have to create your employees. The grid below is displayed when you open the Employees form. This grid allows you to enter information about all of your employees. The hourly rate field should include the hourly rate you are paying your employees including benefits.
Creating Calendar Resources
The name you provide for each calendar is called a calendar Resource. To create a new Resource, select the Manage Resourcesbutton from the Tools menu on the Allpro SchedulePro toolbar. The grid below will be displayed. To create a new Resource you simply enter a new Resource name in the blank gray row located at the bottom of the grid. If you desire, you can enter additional comments about the Resource in the Description column.
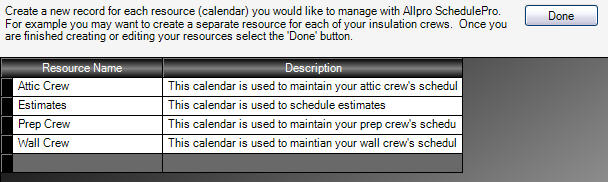
To delete a Resource select the black box located to the left of the Resource you would like to delete and then select the Delete button on your keyboard.
After you have finished setting up your Resources select the Done button and you will be returned to the main screen.
Creating Calendar Resources
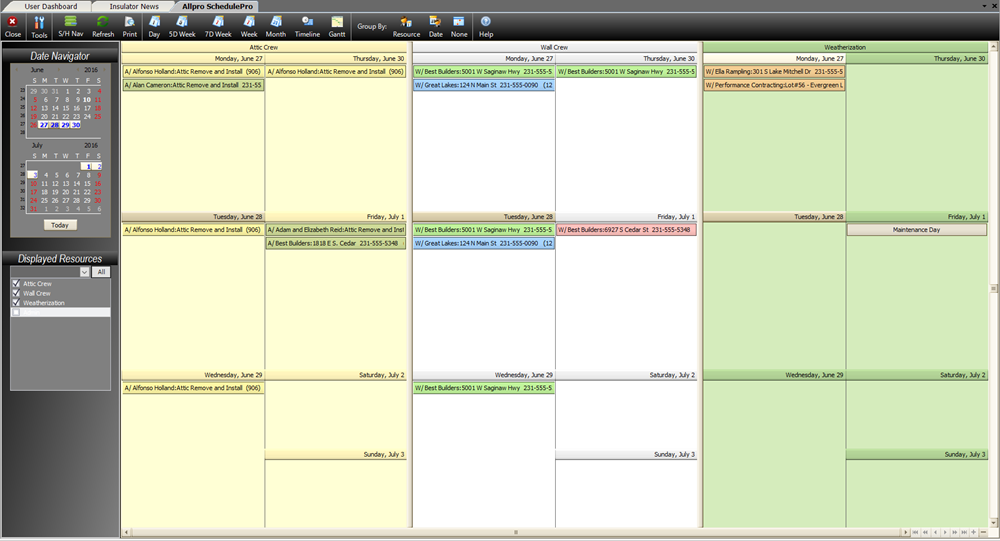
The Displayed Resources panel is located on the lower left side of the Allpro SchedulePro main screen. This panel displays a list of all of the Resources you have created. To display the Resource’s calendar in the main calendar view check the box located on the left side of the Resource’s name. To hide the Resource’s calendar uncheck the box. The dropdown selection for the Displayed Resource allows users to select a specific Group and displays Resources for only that specific selected Group.
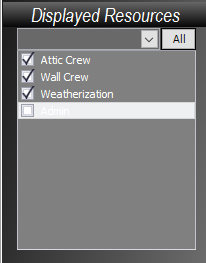
If you have checked multiple boxes you will see more than one calendar displayed in the main area of the form. By default each Resource’s schedule will be displayed on a separate calendar. If you want to merge the schedules for all the Resources that have their box checked select the No Grouping button located on the tool-bar. All the schedules will then be displayed on one calendar.
We recommend that you try to make each Resource’s Name start with a different letter. Then you can type a one character code for each Resource in the Appointment Subject field so you can easily tell which Resource the appointments belong to when they are all merged together. For example, you could type “P“ at the beginning of all the Prep Crew’s appointments and type “W“ for all the Wall Crew’s appointments. That way when the appointments are all merged onto one calendar you will still be able to tell who the Resource of each appointment is.
If you want to separate the schedules so each Resource is displayed on a separate calendar you can select either the Resource or Date button from the tool-bar. Both of these options display each Resource on a separate calendar but they are displayed in different ways.

Creating Calendar Resources
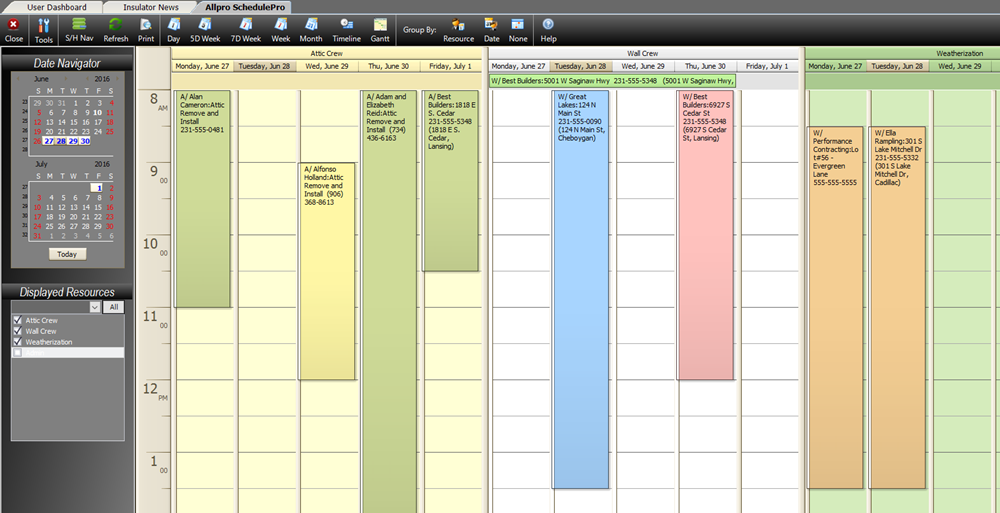
The Day View Calendar displayed below provides you with details about the appointments for any given day. This calendar provides you with a place to enter details about the jobs that will be performed that day. To display the Day view calendar select the Day button on the tool-bar.
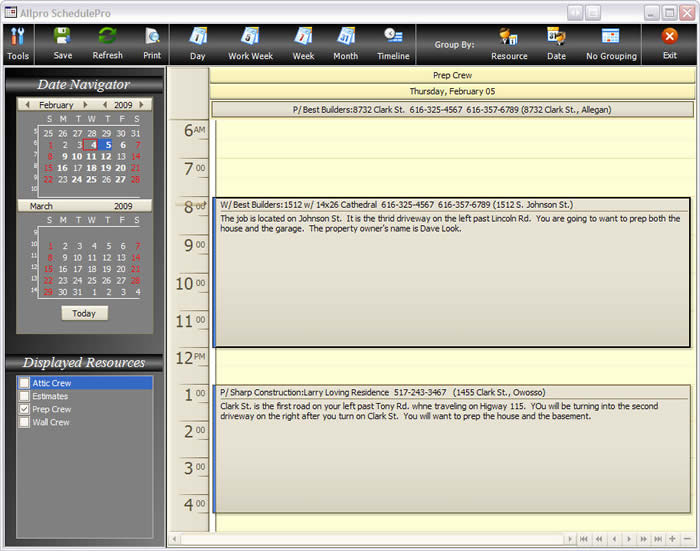
To create new appointments double-click on the calendar and the Appointments Dialog box will be displayed. You can move appointments by dragging appointments from one location on the calendar to another with your mouse. You can also create copies of appointments by holding down the Ctrl key on your keyboard while you drag appointments from one location on the calendar to another with your mouse. Note that when scheduling appointments it is recommended that you do not have the calendars merged. It’s easier to create appointments when each Resource is displayed in a separate calendar.
Working with the 5D and 7D Views
The 5D and 7D View Calendars displayed below provides you with details about the appointments for any given 5 and 7 day work weeks. This calendar provides you with a place to enter details about the jobs that will be performed throughout the work week. This view is useful when you are scheduling appointments to make sure you don’t accidentally create any scheduling conflicts. To display the Work Week view calendar select the 5D Week or 7D Week buttons on the tool-bar.
To create new appointments double-click on the calendar and the Appointments Dialog box will be displayed. You can move appointments by dragging appointments from one location on the calendar to another with your mouse. You can also create copies of appointments by holding down the Ctrl key on your keyboard while you drag appointments from one location on the calendar to another with your mouse. Note that when scheduling appointments it is recommended that you do not have the calendars merged. It’s easier to create appointments when each Resource is displayed in a separate calendar.
Working with the Month View
The Month View Calendar displayed below provides you with a brief look at the appointments that are scheduled for any given month. This view is useful when you are scheduling appointments to make sure you don’t accidentally create any scheduling conflicts. To display the Month view calendar select the Month button on the tool-bar.
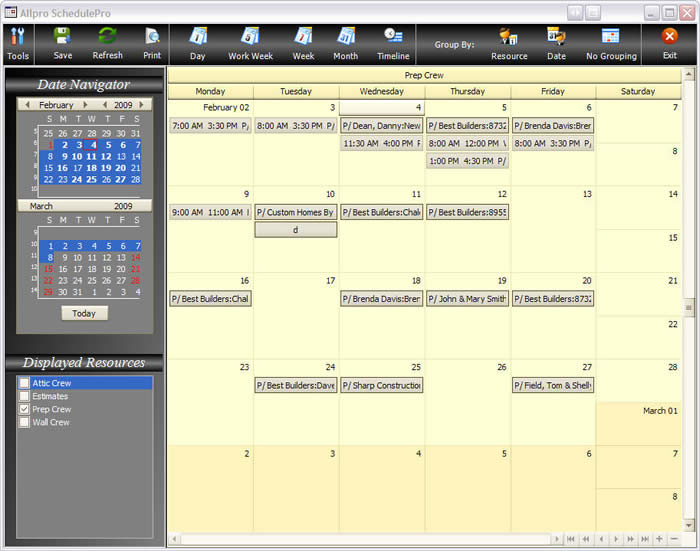
To create new appointments double-click on the calendar and the Appointments Dialog box will be displayed. You can move appointments by dragging appointments from one location on the calendar to another with your mouse. You can also create copies of appointments by holding down the Ctrl key on your keyboard while you drag appointments from one location on the calendar to another with your mouse. Note that when scheduling appointments it is recommended that you do not have the calendars merged. It’s easier to create appointments when each Resource is displayed in a separate calendar.
Working with the Timeline View
The Timeline View Calendar displayed below allows you to view your overall schedule to help you determine the best available times to schedule new jobs. This view provides you with an overall picture of your schedule. To display the Timeline view calendar select the Timeline button on the toolbar.
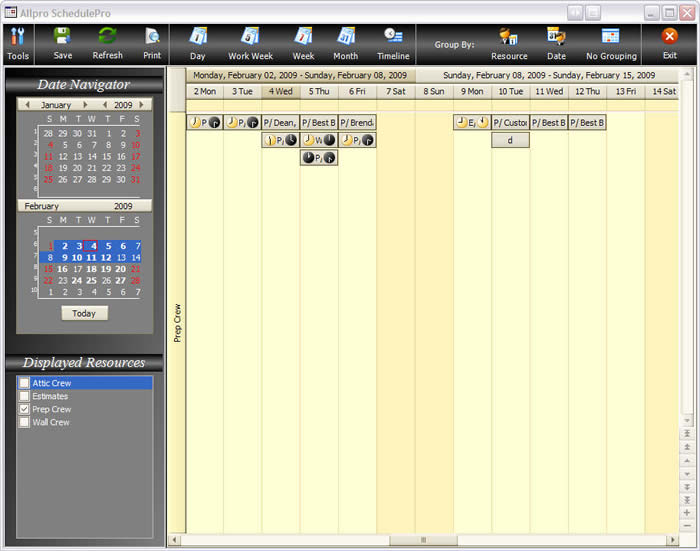
To create new appointments double-click on the calendar and the Appointments Dialog box will be displayed. You can move appointments by dragging appointments from one location on the calendar to another with your mouse. You can also create copies of appointments by holding down the Ctrl key on your keyboard while you drag appointments from one location on the calendar to another with your mouse. Note that when scheduling appointments it is recommended that you do not have the calendars merged. It’s easier to create appointments when each Resource is displayed in a separate calendar.
Entering Appointments on the Appointments Dialog
The Schedule Appointment Dialog displayed below is where you actually enter appointment information. This form is fully integrated with the data you enter in Allpro Insulator. You simply select the Customer/Job you would like to schedule and then select the “Create Auto Subject/Location” button. All of your job location and contact information will automatically be pulled from the Customers form in Allpro Insulator so you do not have to reenter all of this information on your calendar. This allows your crews to have all the information they need when you provide them with their calendar. You will also be able to view the full schedule for a specific job from the Customers form. The best part is there is no double entry! This calendar is fully integrated with Allpro Insulator!
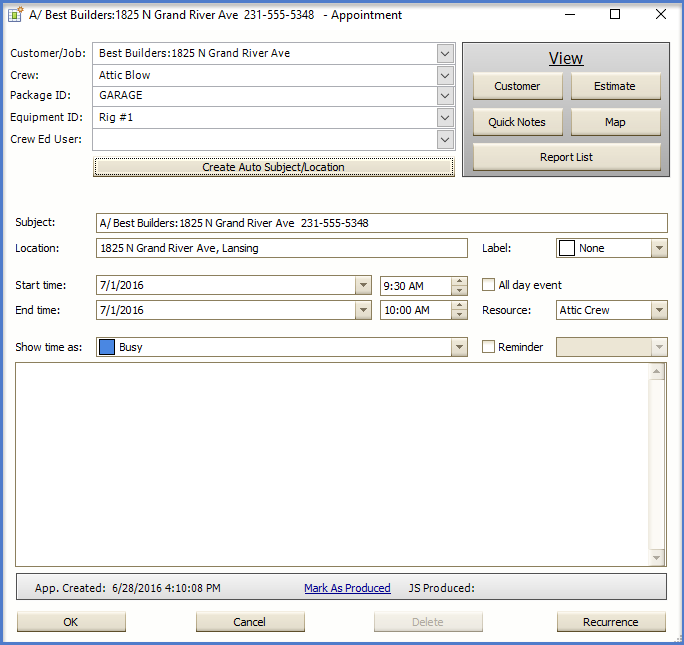
Field Names in the Appointment Dialog:
- Customer/Job: This field allows the user to select a specific Customer/Job for the appointment to be associated with.
- Crew: This field allows the user to select a crew, that will be used for filtering on Job Sheets. When a crew is selected, the appointment is associated with the crew and any Job Sheets printed from the Appointment Dialog or the Scheduled Jobs Form will be filtered by Crew. The filtering by Crew is based on the selected Crew for each singular line item on the Estimates Form.
- Package ID: This field allows the user to select a package, that will be used for filtering on Job Sheets. When a package is selected, the appointment is associated with the package and any Job Sheets printed from the Appointment Dialog or the Scheduled Jobs Form will be filtered by Package. The filtering by Package is based on the selected Package for each singular line item on the Estimates Form.
- Equipment ID: This field allows users to select a specific Rig to be associated to each appointment.
- Crew Ed User: This field allows users to select a specific User to be associated to each appointment.
- Create Auto Subject/Location: This button allows users to auto-create the appointment subject based on the first letter of the Resource, Customer/Job name and Phone Number.
- View-Customer: This button allows users to open the customers form for the selected customer/job.
- View-Estimate: This button allows users to open the Estimates Form for the Estimate associated with the specific Customer/Job.
- View-Quick Notes: This button allows users to open the Quick Notes form for the selected customer/job or estimate.
- View-Map: This button allows users to create a job map to the address of the selected Customer/Job. The starting address for the map can be set in the Preferences Form.
- View-Report List: This button allows users to open the User Report List.
- Subject: This field allows users to edit the Subject for the given appointment.
- Location: This field hold the address when the Auto Subject button is pressed and can be edited.
- Label: This dropdown allows users to select a specific Label to be attached to the appointment. Labels can be edited in the Tools Menu – Set Calendar Default Options.
- Start Time: This field holds the default time of the appointment. If the appointment was created from the Estimates form, the default start time will be 12:00AM of the appointment day. If the appoinment is created from the SchedulePro Form, the start time represents the time of day where the double-click occured.
- End Time: This field holds the default time of the appointment. If the appointment was created from the Estimates form, the default start time will be 12:00AM of the appointment day. If the appoinment is created from the SchedulePro Form, the start time represents the time of day where the double-click occured plus a half hour. This increment depends on the appointment ruler settings in SchedulePro.
- All Day Event: When this box is checked, the appointment will be displayed as an all-day appointment. When un-checked the time entry fields will be displayed and can be edited.
- Resource: This field allows the user to change the Resource to which the appointment will be made. The Resources in the dropdown list will be representative of the currently selected Grouping.
- Show Time As: This allows users to place an indicator on the left side of the appointment which indicates a specific time status.
- Reminder: This allows users to set a reminder interval. The reminder will only be displayed if the user is logged in.
- App Created: This field stores the date and time when the appointment was created.
- Mark As Produced: This link allows users to mark the time when the Job Sheet was produced.
- JS Produced: This field displays the date and time when the Job Sheet was printed.
- Recurrence: This button opens up the recurrence dialog box and allows users to create recurring tasks.
Filtering the Schedule
Allpro SchedulePro provides you with several powerful ways to filter your calendar data so you can easily find what you are looking for.
The Filter panel is displayed when you select the Filter button from the main tool-bar. There are five tabs which provide you with different methods to filter your data.
Date Range Filter
The first filter tab is the Date Range tab. By default only appointments that fall between the default date range will be loaded into the calendar. This feature will greatly improve the performance of the calendar because old past appointments that are no longer relevant will not be loaded. The default date range is based on the Previous Days Qty and the Future Days Qty values you enter on the Options tab of the Company Setup form. You can adjust the dates on the Date Range tab and select the Show Appointments in Date Range button to adjust the current calendar filter. You can also select the Show All Appointments to remove the filter and load all appointments into the calendar. You can also use the Quick Date combo box to automatically adjust the Start Date and End Date based on a specific parameter (example: Month will set the date range to include appointments for the current month).

Label Filter
The second filter tab is the Label tab. When you create an appointment you can select a specific Label for the appointment. For example, you could label certain appointments as “Important”. Each label will have a specific color assigned to it so you can look at your calendar and easily find all “Important” appointments. You can define your own labels on the Calendar Options form. The Label filter allows you to select a specific Label and only appointments that have that Label will be displayed on the calendar. To remove the Label filter select “All Labels” from the Filter by Label drop-down list.

Status Filter
The third filter tab is the Status tab. When you create an appointment you can select a specific Status for the appointment. For example, you could assign certain appointments a status of “Out of Office”. You can define your own statuses on the Calendar Options form. The Status filter allows you to select a specific Status and only appointments that have that Status will be displayed on the calendar. To remove the Status filter select “All Statuses” from the Filter by Status drop-down list.

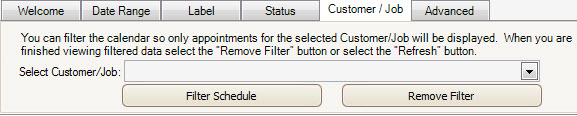
Customer / Job Filter
The fourth filter tab is the Customer / Job filter tab. To create this filter you simply select the Customer/Job you would like to filter by from the drop-down list and then select the Filter Schedule button. Then when you view the calendar you will notice that only appointments for the selected Customer/Job will be displayed. This feature is very useful if you are having a hard time finding a Customer/Job on the schedule. You can choose to display the Month view and easily locate the required appointments. To remove the filter select the Remove Filter button.
Advanced Filter
The fifth filter tab is the Advanced tab. The advanced filter tab allows you to create a very specific filter which allows you to find appointments in an almost unlimited quantity of ways. In the example below, Subject was select as the field to filter by. Contains was selected as the method of searching. Other examples of methods would be “Starts With, Equals, Greater Than, etc.). “Jason” was entered as the search criteria. With this filter created if you were to select he Apply Filter button only appointments that contain the text “Jason” somewhere in the Subject field will be displayed on the calendar. Advanced filter allow you to create very specific filter so you can find exactly what you are looking for. To remove the advanced filter select the “X” to the right of the filter and then select the Apply Filter button.

Saving and Refreshing Calendar Data
When you create an appointment Allpro SchedulePro automatically saves the appointment back to the database. If you are using Allpro SchedulePro on multiple computers on your network you will have select the Refresh button periodically to load appointments other users have created into your calendar. Allpro SchedulePro is displayed in a different window than Allpro Insulator so users will often minimize the calendar instead of closing it. This is not a problem as long as you remember to select the Refresh button periodically otherwise you will not see any of the appointments others have created.
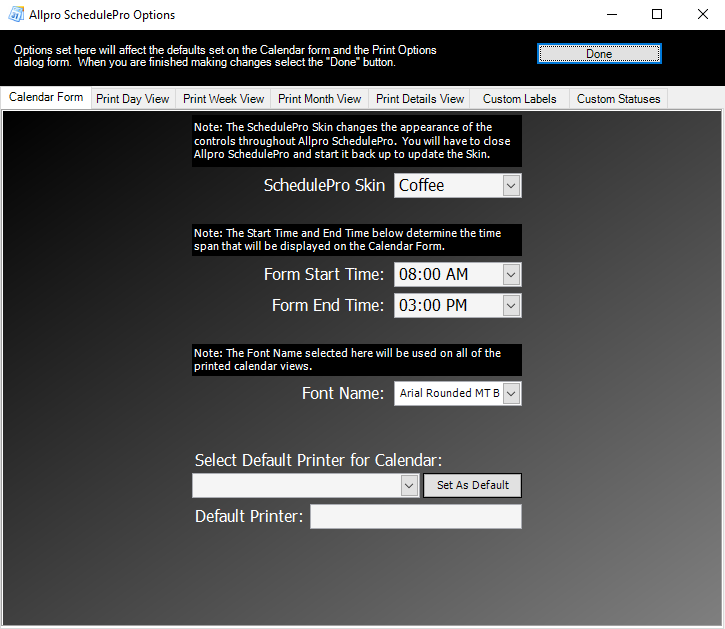
Setting Default Calendar Options
There are several default options that can be set to customize Allpro SchedulePro to better fit your needs. These options can be set on the Allpro SchedulePro Options form. This form can be opened by selecting the Set Default Calendar Options button from the Toolsmenu on the tool-bar.
The Options form contains seven tabs. The first tab is used to set options that affect the appearance as well as the Start Time and End Time displayed on the calendar form. The next four tabs are used to set default print options so each print style will be printed as you require. The last two tabs allow you to customize the Labels and Statuses that appear on the Appointment dialog.
Allpro SchedulePro provides you with every feature you need to efficiently maintain an accurate schedule for multiple crews. Allpro SchedulePro also allows you to view and print the appointment information in a variety of ways. This software is sure to keep your crews running efficiently with less wasted time.