The Item Builder
v14
The Item Builder works with information from Product Details to streamline the process of creating the related Item Details entries. To get the most from it, users should be sure to enter Coverage/Unit, Product Code, and Material Cost information on the Product Details form beforehand. The Product Description should also be reviewed prior to generating Item Details entries, as it will be included in the Item Details description that will be visible to customers on estimates.
Getting Started
When you first open the Item Builder, you will have two options: Create New Items and Manage Work Areas. New users will need to set up their Work Areas before creating items if they have not already done so. The Manage Work Areas selection can also be used to change existing Work Areas. If Work Areas do not require attention, the user can select Create New Items to start the process of generating Item Details entries.
Manage Work Areas
Work Areas will represent locations that products are installed, and might include entries like exterior wall, knee wall, attic, crawlspace, and so forth. Because new users will need to set up Work Areas before creating new items, we will cover this function first.
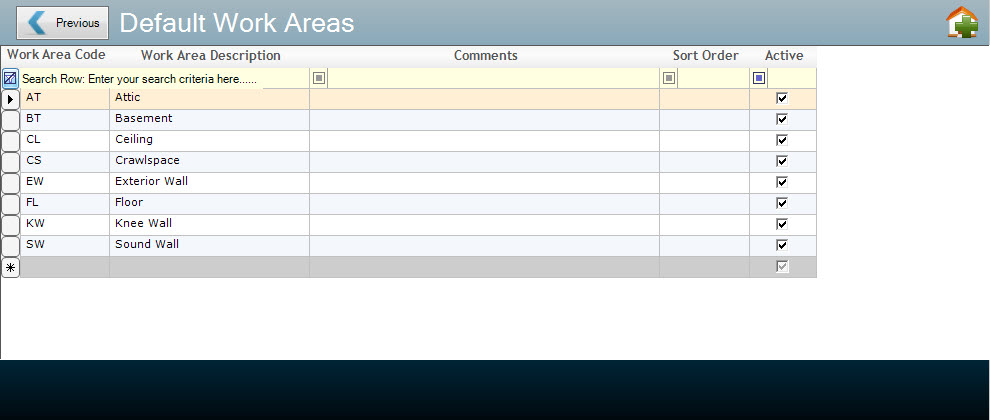
- Work Area Code – This text will be tacked onto the end of the Product Code to generate the Item ID for new Item Details entries produced by the Item Builder.
- Work Area Description – Text describing the work area that will be used as part of the Item Description when generating new Item Details entries using the Item Builder.
- Comments – User can include internal notes for the Work Areas, but these notes will not be included in Item Details entries.
- Sort Order – Numerical values in the Sort Order column will change the order of the Work Area entries in the grid, with the lowest Sort Order value displayed first.
- Active – The active checkbox allows the user to disable Work Areas in the Item Builder without removing the entry.
To create a new Work Area, click into the grayed-out row with an asterisk, and enter a Work Area Code and Work Area Description. Users can add can comments if desired, but they are not required. Work Areas can be disabled by unchecking the checkbox in the Active column. Disabling a Work Area allows users to “hide” entries without completely removing them. To delete a Work Area, select the entry by clicking on the small square on the far left, then hit the delete key on your keyboard.
Create New Items
Clicking Create New Items will allow the user to select the Product Details entry that will be used to generate new Item Details entries from. The Select Product grid is pictured below:
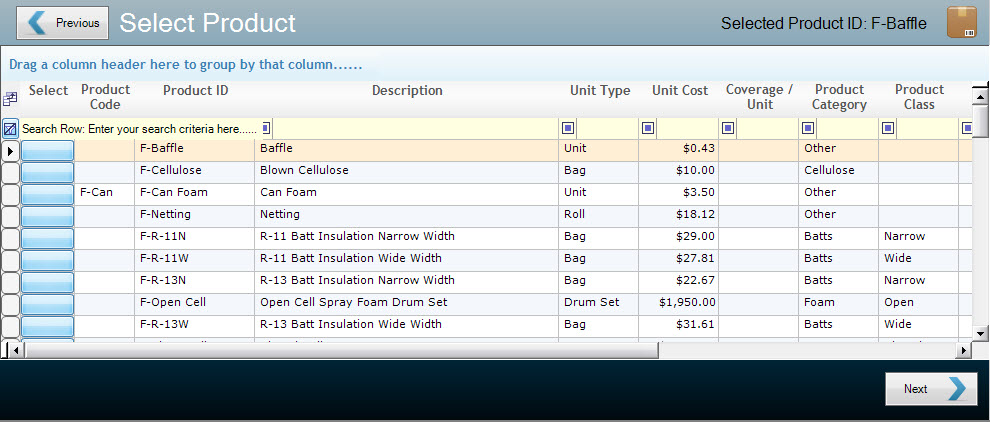
- Select – This button selects the associated Product to generate Item Details entries from and opens the Select Work Areas screen.
- Product Code – This code will be used as the first part of new Item ID’s generated by the Item Builder. Product codes can be entered while using the Item Builder or on the Product Details form.
- Product ID – The Product ID for the related product, as entered on the Product Details form.
- Description – The description for the related product, as entered on the Product Details form. Note that this description will form part of the Item Detail entry’s Item Description and will appear on finished Estimates.
- Unit Type – The physical form that the product is purchased as, as specified on the Product Details form. Typical values include roll, sheet, drum set, and bag.
- Unit Cost – The cost of a single Product Unit, as specified on the Product Details form.
- Coverage/Unit – The number of square feet a single Product Unit will cover. Note, this value is not fixed for loose fill or spray foam products and should be left blank for such products.
- Product Category – The user defined category assigned to the product on the Product Details form.
- Product Class – The user defined class assigned to the Product on the Product Details form.
- DTCreated – Indicates the time and date that the entry was added to the Product Details form
- DTUpdated – Indicates the last time the entry was modified on the Product Details form.
- UpdatedByUser – Indicates which software user last updated the entry.
Select the product that will be used to create new Item Details entries using the oblong blue Select button on the left side of the grid. The Select button will advance the Item Builder to the Select Work Areas form. If the Product does not have a Product Code assigned, the user will need to enter one before continuing. The Product Code can be entered in the field next to the Select button (right on the Select Products form) or on the Product Details form.
Select Work Areas
The Select Work Areas screen allows the users to specify where they install the Product, and if they will require entries for multiple R-values.
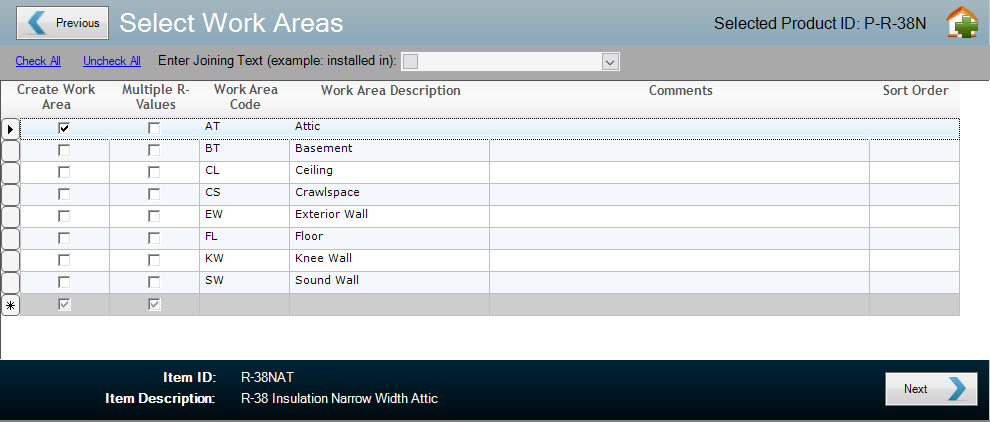
- Enter Joining Text – The dropdown menu at the top allows the user to enter or select Joining Text. Joining Text will be placed between the Product Description and the Work Area Description to create the Item Details Description. Either select an option from the dropdown menu, or users can click the blue square on the left to add, remove, and/or modify entries in the dropdown list.
For example, for the product above installed in a Crawl Space:
| Product Description | Joining Text | Work Area Description |
| R-11 Batt Insulation Wide Width | installed in | Crawl Space |
- Create Work Area – These checkboxes are used to determine whether an Item Details entry will be generated for the associated Work Area. If the selected Product is installed in the specified work area, the checkbox should be checked so a new Item Details entry will be generated.
- Multiple R-Values – Use these checkboxes to that indicate the Product can be installed at different R-Values (or thicknesses) in the associated work area. This checkbox allows users to generate Item Details entries for loose fill and spray insulation products which can be applied in different thicknesses to achieve different R-Values.
- Users will have the opportunity to enter specifics about R-value/thickness for the selected work areas during the next step in the Item Builder.
- Work Area Code – This text will be added onto the end of the Product Code to generate the Item ID for new Item Details entries produced by the Item Builder.
- Work Area Description – Text describing the work area that will be used as part of the Item Description when generating new Item Details entries.
- Comments – User can include internal notes for the Work Areas, but these notes will not be included in Item Details entries.
- Sort Order – Numerical values in the Sort Order column will change the order that Work Area entries are displayed in the grid, with the lowest Sort Order value first.
.Note the Item ID and Item Description preview at the bottom of the form.
Once the Work Area and Multiple R-Values selections have been configured properly, click the Next button in the lower right of the Item Builder. If the Multiple R-Values box is checked, users will be taken to the Enter R-Values screen, otherwise they will be taken to the Review Items form screen.
Enter R-Values
For certain products, including spray foam and cellulose, the same product can be installed at different thicknesses/R-Values. The Enter R-Values grid allows you to specify those thicknesses or R-values, as pictured below.
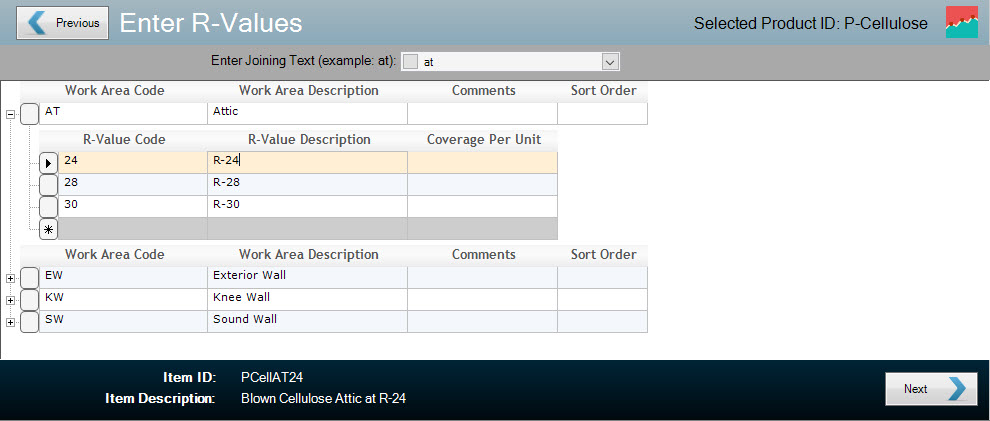
- Joining Text – The dropdown menu at the top allows the user to enter or select Joining Text. Joining Text will be placed between the Work Area Code and R-Value Description when creating the Item Details Description
- Work Areas – Each work area selected for Multiple R-Values will have an entry on this form with a “tree” that can be expanded to specify the desired R-values or thickness for the product. The entries will include information about the Work Area.
- R-Value Code – This text will be combined with the Product Code and Work Area Code to generate the Item ID’s for the new Item Details entries.
- R-Value Description – This text will be used to generate the Item Details Description for the new Item Details entries, built upon Product Description, Work Area Description and Joining Text.
| Product Description | Joining Text | Work Area Description | Joining Text | R-Value Description |
| Blown Cellulose | installed in | Sound Wall | at | 4” |
- Coverage Per Unit – Allows the user to enter the total square footage that can be installed from a single product unit at the specified thickness or R-value.
Note the Item ID and Item Description preview found at the bottom of the form. When finished entering R-Value information, click the Next button to move on to the Review Items Form.
Review Items
The Review Items form allows the user to review the Item Details entries before they are created. Users can make modifications and enter any missing data on this form.
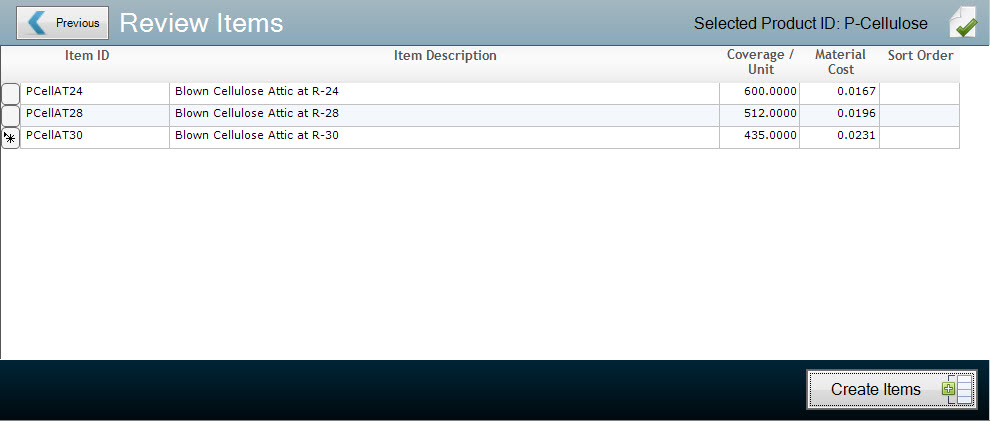
- Item ID – This is a preview of the Item ID that will be generated for the entry. Item ID’s are part of what is used to select Line Items on an Estimate, so it is helpful to develop a system that will help users locate the item they are looking for.
- Item Description – This is a preview of the Item Description that will be generated for the entry. This description will generally be visible to the customer on Estimates, so appropriately descriptive language should be used.
- Coverage Per Unit – This is the total square footage of the item that can be installed from a single Product Unit (roll, bag, sheet, etc.)
- Material Cost – The cost of material used to install a single square foot of the Product. Use care on items with multiple R-values or thicknesses.
- Sort Order – Allows the user to determine the order in which the Item Details Entries will appear on an estimate. Lowest values will appear at the top, descending as the value increases. This is an optional field.
When done reviewing the items and making any necessary modifications, users can click Create Items to create their new Item Details entries. Users will receive confirmation dialogue prior to the Items being created. If the user selects “Yes” to create the items, they will be prompted with the option to open the Item Details form to finish setting up the entries.
Please note, users will still need to add costing information, like Labor Cost and Other Cost (overhead), as well as other data to complete the entries after finishing the Item Builder. For more information on Item Details Entries, check the Item Details help page.