The Estimate Form
- View the Estimate Menu Training Video
- View the Estimate Margins Tab Training Video
- View the Schedule Tab Training Video
- View the Job Sheets Tab Training Video
- View the Projected vs Actual Tab Training Video
- View the Customer/Job Tab Training Video
- View the Estimate Form Time Sheets Training Video
- View the Estimate Plan Templates Training Video
- View the Estimate Toolbar Training Video

- View the Estimate Action Menu Part 1 Training Video
- View the Estimate Action Menu Part 2 Training Video
- View the Estimate Action Menu Part 3 Training Video
- View the Estimate Action Menu Part 4 Training Video
- View the Estimate Action Menu Part 5 Training Video
- View the Estimate Overview Training Video
- View the Full Details Tab Training Video
- View the Upgrades Training Video
The initial setup of the Estimates Form is done from the Company Setup Form and the steps in Phase 1 and Phase 2 of the initial setup process. The creation of Estimates is most easily done by using the Estimate Wizard, to learn more about the Estimate Wizard, click here.
e logo/letterhead, estimate comments and other features of the Estimate are verified in this step of the setup process. The verification of the Items and Products that were previously created is also completed in the step. The Projected vs. Actual Tab of the Estimates Form will allow you to verify the associated Product and how the coverage per unit takes the entered Qty and converts it to a unit.
Directions to complete each step of the setup process can be found on this page. Please scroll down and locate the section where you have a question.
Once complete, you can move on to the Initial Setup of the Percentages Form, by clicking here.
Estimate Form Help Page Quick Navigation
Entering Estimate Information
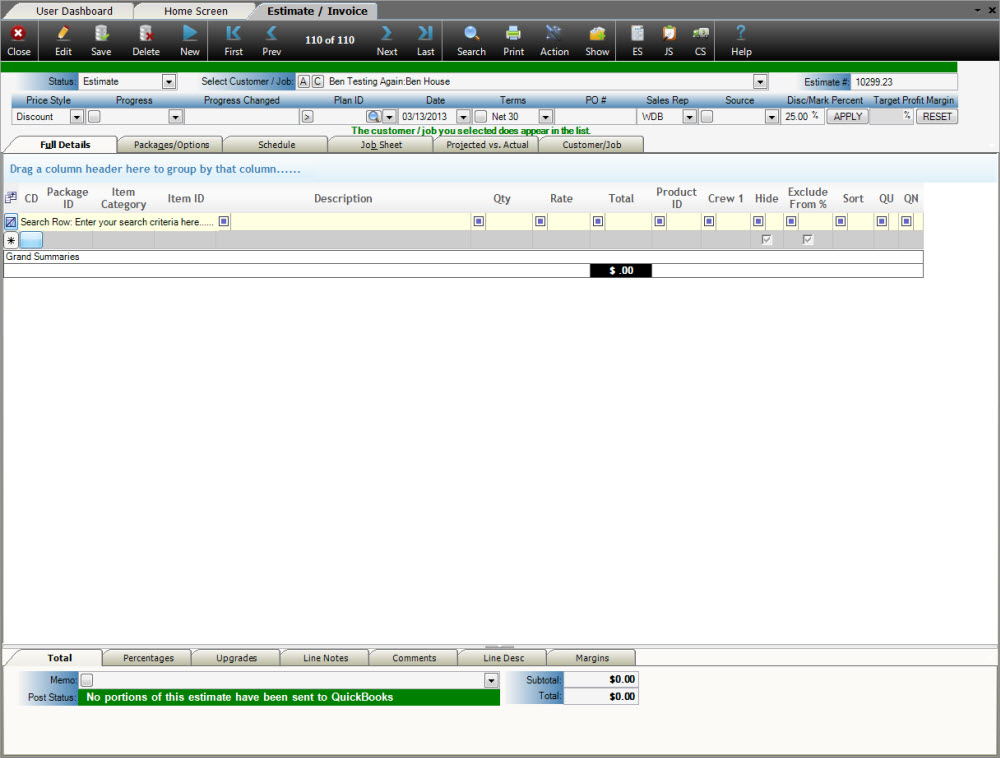
The Estimates form allows you to create very flexible Estimates, Invoices, Job Sheets, and Costing Reports. To create a new estimate, select the New button on the tool-bar and a blank estimate will be displayed. When you return to a record you will notice that the fields on the form are gray and you cannot edit the data. If you want to make changes to the data select the Edit button from the tool-bar. This will unlock the controls so you can make changes.
Status
Allpro Insulator allows you to create both estimates and invoices. If you are using Allpro Insulator QBE you will be creating your estimates with Allpro Insulator and then producing your invoices from QuickBooks. There may be circumstances where you will want to provide your customer with an invoice right away on site. Even if you are using Allpro Insulator QBE you can change the Status from Estimate to Invoice. This should only be done so you can provide your customer with a paper invoice on site. You will still want to send the estimate to QuickBooks to further manage your accounts receivable.
If you are using Allpro Insulator SAE, you will be producing both your estimates and invoices with Allpro Insulator. The Status field allows you to specify whether you want to produce an estimate or an invoice. The job will usually start as an estimate, but if the job is accepted you can change the status from Estimate to Invoice. The balance of the invoice will then appear in the accounts receivable reports.

Select Customer/Job
The first step in creating an estimate is selecting the Customer/Job from the drop-down list. It is important to remember that you cannot create an estimate for just a customer. All estimates must be created for a Customer/Job. If the estimate you want to create is for a new Customer and/or Job, you have to create the Customer and/or Job first on the Customers form before you can create the estimate.
Estimate #
The Estimate # is a value you use to easily lookup a particular estimate. When you create a new Estimate, the Estimate # will automatically be increased by one. You have the option to change the Estimate # if you choose. Some contractors may find it useful to add a decimal place to the Estimate # after an estimate has been revised. This is up to each individual contractor.
Price Style
Allpro Insulator supports Discount, Markup, and Material + Labor estimating styles. The Discount style allows you to specify a base sales price for each item that you will charge your customers. You can apply a discount percent for each customer and/or each estimate to reduce the price charged. The Markup style allows you to specify a total cost for each item and then specify a markup percent for each customer and/or estimate to increase the price charged. The Material Plus Labor style allows you to specify a Material Price and a Labor Price for each of your items. Note that these are different than the Material Cost and Labor Cost fields. The Material Price and Labor Price fields allow you to enter the amount you will charge your customer for both Material and Labor. These values are listed separately on the estimate. This price style is especially useful for weatherization estimates.
When you create a new estimate, the default price style you selected on the Company Setup form will automatically be selected. If you want to change the price style for the current estimate you can change it on the Estimates form.
Progress
The Progress field is an editable drop down that lets you define and set various phases of progress that you would like to keep track of, in the estimating process.
Progress Changed
The field will keep track of the date at which the estimate last went through a Progress change.
Plan ID
In this location you select a Plan ID that you would like to insert into the estimate. When a plan is inserted into the estimate, the estimate receives all of the packages and the items that were set up in the template.
Date
The current date will automatically be filled in when you select the New button. You can change the date by manually typing in a different date or selecting a date from the drop-down calendar.
Terms
If you are using Allpro Insulator QBE your customer’s terms will be imported from QuickBooks. When you select a Customer/Job from the drop-down list their Terms will automatically be filled in for you. Regardless of which edition you are using, you can manually type the estimate terms in the Terms field.
IMPORTANT: The value in the Terms field must be added to the drop-down list in QuickBooks. Both Allpro Insulator and QuickBooks allow you to create your own Terms. Before you can send a new Estimate to QuickBooks, you have to make sure the Terms you entered on the Estimates form have also been setup in QuickBooks. If it has not, QuickBooks will reject the Estimate. The Terms list can be edited from the Lists menu in QuickBooks.
PO #
The PO # field provides you with a place to reference a purchase order number your customer may want you to attach to a particular estimate.
Sales Rep
The Sales Rep field allows you to track which sales rep is responsible for the current estimate. Each sales rep can easily filter the data displayed on the Estimate List so they can focus on their estimates without having to look at all the other sales reps estimates.
IMPORTANT: The value in the Sales Rep field must be added to the drop-down list in QuickBooks. Both Allpro Insulator and QuickBooks allow you to create your own Sales Reps. Before you can send a new Estimate to QuickBooks, you have to make sure the Sales Rep you entered on the Estimates form have also been setup in QuickBooks. If it has not, QuickBooks will reject the Estimate. The Sales Rep list can be edited from the Lists menu in QuickBooks.
Source of Order
The Source of Order field allows you to track what marketing method was responsible for the current estimate. Some examples you may use would be Newspaper Ad, Flyer’s, Referral, etc.
Disc/Mark Percent
The Percent field allows you to apply either a Discount or Markup percent to the current estimate. If you are using the Discount Price Style the percent entered here will apply a discount percent to the Sales Price for each item. If you are using the Markup Price Style the percent entered here will apply a markup percent to the Total Cost for each item. Keep in mind that the Sales Price and Total Cost for each item are managed on the Item Details form. The discount is not applied directly to the value in the Rate column. You now have the ability to set a default Discount/Markup Percent for each Customer. Setting these will automatically adjust values based on this percent.
Target Profit Margin
The Target Profit Margin field allows you to specify a desired profit margin and have Allpro Insulator recalculate your pricing to achieve the desired Profit Margin. Note that the pricing of all line items that do not have the Fixed Values checkbox checked. If Items with Fixed Values are present, it will generally result in some deviation from the Target Profit Margin specified.
If you are going to be inserting line items automatically from the Laser Measuring Device than you can enter a discount/markup percent prior to selecting the Insert Laser Measurements button. The percent will automatically be applied to the rate as the items are imported. If you need to apply a Discount/Markup percent at a later time you can enter the percent and then select the Apply button. The values in the Rate column will be automatically updated.
Toolbar

- Close Button – This closes the current estimate, even though the program saves on its own. It is also recommended to hit the save button,every now and then
- Edit Button – When you return to a record the user will notice that the fields on the form are gray and you cannot edit the data. If you want to make changes, the user must click the Edit button. This will unlock the controls for the user to be able to make changes to the current estimate.
- Save Button – Saves the current estimate that you are working on, the program by default saves it on its own. It is still highly recommend to hit the save button still.
- Delete Button – Delete the current estimate for the user.
- New Button – Create a new estimate, make sure that their is either an customer or job created. The drop down menu for Customer/ Job will flash, asking for a customer or job to be select in order to start estimate.
- First Button – Brings the user back to the first estimate ever created in the program.
- Prev Button – Goes back one previous estimate for the user
- Next Button – Goes to the next estimate for the user
- Search Button – Allows the user to search for an customer or an estimate. The user will be taken to that customer or estimate if selected.
Print Button
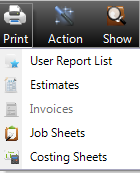
- User Reports List – This is used in the drop down menu.
- Estimates – This Drop down menu feature is used to take you to all the reports associated with the printing on an estimate.
- Invoices – This Drop down menu feature is used to take you to all the reports associated with the printing on an Invoice.
- Job Sheets – This Drop down menu feature is used to take you to all the reports associated with the printing on an Job Sheets.
- Costing Sheets – This Drop down menu feature is used to take you to all the reports associated with the printing on Costing Sheets.
These reports will be covered in the reports help page.
Action Menu
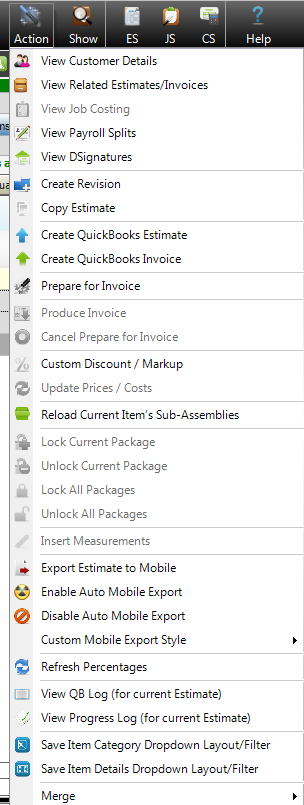
- View Customer Details – This pulls up information on the current customer that is associated with the estimate.
- View Related Estimates/Invoices – Open any related estimates/invoices to the current customer/job selected by the user on the estimate form.
- Job Costing Sheet -This takes the user to the Job Costing Form.
- View Payroll Splits – This will take the user to the payroll splits form. The user getting put in cost for the current job in this form.
- View DSignatures – This allows the user to view current progress of DSign signatures, the feature is only available if you purchase the optional module.
- Create a Revision – This allows the user to make changes to the estimate that is already completed. The current estimate’s status will be set to ‘Archived’ and a new estimate will be created. The new estimate will include all the details from the current estimate with exception of any payments that may have been applied.The new estimate will automatically be displayed. Once Yes has been selected, you can’t undo the operation.
- Copy Estimate – This is will make a current copy of the estimate the user is working. This is a good feature, it can be used as a backup of the current estimate to be safe. The new estimate will automatically be displayed. Payment Information will not be copied
- Create Quickbooks Estimate – If the user is using Quickbooks edition of Allpro insulator. This will send the current estimate to Quickbooks.
- Create Quickbooks Invoice – If the user is using Quickbooks edition to Allpro Insulator,This will sent the current estimate/invoice to Quickbooks.
- Prepare For Invoice – This is used if the user wants to make in invoice for different phases of the estimate. You can select the different package by placing a check box in the Include in Invoice box.
- Produce Invoice – This button becomes available one you had figure out what package you would like to make an invoice for. Once the Invoice is created the user will be taken from the estimate to that invoice and packages selected for the income.
- Cancel Prepare For Invoice – This button is used if the user has changed their mind and don’t want to create that invoice anymore.
- Custom Discount/Markup – This button is used to make an Custom Discount/Markup on specific items rather then all the items on the estimate.
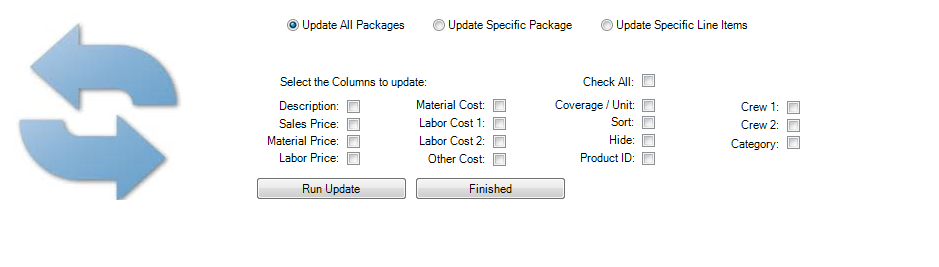
- Update Prices/ Cost – This Tab allows the users to update the values for the current estimate. The values update will be updated to match the values currently set on the Item Details form. Users have the option to select which columns they would like to update as well as select which portions of the estimate are to be updated.
- Reload Current Item’s Sub-Assemblies
- Lock Current Package – By locking the package it will prevent any changes from being made to the current package.
- Unlock Current Package – This will unlock the current package that the user has locked.
- Lock All Packages – This will lock all packages on the current estimate.
- Unlock All Packages – This will unlock all the packages that are currently locked on the estimate.
- Insert Measurements – This will insert Measurements that you have collected from PlanSwift.
- Export Estimate to Mobile
- Enable Auto Mobile Export
- Disable Auto Mobile Export
- Custom Mobile Export Style
- Refresh Percentages – Will delete all the Percentages that are currently associated with the current estimate and then insert the default Percentages for the current Sales Rep.
- View QB Log (for current Estimate)
- View Progress Log ( for current Estimate)
- Save Item Category Dropdown Layout/Filter
Show Button
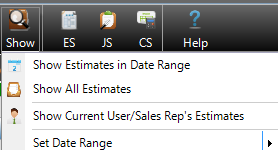
The Show button allows users to specify filters for the estimates in the “que” at the top of the form.
- Show Estimates in Date Range – Limits the estimates to those in the specified date range
- Show All Estimates – Removes all filters from the estimates in the que.
- Show Current User/Sales Rep’s Estimates – Filters the que to contain only estimates generated by the current user or associated sales rep.
- Set Date Range – Allows the user to set the date range for date range-based filtering.
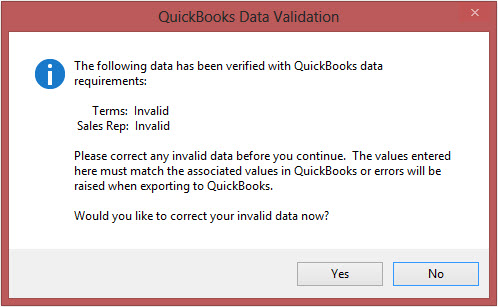
QuickBooks Data Validation – QuickBooks Edition Only
If you are using Allpro Insulator QuickBooks Edition, you will be given notice of invalid data being entered onto the estimate. The QuickBooks data validation tool checks to make sure that information being entered by the sales reps, matches the information in QuickBooks. For the estimate, this tool will validate your “Terms” and “Sales Rep”. If you get an error that is telling you that specific data is Invalid (shown Below), simply navigate to those fields and choose valid options. If this error persists, additional setup may be needed in your “Company Info and Preferences”. For full instructions on how to set up this feature for proper data validation, visit the “Company Setup” page HERE.
Selecting Packages for Estimates
The next step to creating an estimate is to select or creating the Packages that you want to include in the current estimate. The image below shows the grid you use to select the Pack IDs.
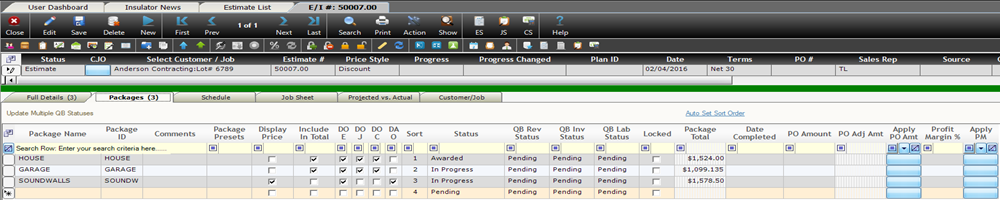
The Package ID column has a drop-down list that displays all of the Packages. You simply select the Package IDs you want to include in the current estimate. The image above shows a job with three separate options: the House, Bonus Room, and Garage Wall.
This grid also allows you to select how you want each job to be displayed on the estimate. The example above shows that both the House and the Garage will be done for sure and they want to include those charges in the total on the estimate. This is a convenient way to provide your customers with package pricing. You can also control which packages will be displayed on the job sheets and which packages you want to send to QuickBooks. The Sort Order column is used to specify the order in which you want the packages to be displayed. In the example above you can see that the House package is set to be displayed first, then the Garage package.
This grid provides you with a lot of control over how your packages will be displayed and billed.
You will have to manually type in your line items on the Details grid. You will have to create a record in the Packages/Options grid for each package. By creating these job packages you will be able to control the way each package is displayed. You just have to enter a different number or letter for each package. To replicate the example above, you would just type 100, 101, and 102 in the Package ID columns. You can use any numbering or naming method you choose as long as there are not two job packages with the same Package ID in one estimate. The Package ID field is now alphanumeric so you can enter numbers or letters. We do recommend that you keep your Package IDs as short as possible. For the example above instead of using 100, 101, and 102 you could use H, B, G (the first letter of each package name).
You have several other that you have to work with on each package. Each field is designed for a specific task that can affect the way data is exported and viewed throughout the program. Below is a description of each field in the packages grid.
- Package ID – This field is used for specific identification of the package. Each package on an estimate must have their own Package ID in order for the estimate to function properly.
- Package Name – This will be the name of the package that is displayed to the customer on the Estimates.
- Comments – This is a place for you to comment on the package or keep notes.
- All – By checking this box all other Display columns will be checked.
- Display Price – By checking this box the price will be displayed with the package.
- Included In Total – By checking this box the package will be included in the total at the bottom of the estimate.
- DOE – By checking this box the package will be displayed on the estimate.
- DOJ – By checking this box the package will be displayed on the job sheets.
- DOC – By checking this box the package will be included in your costing reports.
- DAO – By checking this box the package will have the option of yes or no displayed for the customer to circle.
- Status – This field is an editable drop-down, this is used to sort by the terms you have set for the package statuses.
- QB Rev Status – This is a drop-down field that lets you select the status of the Revenue Estimate for its progression in being sent to QuickBooks. Options here include Pending, Ready to Send, Sent, and Don’t Send.
- QB Inv Status – This is a drop-down field that lets you select the status of the Inventory Estimate for its progression in being sent to QuickBooks. Options here include Pending, Ready to Send, Sent, and Don’t Send.
- QB Lab Status – This is a drop-down field that lets you select the status of the Labor Estimate for its progression in being sent to QuickBooks. Options here include Pending, Ready to Send, Sent, and Don’t Send.
- Locked – When a package is sent to QuickBooks, you have the option of locking them so that they cannot be altered after they are sent. They can be unlocked after they have been locked, but it will require special permissions from the user form.
- Package Total – This will display the total of all items that have been included in this package.
- Date Completed – In this field you can select the date this package was completed.
- PO Amount– If you have been issued a PO from you customer you can enter in the amount on that PO in this field (see PO Adj Amt, and Apply PO Amt for more details).
- PO Adj Amt – This field is the adjusted amount that was made after you apply your PO Amount.
- Apply PO Amount – This field is a button that triggers your PO Amount override. When this is clicked, if you have an amount in your PO Amount field, the total for this package will be set to the PO amount. Equal percentage adjustments will be made across all items in this package to set the package total to the PO Amount.
- Profit Margin % – This field allows users to enter an amount to represent the Profit Margin for the entire package. When a percent is entered into this field, when the Apply PM button is pressed, the profit margin for the package will be changed to the desired percent. The line items within the package will be adjusted to meet this profit margin. This allows users have specific profit margin percentages for each package in an Estimate.
- Apply PM – This button will apply a percentage entered into the Profit Margin % field and change the given packages Profit Margin to the desired percentage.
Using the Package Renaming Option
The option exists on the Packages Tab of the Estimates Form to quickly and easily rename the Package ID of a specific Package and have it change the Package ID of each Line Item to the new Package ID, saving time.
To use this option, right-click in the Packages Grid on the Packages Tab:
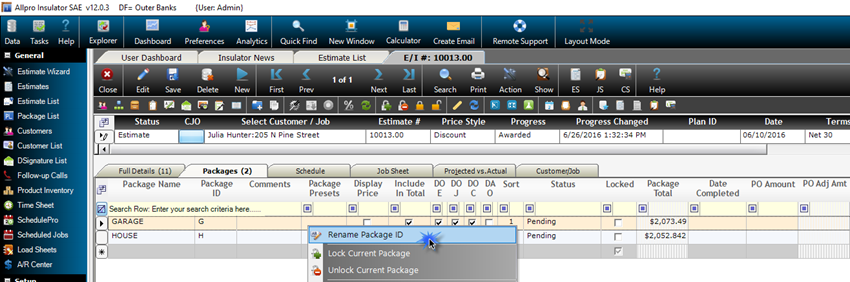
The Rename Package dialogue box will appear and allow for Users to Rename the Package ID:
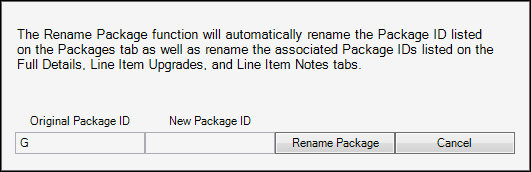
Once the New Package ID is entered, hit the Rename Package button and the appropriate Package ID will rename for each Line Item in the Full Details Tab.
Note: This feature was added in Allpro Insulator V12, in V11 Package Renaming occured automatically and in versions previous to that, Package Renaming did not exist.
Working with Line Items in Estimates
If you imported your measurements from Plan Swift, your last step was to select the Insert Measurements button. After you select the Insert Measurements button from the Measurements tab, the Details grid will be displayed with all of the measurements associated to the Packages you selected. If you look at the image below you will see all of the summarized measurements for Package ID 1. The Qty column displays the total units (square feet) for each item. The Rate column is based on the prices you set on the Item Details form. Remember you have the option to apply a discount or a markup percent when you create the estimate.
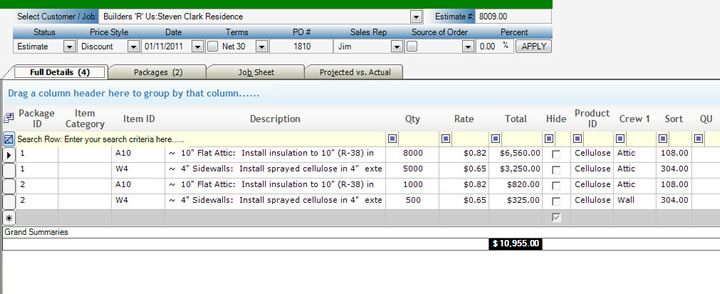
Once the items have been inserted, you are free to edit them in any way you choose. There may be some changes that you wish to make due to the requirements for the particular job. You can also create new records or delete records. Allpro Insulator does all the data entry and calculations for you but you are in no way limited to what is automatically inserted. For example, you may want to add an additional charge for long travel time. You can just create an additional line and enter the amount you would like to charge.
If you are not inserting measurements, after you have finished setting up your packages you can select the Details tab and start manually entering your line items.
Package ID
The first column is the Package ID column. This column is used to tell Allpro Insulator which package you want to associate the line item with. For example, if you are entering a line item for the “House” package then you will want to enter “100” in the Package ID column. You would enter “100” because “100” was entered as the Package ID for the “House” package on the Packages/Options tab
Item ID
When you start typing in the Item ID column you will notice that the field starts to auto-complete based on items that are in the list. You can either type in the Item ID or you can click on the drop-down arrow that is displayed and then select the appropriate Item ID from the list. The items that appear in the drop-down list are the items you created on the Item Details form. Note that you can have multiple line items with the same Item ID. For example, you may have “W4” (4” Wall) for both the House Package and the Garage Walls Package.
Description
The description column will automatically be filled in based on the Item ID you select. This information comes from the descriptions you entered on the Item Details form. You can edit the text in the Description column as needed.
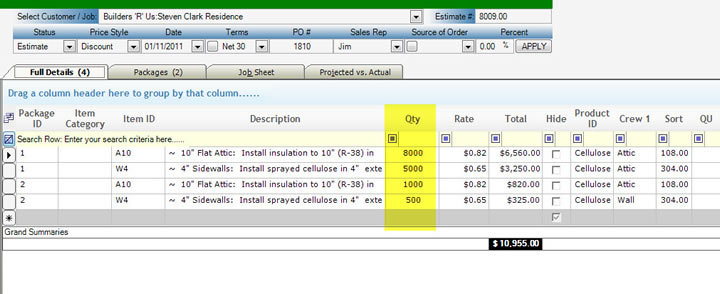
Qty
The Qty column is where you enter the total coverage per unit (total square feet) for the current line item. This would be the sum of all the measurements for the particular Item ID. For example, you may have taken thirty 4” wall measurements when measuring the house. The quantity you enter here should be the total square foot quantity for all the 4” wall measurements for the current package.
Rate
The Rate column is where you enter what you are charging per unit (per square foot) for the current line item. The default rate that you entered on the Item Details form will be automatically inserted for you. If you are using the Discount Price Style (specified near the top of the Estimates form) the price inserted in the Rate column will be the Sales Price value you entered on the Item Details form. If you are using the Markup Price Style the price inserted in the Rate column will be the Total Cost value you entered on the Item Details form.
You can automatically adjust the price by entering in a percent value in the Percent field (located in the top section of the Estimates form) and then selecting the Apply button. If you are using the Discount Price Style the percent entered will be applied to the Rate of all the line items as a discount. If you are using the Markup Price Style the percent entered will be applied to the Rate of all the line items as a markup.
You can also manually change the value in the Rate column if needed.
Total
The Total column represents the value of the Qty column value multiplied by the Rate column value. You can also manually enter the Total column value and the Rate column value will automatically be adjusted. This is useful if you know what you want to charge for a line item but are not sure what the Rate should be set at to attain the desired Total value.
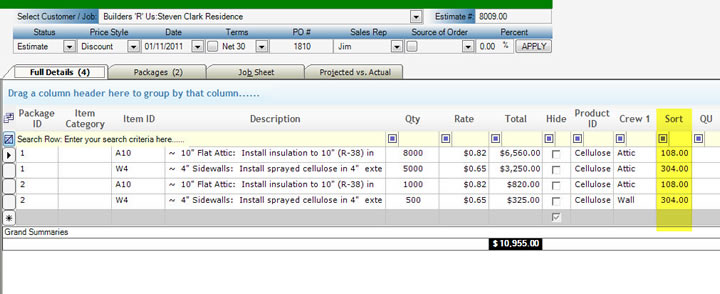
Sort Order (S.O.)
The Sort Order column is used to select the order in which you would like the line items to print on the estimate. There may be times where you add addition line items to the estimate but you want them to be displayed elsewhere in the printable estimate. The default Sort Order is inserted based on the value you entered on the Item Details form but you also have the option to change it on the estimate itself.
Note: If you have multiple line items in one package that is based on the same Item ID, they will only show up separately on reports if you give them a different sort order numbers.
Hide
The Hide column is used to keep certain line items from being printed on the estimate. For example, you may want to add a travel charge for long distance jobs but you may not want the charge to be listed on the printable estimate. If you check the Hide checkbox the travel fee will be added to the package you specify but the customer will not see this as an additional charge. The default Hide value is inserted based on the value you entered on the Item Details form but you also have the option to change it on the estimate itself.
Working with the Right-Click Menu
The Right-Click Menu within Allpro Insulator allow users to access special features or quickly and easily access specific normal features.

1. This feature allows users to edit the Description field of any currently selected Line item. The Edit Line Item Description Tab was removed in V11 and re-added in V12 as a right-click option. The Description is fully editable by clicking into the cell as well.
2. This right-click option allows users to easily switch to the Item Details Form in order to view the same item directly on the Item Details Form. This allows for a quick and easy method of Item costing or other comparisons.
3. This right-click option allows users to easily switch to the Product Details Form in order to view the same item directly on the Product Details Form. This allows for a quick and easy method of Product costing or other comparisons.
4. This right-click option will pop-up a window that shows all related sub-assemblies, line item upgrades and line item notes that are associated with the specific item. The feature can be used to assist in tracking what items go with what notes, sub-assemblies or upgrades.
5. This right-click option will open the lower grid of Full Details Tab of the Estimates Form and display the Tiered Pricing tab, with the specific Tiered Pricing items highlighted.
6. This right-click option will open the lower grid of Full Details Tab of the Estimates Form and display the Upgrades tab, with the specific Line Item Upgrades item highlighted.
7. This right-click option will open the lower grid of Full Details Tab of the Estimates Form and display the Line Notes tab, with the specific Line Item Notes highlighted.
8. This right-click option will highlight any of the sub-assemblies that are associated with a main item in blue on the Full Details Grid of the Estimates Form.
9. This feature will export and open the current grid to Adobe PDF.
10. This feature will export and open the current grid to Microsoft Excel.
11. This feature will Cut the selected content in order to be pasted by pressing Paste in the Right-Click Menu or Ctrl+V.
12. This feature will Copy the selected content in order to be pasted by pressing Paste in the Right-Click Menu or Ctrl+V.
13. This feature will Paste the content that has been previously Copied or Cut.
14. This feature will allow for a simple Undo of the last keyboard action.
15. This feature will allow for a simple Redo of the last Undo.
16. The Spell Check feature will allow for Users to select whether they would like the Spell Check dialog to appear for spell checking of the Full Details grid. An option also exists to quickly and easily Spell Check All Descriptions.
17. This feature allows Users to easily make changes to an existing Item and keep a record of what the Item was originally created as. This feature helps in creating a simple audit trail on the Estimates Form. When selected, the current Item will be copied and placed in a Package called “Auto Change Up” and the newly created Item can then be edited as needed. The Auto Change Up Package will be automatically locked to avoid the changing of the original archived item.
18. This feature allows users to delete the current selected line item. Deleting a line item can also be accomplished by selecting the line item and pressing delete on the keyboard.
Tiered Pricing
Tiered Pricing allows you to have items on your estimate automatically set prices for the item based on specific things. “Tier Level, Job Type and Job Location. or a mix of any of them
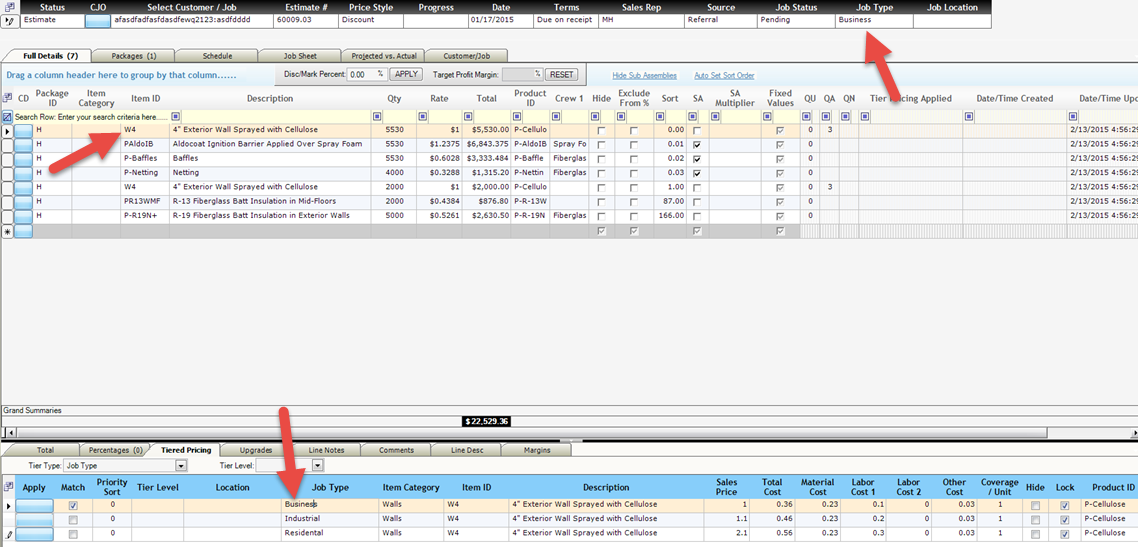
You have to setup your items on the item details form to use tiered pricing beforehand. In the above image, the item is set for Tired pricing by Job Type. Once you setup tired pricing and you set the job type as something that matches what is setup on the item details form it will automatically set the price when you insert the item into an estimate.
In this Example we entered W4 into the estimate and our Job Type is Business so when you entered it into the estimate it looks through and finds the tiered pricing tht matches it and sets all the values to match what you have setup in tiered pricing.
You can turn off editing features to this in the permissions screen.
Sending Estimates to QuickBooks
The features listed in this section are only available with Allpro Insulator QBE (QuickBooks Edition). Allpro Insulator SAE (Stand Alone Edition) allows you to convert estimates into invoices and then manage your receivables.
Allpro Insulator provides you with all the tools to easily create estimates and job sheets, as well as manage sales prices and actual job costs. Allpro Insulator, however, is not a complete accounting program. If you run a large company and you want to have complete accounting and payroll capabilities, then Allpro Insulator combined with QuickBooks is the perfect choice for you. As far as accounting goes, QuickBooks is a great program. It just doesn’t have the custom tools insulation contractors need to easily create estimates and manage jobs.

Once you have finished making any necessary changes to the estimate, you have the option to send the estimate to QuickBooks. This typically won’t be done until the estimate has been accepted by your customer. This process couldn’t be any easier. You simply open the estimate you want to send to QuickBooks and then select the Create QuickBooks Estimate button from the Action menu located on the tool-bar. Make sure you have the correct QuickBooks Company file open before you try sending an estimate to QuickBooks. After you select the button, the QuickBooks communicator form will open and guide you through this process. You can then open the Estimates form in QuickBooks and the new estimate will be displayed. The estimate can then be invoiced and further processed with QuickBooks. The estimate will, however, still be in Allpro Insulator where you can create job sheets and track actual job costs.
Only job options that have the “Ready To Send” status set on the Packages/Options tab will be sent to QuickBooks. This ensures you don’t accidentally try to bill your customer for a package that they have not agreed to pay for.
If you were to make changes after the estimate has been sent to QuickBooks you could have inconsistent data between Allpro Insulator and QuickBooks. You can still print the estimate, make changes to the job sheet, and work with the Projected / Actual grid, you just can’t change any of the data that has been sent to QuickBooks. If you do need to make changes to the estimate and you want to resend the estimate to QuickBooks you can select “Ready To Send” on the package that you have updated, and wish to resend. If you are going to be resending the estimate to QuickBooks it may be necessary to delete the old estimate from QuickBooks.
Percentages
In the percentages tab it allows you to apply percentages that you have already created.

The” Percentage name” Field is where you can select from a list of percentages that you have already created.
The “Label” Field is where you cant write about what the percentage actually is.
The “% Value” Field is where you can set the percentage to be applied.
The “Based On” Field is where you select what your percentage is based on. (Gross Sale, Gross Profit, Gross, Profit Actual, Gross Material Price,Gross Material Cost, Gross Material Cost Actual, Gross Labor Price, Gross Labor Cost 1, Gross Labor cost 2 and Gross Labor Cost Actual.)
The “Add Charge” Checkbox is where you select if you want too add this charge to the estimate/invoice.
The “Hide” Checkbox is where you select if you want this percentage to be shown on the estimate or invoice.
The “Apply” Button Calculates and applies the amount to add to the estimate or invoice.
The “Sort” Field is where you can set the order of the percentages that show up on the invoice or estimate.
Creating a Copy of an Estimate
Prior to creating a copy of an Estimate, it is important that the Customer and Job be created prior to making the copy.
There may be circumstances when you have more than one contractor requesting an estimate for the same job. Rather than recreate the entire estimate, Allpro Insulator allows you to create a copy of an estimate. To create a copy of an estimate, open the estimate you want to copy, then select the Copy Estimate button from the Action menu located on the toolbar. You will be asked if you want to create a copy of the current estimate, select the Yes button. The new estimate will be displayed, and the Customer/Job field will be blank. You simply select the new Customer/Job from the list and you’re finished. This feature should only be used on a limited basis, as continuing to create copies will eventually cause problems in the database. If the same Estimate information is required repeatedly, consider creating a Plan or QuickInsert Template.
Creating Job Sheets
Allpro Insulator allows you to provide your employees with a detailed job sheet before they head out to a new job. When you select the Job Sheet tab on the Estimates form the Directions and Comments fields are displayed. In the Directions field you can enter detailed directions to the job site. These directions will be displayed at the bottom of the printed job sheet. You can use the Comments field to enter any additional comments you want printed on the job sheet.
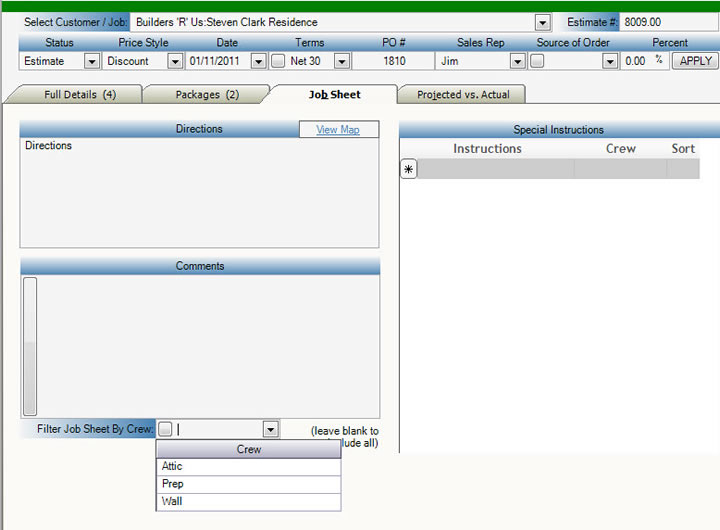
The Special Instructions grid provides you with an easy way to display recurring instructions on the job sheet. You can create a default list of special instructions and then just select the ones that apply to the current job. For example, there may be several jobs where you want to tell your crew to bring scaffolding. Rather than type it in the Comments field you can simply select it from the list of special instructions.
The printed job sheet displays all the items from the estimate along with the projected quantity of units (bags of insulation) that will be required to complete the job. Employees can also use the job sheet to write down the actual quantity of units (bags of insulation) used to complete each item. These values can then be used to determine the difference between the Projected Unit Quantity and the Actual Unit Quantity.
Only job packages that have the “Display on JS” checkbox checked on the Packages/Options tab will be displayed on the job sheet. This ensures your employees don’t accidentally complete a job package that the customer has not agreed to pay for.
Working with the Projected vs. Actual Grid
On the Item Details form you enter the coverage per unit (square foot per bag) quantity for each item. When you enter a coverage per unit quantity on the Details grid of the Estimate form, the Projected Unit Quantity is calculated by dividing the quantity by the coverage per unit quantity.
When you select the Projected vs. Actual tab on the Estimates form the grid automatically displays all the items from the estimate. The grid displays the Quantity, Coverage Per Unit Quantity, and the Projected Unit Quantity automatically. After the job has been completed you can enter the Actual Unit Quantity so you can compare the two. If you select the “=P” button displayed in the grid below, the Actual Unit Quantity will be set to the same value as the Projected Unit Quantity. If they are not the same you can manually type in the Actual Unit Quantity. The last column displays the difference between the two. The unit quantities are rounded to the nearest whole number. For example, if the job should take 38.6 units (example: 39 bags of insulation) the Projected Unit Quantity will be set to 39 units. All costing reports are based on the Projected Unit Quantity and the Actual Unit Quantity.
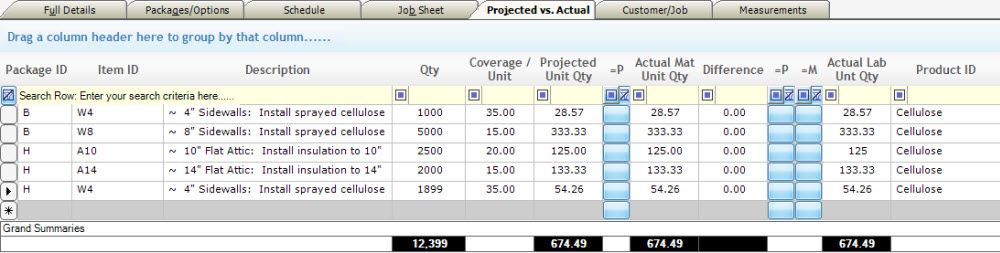
For the “Actual Lab Unit Qty” you have the option to make this equal either the projected amount (“=P” button) or the actual amount ( “=m” button). This column is what your labor splits will be based on.
Scheduling a Job
On this tab is where you can schedule the job to the crews that you have setup.

The “Select Calendar” dropdown is where you select the Calendar that this gets assigned to this example was the Attic Crew.
The “Select Crew” dropdown is where you select what crew that this gets assigned to for the job sheet report.
The “Select Schedule Date” is where you select the date that this job is scheduled for.
The “Schedule Job” Button Schedules the job for you.
The “Refresh Schedule” Allows you to refresh the scheduled jobs list.
After creating the scheduled job if you need to edit anything on it the first button listed in the image above will let you edit that scheduled job.
![]()
Once you bring up the Edit job it will show another box that looks like the above image.
The “Save Changes” Button allows you to save the changes that you have made.
The “Subject” field you can change the Subject to anything that helps you remember what this is going to help remind you what exactly you’re doing on this job.
The “All Day” check box is checked by default you can uncheck this box and it will allow you to set the times that this job is scheduled for.
The “Start” Field is where you enter the Date/Time of when you would like the crew to be at the job and starting. Only editable if it’s not set to an all day job.
The “End” Field is where you enter the Date/Time of when you would like the crew to be ending the job. Only editable if it is not set to an all day job.
The “Crew” Field allows you to change what crew that this is assigned to.
The “Notes” Field is where you can enter notes for the crew about this job.
The “Delete” Button allows you to delete this scheduled job.
After you have everything setup the way you would like it hit the “Save Changes” button and you’re done scheduling this part of the job.
Payments
The Payment tab only shows up if you have turned your estimate into an invoice.
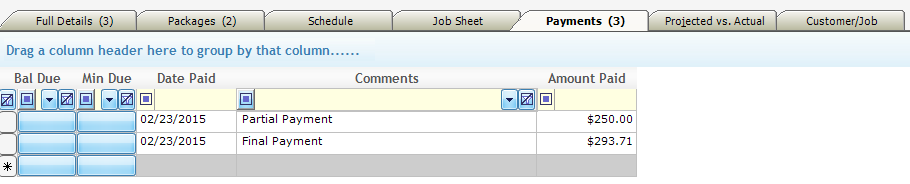
In the Payments tab is where you can keep track of payments for the same Invoice.
If you hit the “Bal Due” Button it will Fill in the Amount Paid with the total balance do of the Invoice.
If you hit the “Min Due” Button it will Fill in the percentage that you decided was the minimum due.
The “Date Paid” drop down allows you to select the date of the payment.
The “Comments” section is for you to enter a comment about the payment you received.
The “Amount Paid” is where you enter the payment that is to be applied to the Invoice.
Once you hit save it will save the payment for you and show the final balance.
Creating Line Item Upgrades
As part of Allpro Insulator, the ability exists to offer upgrades on a specific line item to the Customer with ease. Line Item Upgrades gives the users of Allpro Insulator the ability to up-sell on each specific line item, creating more flexibility within the program.
Adding a Line Item Upgrade to a specific line item on the Estimates Form is simple, on the Estimates Form, Full Details Tab, select an item you would like to add an upgrade for.
Once selected, click on the Upgrades Tab at the bottom of the Estimates Form as shown below:.
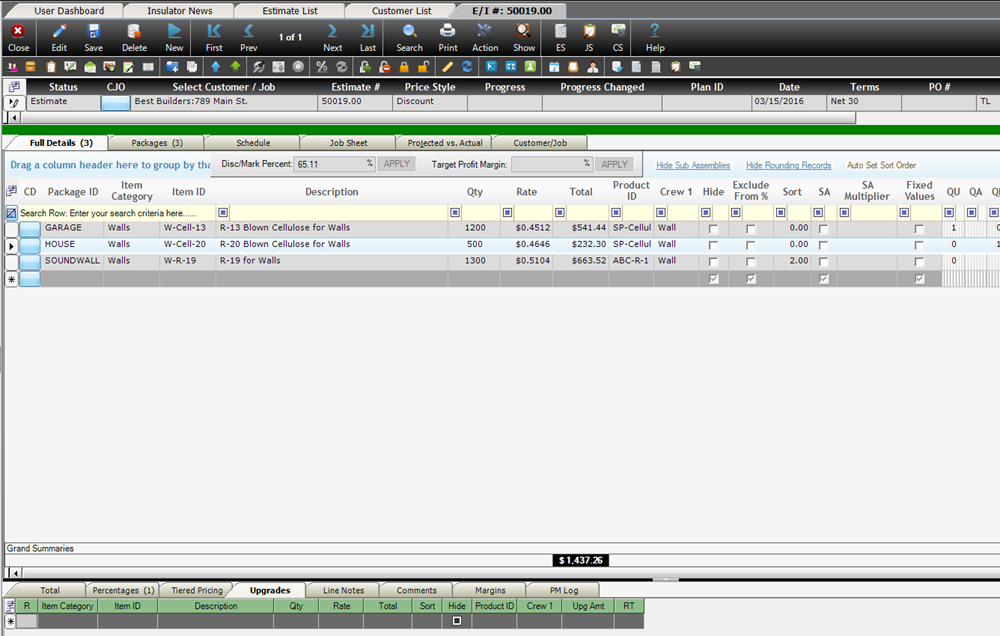
In the above scenario, a Line Item Upgrade is being added for the item with the Item ID of W-Cell-20. To add the upgrade, select the Item Category, Item ID in the same way that you would when creating a regular line item. When the Line Item Upgrade is chosen, you will notice that the appropriate Qty, Rate and Total will be displayed, as shown below:
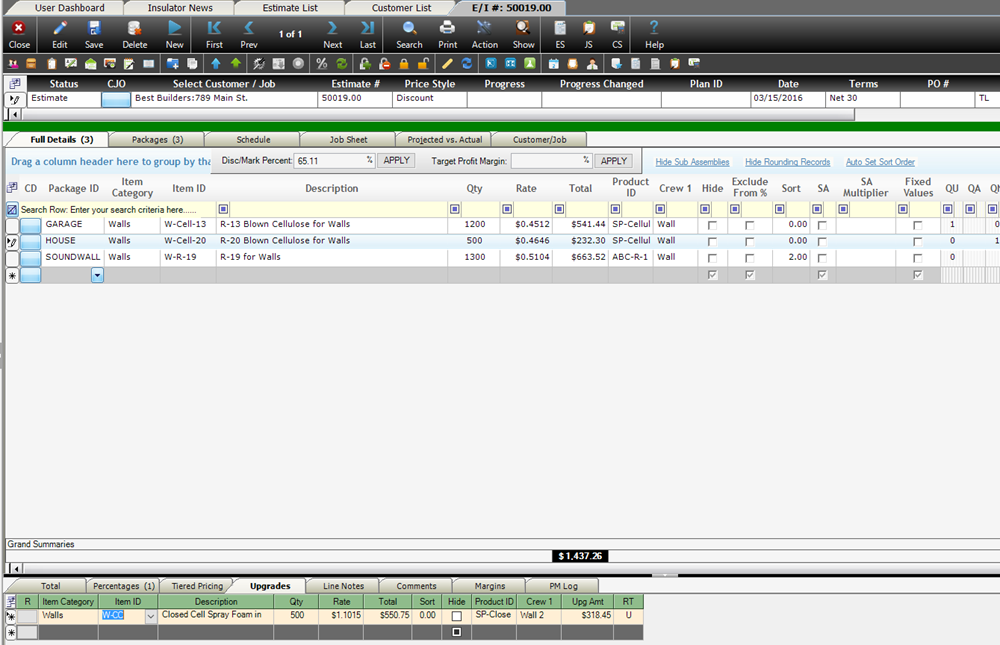
When the Line Item Upgrade is created, it can also be noticed that the Upg Amt column displays the appropriate amount of the upgrade. Once the Line Item Upgrade is created, it can be viewed on an Estimate, as shown below:
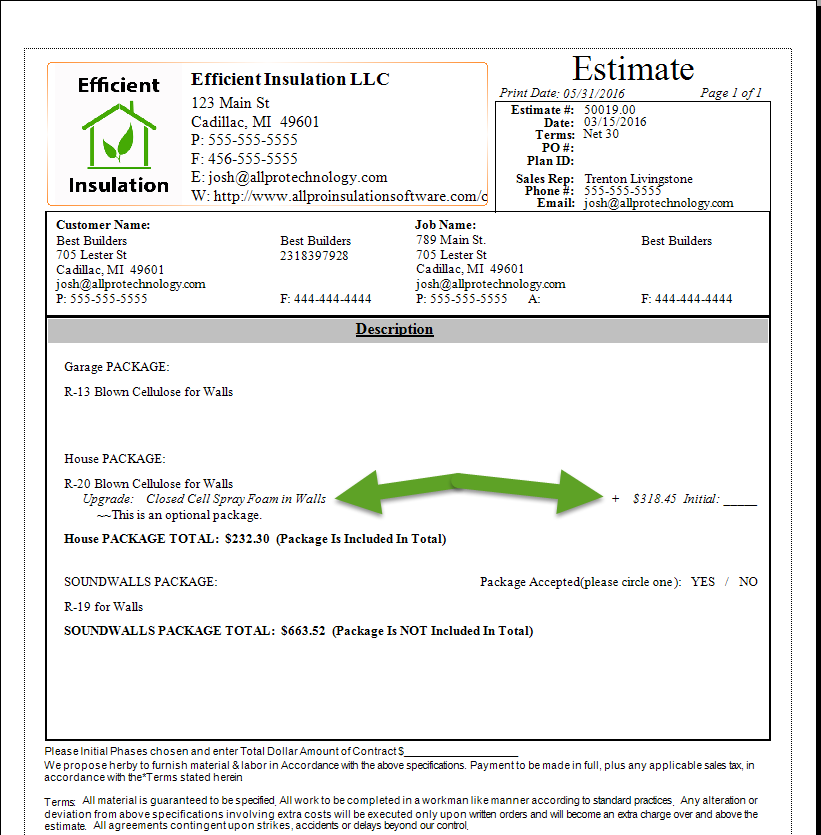
The Line Item Upgrades feature of Allpro Insulator functions with Sub-Assemblies, Discounts/Markups, Tiered Pricing and Profit Margin Percents. This means that as these additional features of Allpro Insulator are used, the Line Item Upgrades Rate, Total and Upg Amt will update as needed.
Since some users of Allpro Insulator would prefer to have the Line Item Upgrades be automatically inserted into the Estimate, the ability to have automatically inserted Line Item Upgrades exists and can be setup from the Item Details Form. For more information regarding the setting up of Automatic Line Item Upgrades, please click here.
Printing Estimates, Job Sheets, and Invoices
Click HERE for our Report Master help Page.
Advanced Job Costing and Payroll Splits
Click HERE to view Multi-Day Splits and Payroll Splits help page.