The Estimate Wizard
 Allpro Insulator v15
The Estimate Wizard simplifies and streamlines the creation of Estimates, Plan Templates, and Quick Insert Templates into a single workflow. It allows users to select existing Customer and Jobs, or enter new Customer and Job information. It also facilitates the use of existing Plan and Quick Insert Templates.
Regarding templates, Plan Templates are tied to a specific floor plan and customer, although the customer filter can be overridden to allow the Plan Template to be used with other customers. Plan Templates are ideal for track housing, where the floor plans and materials are consistent. Quick Insert Templates, on the other hand, are not tied to a particular customer or job, and are intended for more general use. For example, a Quick Insert Template might be created for a cellulose retrofit, where the materials used in the job are fairly consistent, even if the floor plan and quantities vary.
We’ll cover the process of using the Estimate Wizard to create Estimates, Plan Templates, and Quick Insert Templates, as well as how to apply a template to a new Estimate. Each process will be covered individually, simply scroll down to locate the relevant section of this help page, or select a link below.
| Creating an Estimate | Creating a Plan Template |
| Creating a Quick Insert Template | Applying Templates |
Creating an Estimate
Estimating is the backbone of Allpro Insulator, and creating new Estimates is quick and easy using the Estimate Wizard. Whether estimating for an existing customer or someone new, the Estimate Wizard walks users through the process.
Step 1 – Selecting Estimate
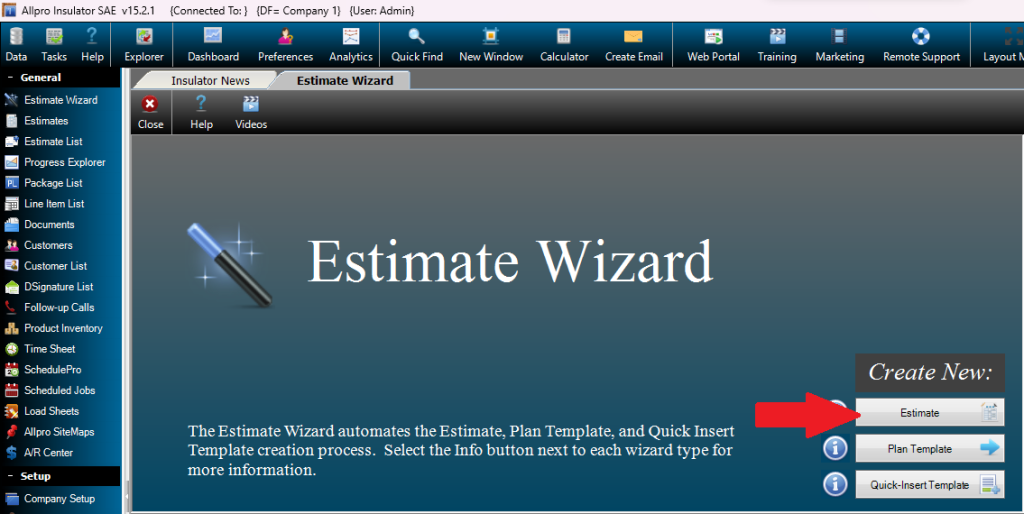
To start, users will need to open the Estimate Wizard from the top left of the Form Explorer.

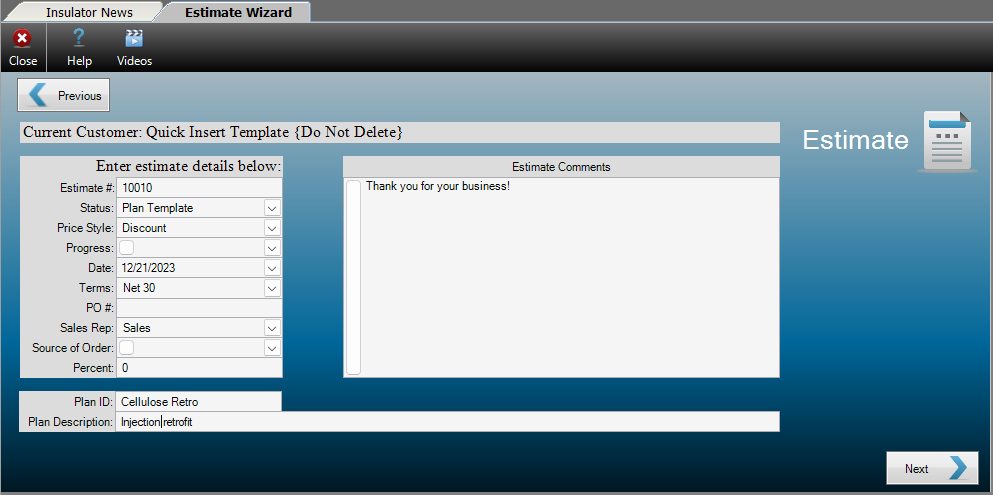
In the first step of the Estimate Wizard, users will select whether to create a new Estimate, Plan Template, or Quick Insert Template. Click the Estimate button to start the process and move on to the next step.
Step 2 – Customer Information
During this step, users will select or create the customer for whom the Estimate will be generated.
Existing Customers – If the customer has already been entered or imported (QBE only) into Allpro Insulator, select the customer’s name from the dropdown to the right of “Select Existing Customer” option. Typing the first part of the customer’s name will help filter down to the desired Customer entry. Click Next to move on to the next step once the Customer has been selected.

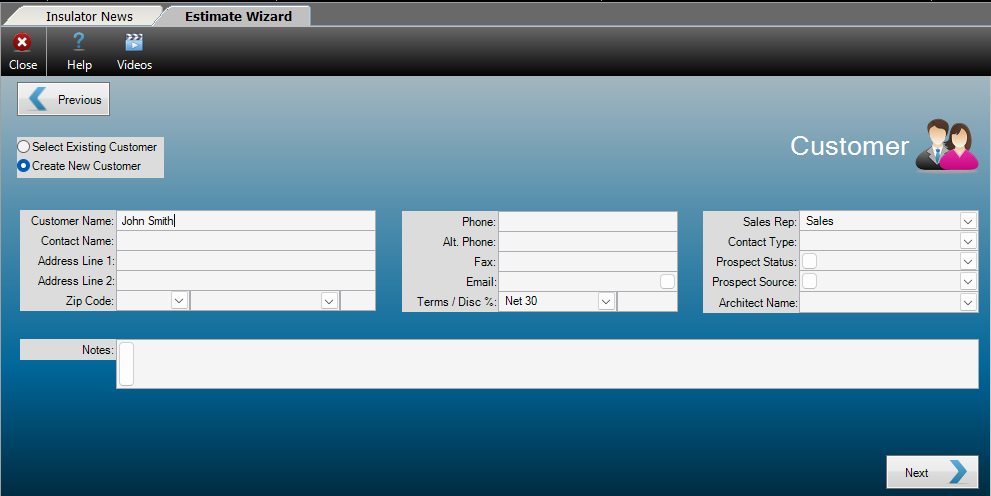
New Customers – If working with a new customer, select the Create New Customer option. Once selected, a grid will appear where the new customer’s contact details, sales terms, default sales rep, customer relationship management information, and any notes can be entered. Click Next when done entering customer information to move on to the next step.
- Carefully review the Customer name for accuracy when entering it in the Estimate Wizard. The Customer name is one of the few pieces of Customer information that cannot be easily changed, so it’s preferable to get it right the first time.
- Only the Customer Name is required during this step. The remaining customer information can be entered on the Customer form later if it is unavailable when creating the new Customer.
- Once entered in the Estimate Wizard, the Customer’s information will be saved in Allpro Insulator for future use and/or reference.
The Create New Customer Grid
The information below refers to the grid that appears when entering a new Customer in the Estimate Wizard. The description and function of each field in the grid is defined below.
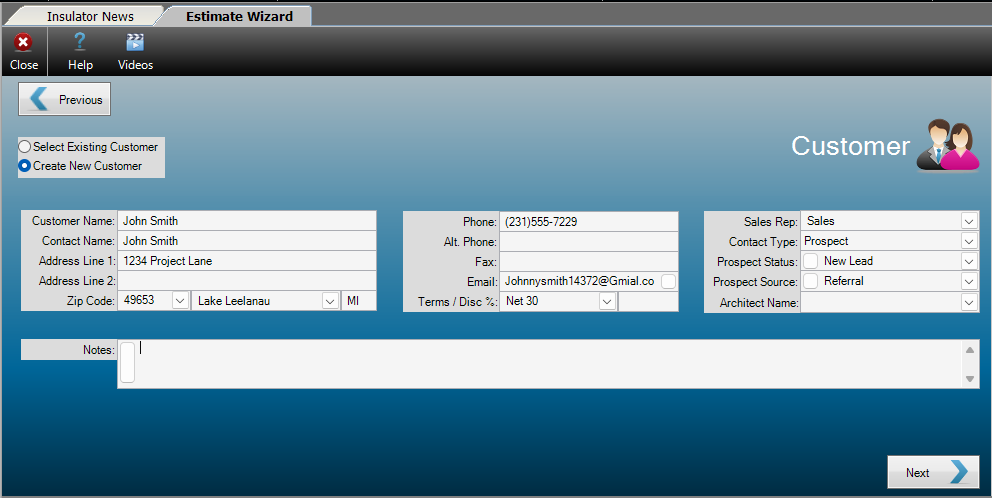
Customer Name – Allows the user to enter the customer’s name. This field is required.
Contact Name – Allows the user to enter the name of their point of contact with the customer.
Address Line 1/Line2 – Allows the user to enter the street address for the customer.
Zip Code – Allows the user to enter the Zip Code portion of the Customer’s address.
-
-
- Note that the city and state will populate automatically when the Zip Code is entered. For more help with Zip Codes, click here.
-
City/State – Displays the City and State associated with the Customer address. These fields populate automatically when the Zip Code is entered.
Phone – Allows the user to enter the main phone number associated with the customer.
Alt. Phone – Allows the user to enter a second phone number associated with the customer.
Fax – Allows the user to associate a fax number with the customer.
Email – Allows the user to enter a primary email address for the customer.
Terms/Disc % – Allows the user to set sales terms using a dropdown menu, and allows the user to specify a default Discount Percentage for the customer.
Sales Rep – Allows the user to select a default Sales Rep for the customer. For more help with Sales Reps, click here.
Contact Type – Allows the user to specify if the contact is a Customer, Prospect, or Former Prospect; a Customer Relationship Management (CRM) feature.
Prospect Status – A customizable field that can be used to track the status of the customer as a sales prospect; a Customer Relationship Management (CRM) feature.
Prospect Source – A customizable field that allows the user to specify how the prospective customer was acquired; a Customer Relationship Management (CRM) feature.
Notes – Allows the user to enter internal notes regarding the customer. These notes do not appear on paperwork intended for the customer and are for internal use.
Step 3 – Job Information
During this step the user will create or select a Job to associate with the Customer from Step 2.
Existing Job – If you selected an existing Customer, you may want to select an existing Job. To do so, select the dropdown to the right of “Select Existing Job” and locate the Job entry. You can also start typing the Job name in the field provided to filter down to the desired entry. Click Next to move on to the next step once the Job has been selected.
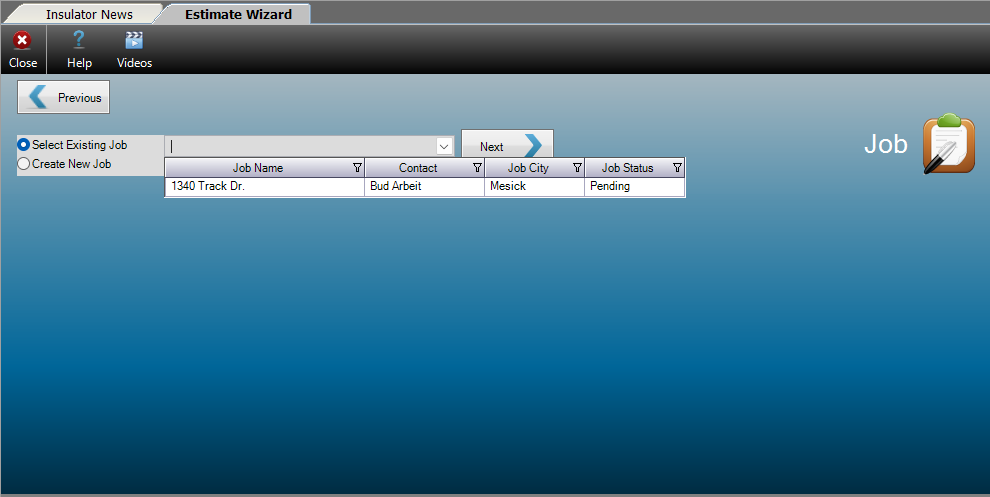
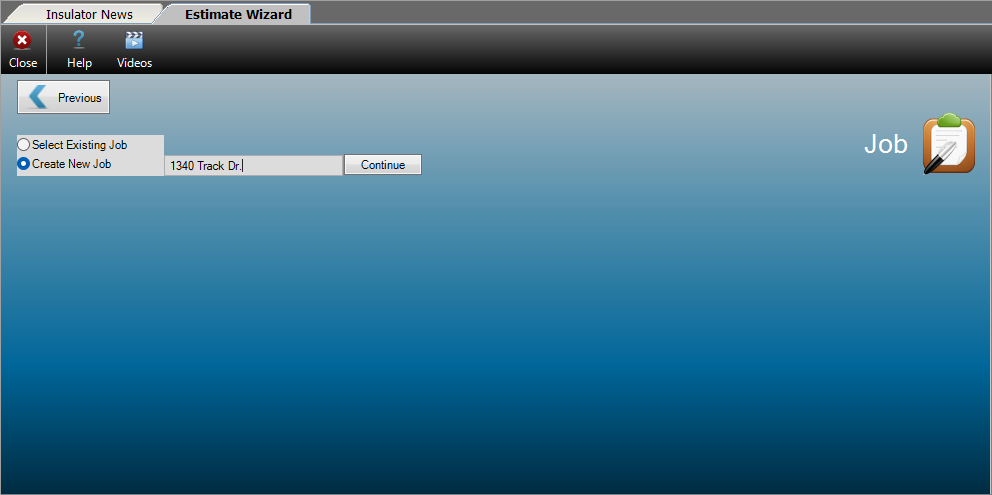
New Job – If you are working with a new Customer or want to create a new Job for an existing Customer, select “Create New Job” and type the Job name in the field to the right. Click Continue when done entering the Job name.
- Carefully review the Job name for accuracy when entering it in the Wizard. The Job name is one of the few pieces of Job information that cannot be easily changed, so it’s preferable to get it right the first time.
- Only the Job Name is required for this step, other Job information can be entered later if it is unavailable when creating the new Job.
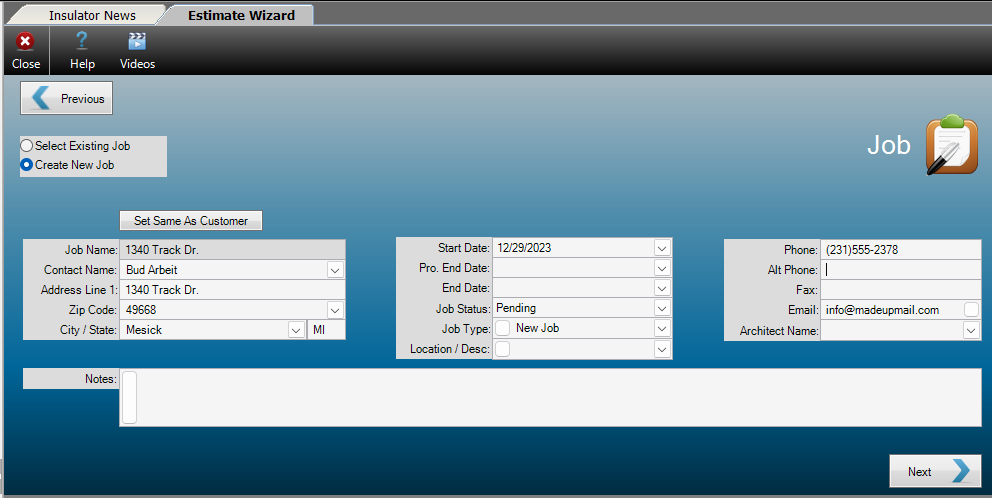
- If the Customer and Job information are the same, as in residential jobs, click the “Set Same As Customer” button near the top of the grid to automatically fill in the Job information.
The Create New Job Grid
After entering the new Job Name and clicking Continue, users will be provided with a grid to enter information about the Job. This includes the Job address, contact details, start and end dates, and other information.
The information below refers to the grid that appears when entering new Jobs in the Estimate Wizard. The description and function of each field in the grid is defined below.
Set Same as Customer – This button copies the contact information that was entered for the Customer and inserts it into the Job Information grid.
Job Name – Displays the Job Name entered by the user.
Contact Name – Allows the user to enter the name of the primary contact for the Job.
Address Line 1 – Allows the user to enter the street address of the job site.
Zip Code – Allows the user to enter the Zip Code portion of the job site address.
-
-
- Note that the city and state will populate automatically when the Zip Code is entered. For more help with Zip Codes, click here.
-
City/State – Displays the City and State associated with the Job address. These fields populate automatically when the Zip Code is entered.
Start Date – Allows the user to specify a start date for the Job.
-
-
- Note that the start date on Job Sheets and other paperwork is pulled from appointments in SchedulePro, Allpro Insulator’s internal calendar.
-
Pro. End Date – Allows the user to specify a projected end date for the Job.
End Date – Allows the user to specify the date on which the Job ends.
-
-
- Note that the End date on Job Sheets and other paperwork is pulled from appointments in SchedulePro, Allpro Insulator’s internal calendar.
-
Job Status – Allows the user to select the current status of the Job: Pending, Awarded, In Progress, Closed or Not Awarded. The default Job Status is Pending.
-
-
- Job Status values can impact other functions related to the Job, particularly if the status is set to Closed.
-
Job Type – This customizable dropdown menu allows the user to specify the type of job the estimate will be for. If subscribed to the Advanced Features Module (AFM), this value can be used in Tiered Pricing. For more information on AFM, click here.
Location/Desc. – This customizable dropdown menu allows the user to specify a location or description for the job. If subscribed to the Advanced Features Module (AFM), this value can be used in Tiered Pricing. For more information on AFM, click here.
Phone – Allows the user to enter a contact number for the Job.
Alt. Phone – Allows the user to enter a second phone number associated with the Job.
Fax – Allows the user to associate a fax number with the Job.
Email – Allows the user to enter a primary email address for the Job.
Architect Name – Allows the user to select an architect to associate with the Job.
-
-
- The list of Architects is managed on the Architects form. For help with the Architects form, click here.
-
Notes – Allows the user to enter internal notes regarding the Job. These notes do not appear on paperwork intended for the customer or job, and are for internal use.
Step 4 – Estimate Information
With the customer and job information taken care of, this step provides the user with an opportunity to review the information and settings pertaining to the Estimate they are about to create. Use the previous button to go back and make any needed changes, then click Next to move on to step 5.
- Step 4 is also where Plan or Quick Insert Templates can be applied to the Estimate if a template is to be used. The processes are described separately here.
- All information the user has already entered will be retained, even if it’s necessary to use the Previous button to go back.
- Please note, the term “Estimate” in Allpro Insulator sometimes broadly refers to records that are managed on the Estimate form. It may mean template, estimate, or invoice, depending on the context.
The Estimate Information Grid
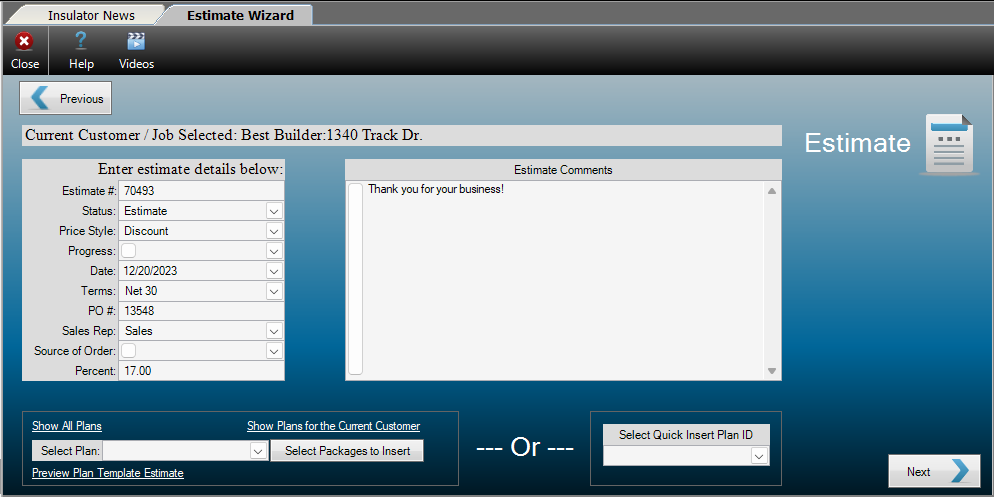
The Estimate Information grid displays general information about the Estimate. The description and function of each field in Estimate Information grid is described below.
Estimate # – Displays the number that will be assigned to the Estimate.
Status – Displays the status of the Estimate: Estimate, Invoice, Review or Plan Template.
Price Style – Displays the price style of the Estimate: Discount or Markup.
-
-
- Discount Price Style – Starting prices are set in Item Details and users can choose to discount them by a percentage value.
- Markup Price Style – Starting prices are set at the total cost and can then marked up by a percentage value.
-
Progress – A customizable field that allows users to specify the current stage of progress for the Estimate.
Date – Displays the estimate date, based on the date on which it was created. Users can manually adjust the date if needed.
Terms – Displays the sales terms for the Estimate.
-
-
- For Allpro Insulator Stand Alone and QuickBooks Online Edition users, sales terms are managed in Company Setup. For help with Company Setup, click here.
- For Allpro Insulator QuickBooks Desktop Edition users, sales terms are managed in QuickBooks and imported into Allpro Insulator. For help with importing terms from QuickBooks, click here.
-
PO # – Allows the user to enter a purchase order number for the Estimate, if applicable.
Sales Rep – Allows the user to select which Sales Rep is assigned to the Estimate.
-
-
- Sales Reps are created and managed on the Sales Reps form. For more help with Sales Reps, click here.
-
Source of Order – A customizable field that allows the user to specify how the order was acquired. Default values are Cold Call, Mailer, Referral, or Repeat Customer.
Percent – Allows the user to specify a discount or markup percentage for use with the selected Price Style.
Estimate Comments – Displays and allows the user to modify the estimate comments that will appear just above the signature line on produced (e.g. printed, emailed, or exported) Estimates.
-
-
- Estimate Comments are often used to specify terms and conditions and the default Comments can be modified in Company Setup. For help with Estimate comments, click here.
-
Show All Plans – Removes customer based filters for Plan Templates. By default, Plan Templates are filtered by Customer.
Show Plans for the Current Customer – Applies customer based filters to Plan and Quick Insert Templates. By default, Plan Templates are filtered by Customer.
Select Plan – Allows the user to select a Plan Template to apply to the current Estimate.
Preview Plan Template Estimate – Allows the user to view a preview of an Estimate with the selected Plan Template applied.
Select Quick Insert Plan ID – Allows the user to select a Quick Insert Template to apply to the current Estimate.
Step 5 – Packages
In this step of Estimate Wizard, users will create and configure Packages. Each Package represents a separate portion of the Estimate. Users can break the estimate into as many Packages as desired, but at least one Package is required. Line Items cannot be added to an Estimate without first selecting a Package.
Packages allow line items to be grouped together on the Estimate, and are often based on the physical location of the work to be performed. When the work is complete, Estimates can be broken into multiple separate invoices based on Package.
Users will also manage settings for how each Package will be displayed on the Estimate and which paperwork and processes they will be included in. These settings are all configured using a series of checkboxes, which will be covered in more detail below.
The Packages Grid

The Packages grid is used to create and manage Packages. The description and function of each field in the Packages grid can be found below.
Package Name – This customizable field allows the user to enter or select the name of the Package.
Package ID – Allows the user to specify an ID for the Package, often shorter than the Package Name. This value can help speed up Package selection when adding line items to Estimates.
-
-
- Experienced users often assign numbers (1, 2, 3, etc.) to the Package ID to simplify Package selection even further.
-
Comments – Allows the user to enter optional notes regarding the Package. These notes do not appear on produced (e.g. printed, exported, or emailed) Estimates.
Package Presets – Allows the user to select from preconfigured options for the Package. Each of the options will be explained in greater detail further down the help page.

Standard – Checks Include in Total and DOE (Display on Estimate).
Optional – Checks Display Price, DOE (Display on Estimate), and DAO (Display as Option).
Accepted – Checks Include in Total, DOE (Display on Estimate), DOJ (Display on Job Sheet), and DOC (Display on Cost Sheet).
Check All – Checks Display Price, Include in Total, DOE (Display on Estimate), DOJ (Display on Job Sheet), DOC (Display on Cost Sheet), and DAO (Display as Option).
Display Price – Determines whether each Package will display a subtotal for the line items that are part of the Package.
Include in Total – Determines whether the charges included in the Package will be added to the Total Charges on the Estimate. This box should be checked unless the Package is optional.
DOE (Display on Estimate) – Determines whether the Package will appear on the Estimate. Generally, this box should be checked.
DOJ (Display on Job Sheet) – Determines whether line items in the Package will be included on the material list for the Job. Material lists are referred to as Job Sheets in Allpro Insulator.
DOC (Display on Cost Sheet) – Determines whether the line items in the Package will be included in Job Costing function and reports.
DAO (Display as Option) – Determines whether the Package will be displayed as optional on the Estimate.
-
-
- Optional Packages should have Display Price checked, but should not be configured to appear on Job or Cost Sheets unless they have been accepted by the customer.
-
Sort – Allows the user to specify the order that the Packages should appear in on the Estimate, from the lowest to the highest Sort value.
-
-
- As Packages are added, they will automatically be assigned a sort order based on the order in which they were created.
-
Status – A customizable field that allows the user to specify a status for the Package. By default, users may choose from Awarded, Closed, In Progress, Not Awarded, and Pending.
-
-
- Job Status values can impact other functions related to the Job, particularly if the status is set to Closed.
-
When done configuring Packages, click next to move on to the last step.
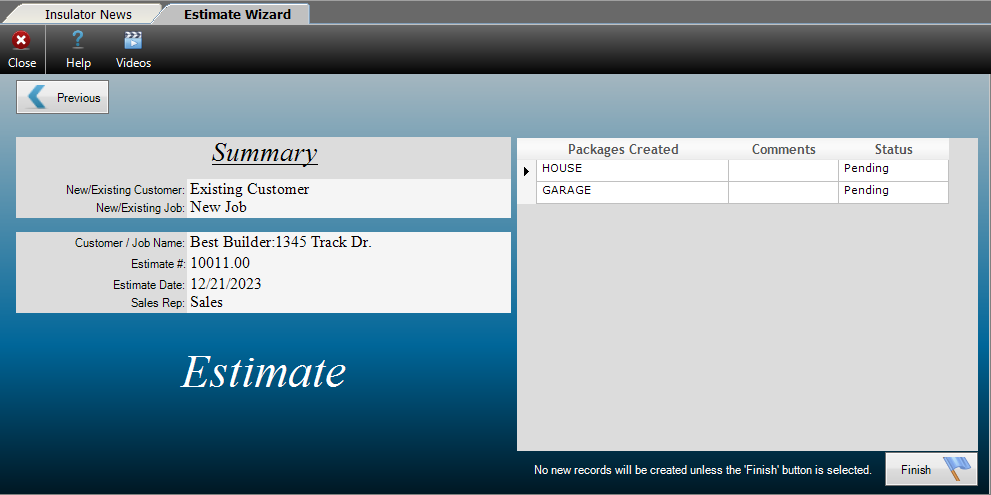
Step 6 – Summary
During the last step, the user will be presented with a summary of information regarding the new Estimate. If any corrections are required, use the Previous button to go back and make the desired changes. All existing entries will be retained when using the Previous button, eliminating the need to reenter information.
The Summary Grid

The description and function of each field in Estimate Information grid is described below.
New/Existing Customer – Displays whether the customer is a New Customer or an Existing Customer.
New/Existing Job – Displays whether the job is a New Job or an Existing Job.
Customer/Job Name – Displays the Customer and Job names separated by a colon.
Estimate # – Displays the number assigned to the Estimate.
Estimate Date – Displays the date the Estimate was created.
Sales Rep – Displays the Sales Rep for the current Estimate.
Packages Created – Displays the name of Packages that will be part of the Estimate.
Comments – Displays any comments entered for the Package.
Status – Displays the Status assigned to the Package.
When done making any necessary changes, or if no changes are needed, click Finish to complete the Estimate Wizard and open the newly generated Estimate.
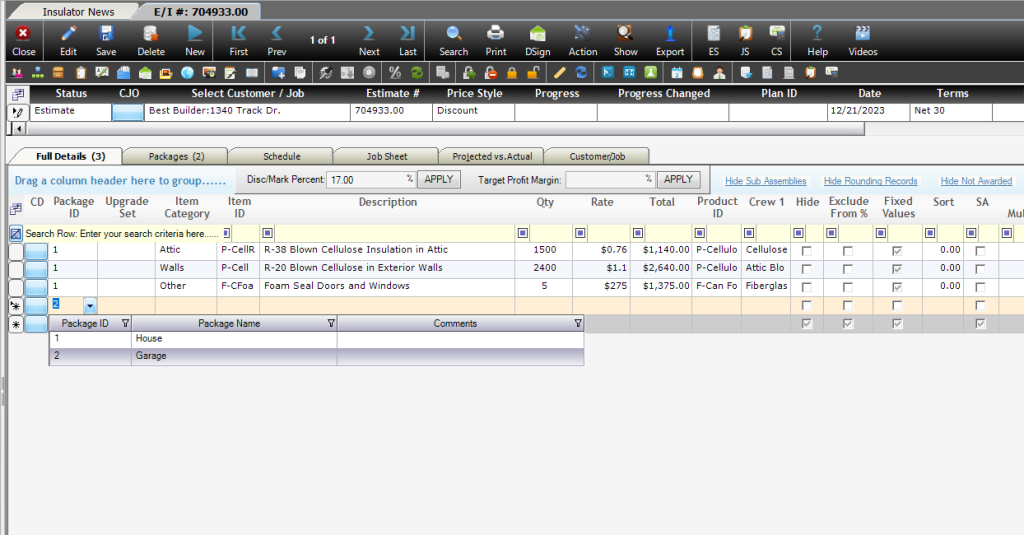
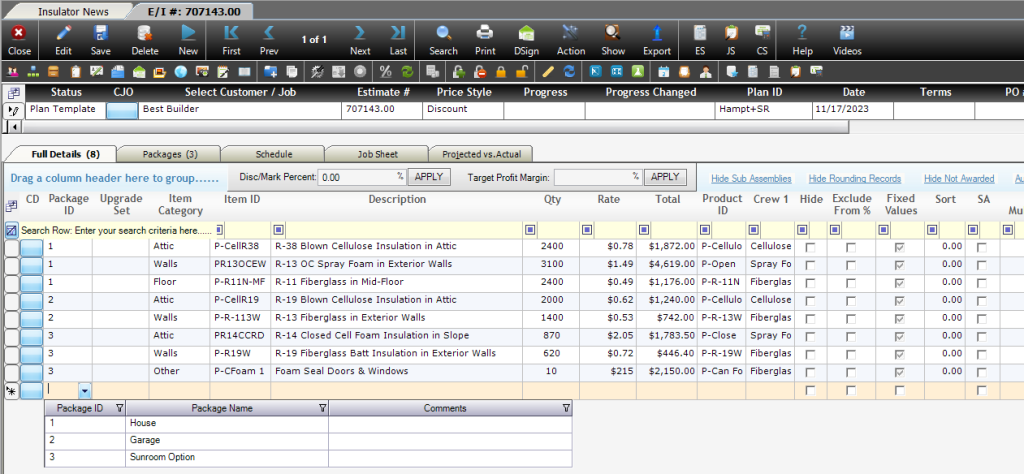
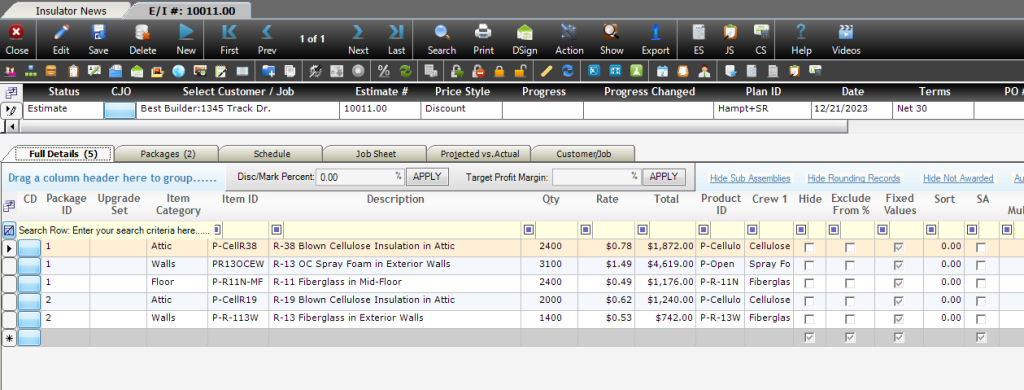
Step 7 – The Estimate Form
The last step in creating an Estimate is performed on the Estimate form. Packages and line items will be entered as normal: users will create line items by first selecting a Package, then selecting the Item Details entry for the desired material/work location and entering the square footage. Users can also add or modify Packages and most other settings directly from the Estimate form. For more help with the Estimate form, click here.

Creating a Plan Template
Plan Templates take the work out of estimating for similar or identical floor plans or Jobs, such as in track housing. Enter customer information, configure Packages, create line items, and enter square footage just once, then simply apply the Plan Template as needed. Allow for floor plan options by breaking each into its own Package, then select only the Packages needed for the current floor plan when applying the Plan Template. If there are changes to the materials or floor plans, simply update the template instead of starting from scratch.
Plan Templates are tied to a specific customer, although this limitation can be overridden to allow the Plan Template to be used with different customers. Quick Insert Templates, on the other hand, are not tied to a particular customer or a job, and are intended for more general use. For example, a Quick Insert Template might be created for a cellulose retrofit, where the materials used in the job are fairly consistent, even if the square footage and exact materials vary somewhat.
In addition to creating new Plan Templates, the Estimate Wizard is also used to apply existing ones. We’ll cover the process of applying a Plan Template separately, here.
- Plan Templates include Customer information, but do not include Job information. This is because they are not tied to particular Job, and the Job information will be entered when the Plan Template is applied to an Estimate.
Step 1 – Selecting Plan Template
To start, users will need to open the Estimate Wizard from the top left of the Form Explorer.
In the first step of the Estimate Wizard, users will select whether to create a new Estimate, Plan Template, or Quick Insert Template. Click the Plan Template button to start the process and move on to the next step.

Step 2 – Customer Information
During this step, users will select or create the customer for whom the Estimate will be generated.
Existing Customers – If the customer has already been entered or imported into Allpro Insulator, select the customer’s name from the dropdown to the right of “Select Existing Customer” option. Typing the first part of the customer’s name will help filter down to the desired Customer entry. Click Next to move on to the next step once the customer has been selected.
New Customers – If working with a new customer, select the Create New Customer option. Once selected, a grid will appear where the new customer’s contact details, sales terms, default sales rep, customer relationship management information, and any notes can be entered. Click Next when done entering customer information to move on to the next step.
- Carefully review the Customer name for accuracy when entering it in the Estimate Wizard. The Customer name is one of the few pieces of Customer information that cannot be easily changed, so it’s preferable to get it right the first time.
- Only the Customer Name is required during this step. The remaining customer information can be entered on the Customer form later if it is unavailable when creating the new Customer.
- Once entered in the Estimate Wizard, the Customer’s information will be saved in Allpro Insulator for future use and/or reference.
The Create New Customer Grid
The information below refers to the grid that appears when entering a new Customer in the Estimate Wizard. The description and function of each field in the grid is defined below.
Customer Name – Allows the user to enter the customer’s name. This field is required.
Contact Name – Allows the user to enter the name of their point of contact with the customer.
Address Line 1/Line2 – Allows the user to enter the street address for the customer.
Zip Code – Allows the user to enter the Zip Code portion of the Customer’s address.
-
-
- Note that the city and state will populate automatically when the Zip Code is entered. For more help with Zip Codes, click here.
-
City/State – Displays the City and State associated with the Customer address. These fields populate automatically when the Zip Code is entered.
Phone – Allows the user to enter the main phone number associated with the customer.
Alt. Phone – Allows the user to enter a second phone number associated with the customer.
Fax – Allows the user to associate a fax number with the customer.
Email – Allows the user to enter a primary email address for the customer.
Terms/Disc % – Allows the user to set sales terms using a dropdown menu, and allows the user to specify a default Discount Percentage for the customer.
Sales Rep – Allows the user to select a default Sales Rep for the customer. For more help with Sales Reps, click here.
Contact Type – Allows the user to specify if the contact is a Customer, Prospect, or Former Prospect; a Customer Relationship Management (CRM) feature.
Prospect Status – A customizable field that can be used to track the status of the customer as a sales prospect; a Customer Relationship Management (CRM) feature.
Prospect Source – A customizable field that allows the user to specify how the prospective customer was acquired; a Customer Relationship Management (CRM) feature.
Notes – Allows the user to enter internal notes regarding the customer. These notes do not appear on paperwork intended for the customer and are for internal use.
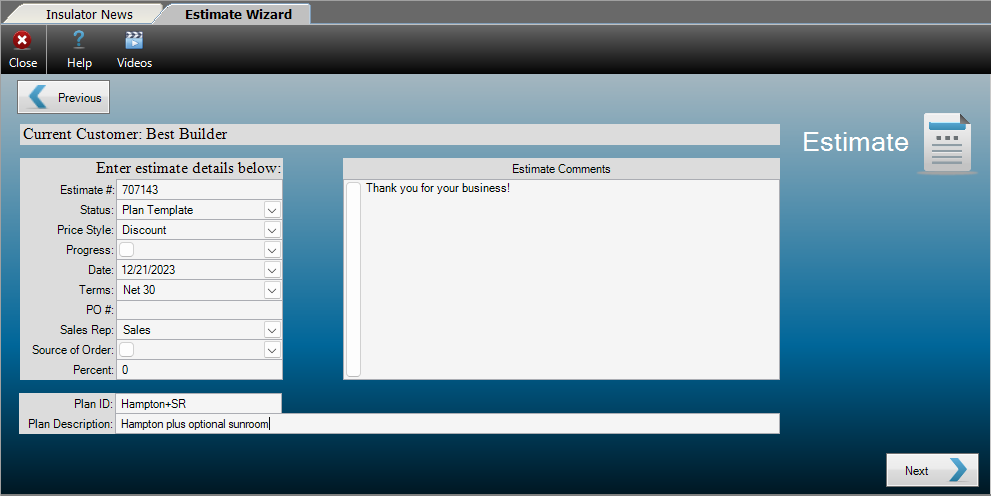
Step 3 – Estimate Information
With the customer information taken care of, this step provides the user with an opportunity to review the information and settings pertaining to the Plan Template. Use the previous button to go back and make any needed changes, then click Next to move on to the next step.
- Plan Templates do not include Job information, as they don’t have a Job associated with them. Job information will be entered when applying the template.
- All information the user has already entered will be retained, even if it’s necessary to use the Previous button to go back and make changes.
- Please note, the term Estimate in Allpro Insulator sometimes broadly refers to records that are managed on the Estimate form, and may mean template, estimate or invoice, depending on the context.
The Estimate Information Grid
The description and function of each field in Estimate Information grid can be found below.
Estimate # – Displays the number that will be assigned to the Estimate.
Status – Displays the status of the Estimate: Estimate, Invoice, Review or Plan Template.
Price Style – Displays the price style of the Estimate: Discount or Markup.
-
-
- Discount Price Style – Starting prices are set in Item Details and users can choose to discount them by a percentage value.
- Markup Price Style – Starting prices are set at the total cost and can then marked up by a percentage value.
-
Progress – A customizable field that allows users to specify the current stage of progress for the Estimate.
Date – Displays the estimate date, based on the date on which it was created. Users can manually adjust the date if needed.
Terms – Displays the sales terms for the Estimate.
-
-
- For Allpro Insulator Stand Alone and QuickBooks Online Edition users, sales terms are managed in Company Setup. For help with Company Setup, click here.
- For Allpro Insulator QuickBooks Desktop Edition users, sales terms are managed in QuickBooks and imported into Allpro Insulator. For help with importing terms from QuickBooks, click here.
-
PO # – Allows the user to enter a purchase order number for the Estimate, if applicable.
Sales Rep – Allows the user to select which Sales Rep is assigned to the Estimate.
-
-
- Sales Reps are created and managed on the Sales Reps form. For more help with Sales Reps, click here.
-
Source of Order – A customizable field that allows the user to specify how the order was acquired. Default values are Cold Call, Mailer, Referral, or Repeat Customer.
Percent – Allows the user to specify a discount or markup percentage for use with the selected Price Style.
Plan ID – This mandatory field allows the user to assign a name for the template. This information can be found near the top of the Estimate form when working with or applying a Plan Template.
Plan Description – Allows the user to enter a description for the current Plan Template. This information can be found on the Job Sheet tab of the Estimate form as well.
Estimate Comments – Displays and allows the user to modify the estimate comments that will appear just above the signature line on produced (e.g. printed, emailed, or exported) Estimates.
-
-
- Estimate Comments are often used to specify terms and conditions. The default Comments can be managed in Company Setup. For help with Estimate comments, click here.
-
Step 4 – Packages
In this step of Estimate Wizard, users will create and configure Packages. Each Package represents a separate portion of the Plan Template. Users can break the template into as many Packages as desired, but at least one Package is required. Line Items cannot be added to an Estimate without first selecting a Package.
Packages allow line items to be grouped together on the Estimate, and are often based on the physical location of the work to be performed. In the case of templates, Packages can also be used to accommodate floor plan options. Simply create a Package for each floor plan option, then select only the relevant options when applying the template. When the work is complete, Estimates can also be broken into multiple invoices based on Package.
Users will manage settings for how the Package will be displayed on the Estimate and which paperwork and processes each Package will be included in. These settings are configured using a series of checkboxes, which will be covered in more detail below.
The Packages Grid
The Packages grid is used to create and manage Packages. The description and function of each field in the Packages grid can be found below.
Package Name – This customizable field allows the user to enter or select the name of the Package.
Package ID – Allows the user to specify an ID for the Package, often shorter than the Package Name. This value can help speed up Package selection when adding line items to Estimates.
-
-
- Experienced users often assign numbers (1, 2, 3, etc.) to the Package ID to simplify Package selection even further.
-
Comments – Allows the user to enter optional notes regarding the Package. These notes do not appear on produced (e.g. printed, exported, or emailed) Estimates.
Package Presets – Allows the user to select from preconfigured options for the Package. Each of the options will be explained in greater detail further down the help page.
Standard – Checks Include in Total and DOE (Display on Estimate).
Optional – Checks Display Price, DOE (Display on Estimate), and DAO (Display as Option).
Accepted – Checks Include in Total, DOE (Display on Estimate), DOJ (Display on Job Sheet), and DOC (Display on Cost Sheet).
Check All – Checks Display Price, Include in Total, DOE (Display on Estimate), DOJ (Display on Job Sheet), DOC (Display on Cost Sheet), and DAO (Display as Option).
Display Price – Determines whether each Package will display a subtotal for the line items that are part of the Package.
Include in Total – Determines whether the charges included in the Package will be added to the Total Charges on the Estimate. This box should be checked unless the Package is optional.
DOE (Display on Estimate) – Determines whether the Package will appear on the Estimate. Generally, this box should be checked.
DOJ (Display on Job Sheet) – Determines whether line items in the Package will be included on the material list for the Job. Material lists are referred to as Job Sheets in Allpro Insulator.
DOC (Display on Cost Sheet) – Determines whether the line items in the Package will be included in Job Costing function and reports.
DAO (Display as Option) – Determines whether the Package will be displayed as optional on the Estimate.
-
-
- Optional Packages should have Display Price checked, but should not be configured to appear on Job or Cost Sheets unless they have been accepted by the customer.
-
Sort – Allows the user to specify the order that the Packages should appear in on the Estimate, from the lowest to the highest Sort value.
-
-
- As Packages are added, they will automatically be assigned a sort order based on the order in which they were created.
-
Status – A customizable field that allows the user to specify a status for the Package. By default, users may choose from Awarded, Closed, In Progress, Not Awarded, and Pending.
-
-
- Job Status values can impact other functions related to the Job, particularly if the status is set to Closed.
-
When done configuring Packages, click next to move on to the next step.
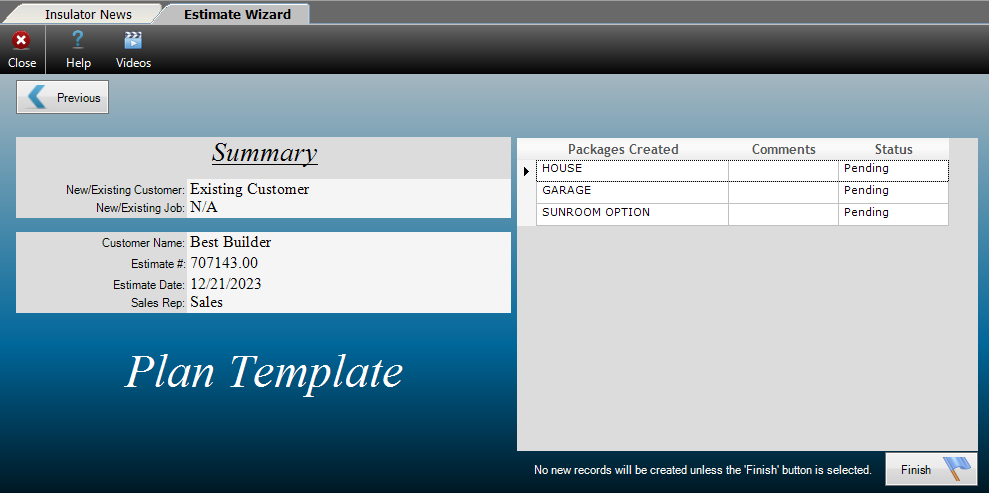
Step 5 – Summary
During this step, the user will be presented with a summary of information regarding the new Plan Template. If any corrections are required, use the Previous button to go back and make the desired changes. All existing entries will be retained when using the Previous button, eliminating the need to reenter information.
The Summary Grid
The description and function of each field in Estimate Information grid is described below.
New/Existing Customer – Displays whether the Customer is a New Customer or an Existing Customer.
New/Existing Job – Displays whether the Job is a New Job or an Existing Job.
Customer/Job Name – Displays the Customer and Job names separated by a colon.
Estimate # – Displays the number assigned to the Estimate.
Estimate Date – Displays the date the Estimate was created.
Sales Rep – Displays the Sales Rep for the current Estimate.
Packages Created – Displays the name of Packages that will be part of the Estimate.
Comments – Displays any comments entered for the Package.
Status – Displays the Status assigned to the Package.
When done making any necessary changes, or if no changes are needed, click Finish to complete the Estimate Wizard and open the newly generated Plan Template.
Step 6 – The Estimate Form
The last step in creating a Plan Template is performed on the Estimate form. Packages and line items will be entered in the same way as a normal Estimate: users will create line items by first selecting a Package, then selecting the Item Details entry for the desired material/work location and entering the square footage. For more help with the Estimate form, click here.

Once the Plan Template is complete, it can be used as many times as needed. If changes to the floor plan, materials, or pricing are needed, the Plan Template can be edited and updated just like an Estimate. For help with applying a Plan Template, click here.
Creating a Quick Insert Template

Quick Insert Templates allow users to create generalized templates for various job types For example, a Quick Insert Template might be created for a cellulose retrofit, where the materials used in the job are fairly consistent, even if the square footage and necessary materials vary somewhat. Accordingly, Quick Insert Templates are not tied to a particular Customer or Job. Customer and Job information will be entered when the template is applied.
In addition to creating new Quick Insert Templates, the Estimate Wizard is also used to apply existing ones. We’ll cover the process of applying a Quick Insert Template separately, here.
Step 1 – Selecting Plan Template
To start, users will need to open the Estimate Wizard from the top left of the Form Explorer.
In the first step of the Estimate Wizard, users will select whether to create a new Estimate, Plan Template, or Quick Insert Template. Click the Quick Insert Template button to start the process and move on to the next step.

Step 2 – Estimate Information
This step provides the user with an opportunity to review the information and settings pertaining to the Quick Insert Template they are about to create. Note that the steps to enter Customer and Job information were skipped because this information is not relevant for Quick Insert Templates.
- Please note, the term Estimate in Allpro Insulator sometimes broadly refers to records that are managed on the Estimate form, and may mean template, estimate, or invoice, depending on the context.
The Estimate Information Grid
The description and function of each field in Estimate Information grid can be found below.
Estimate # – Displays the number that will be assigned to the Quick Insert Template.
Status – Displays the status of the Estimate: Estimate, Invoice, Review or Plan Template.
Price Style – Displays the price style of the Estimate: Discount or Markup.
-
-
- Discount Price Style – Starting prices are set in Item Details and users can choose to discount them by a percentage value.
- Markup Price Style – Starting prices are set at the total cost and can then be marked up by a percentage value.
-
Progress – A customizable field that allows users to specify the current stage of progress for the Quick Insert Template.
Date – Displays the estimate date, based on the date on which it was created. Users can manually adjust the date if needed.
Terms – Displays the sales terms for the Quick Insert Template.
-
-
- For Allpro Insulator Stand Alone and QuickBooks Online Edition users, sales terms are managed in Company Setup. For help with Company Setup, click here.
- For Allpro Insulator QuickBooks Desktop Edition users, sales terms are managed in QuickBooks and imported into Allpro Insulator. For help with importing terms from QuickBooks, click here.
-
PO # – Allows the user to enter a purchase order number for the Quick Insert Template, if applicable.
Sales Rep – Allows the user to select which Sales Rep is assigned to the Quick Insert Template.
-
-
- Sales Reps are created and managed on the Sales Reps form. For more help with Sales Reps, click here.
-
Source of Order – A customizable field that allows the user to specify how the order was acquired. Default values are Cold Call, Mailer, Referral, or Repeat Customer.
Percent – Allows the user to specify a discount or markup percentage for use with the selected Price Style.
Plan ID – This mandatory field allows the user to assign a name for the template. This information can be found near the top of the Estimate form when working with or applying a Quick Insert Template.
Plan Description – Allows the user to enter a description for the current Quick Insert Template. This information can be found on the Job Sheet tab of the Estimate form as well.
Estimate Comments – Displays and allows the user to modify the Estimate Comments that will appear just above the signature line on produced (e.g. printed, emailed, or exported) Estimates.
-
-
- Estimate Comments are often used to specify terms and conditions. The default Comments can be managed in Company Setup. For help with Estimate comments, click here.
-
Step 3 – Packages
In this step of Estimate Wizard, users will create and configure Packages. Each Package represents a separate portion of the Quick Insert Template. Users can break the template into as many Packages as desired, but at least one Package is required. Line Items cannot be added to an Estimate without first selecting a Package.
Packages allow line items to be grouped together on the Estimate, and are often based on the physical location of the work to be performed. When the work is complete, Estimates can also be broken into multiple invoices based on Package.
Users will manage settings for how the Package will be displayed on the Estimate and which paperwork and processes each Package will be included in. These settings are configured using a series of checkboxes, which will be covered in more detail below.
The Packages Grid
The Packages grid is used to create and manage Packages. The description and function of each field in the Packages grid can be found below.
Package Name – This customizable field allows the user to enter or select the name of the Package.
Package ID – Allows the user to specify an ID for the Package, often shorter than the Package Name. This value can help speed up Package selection when adding line items to Estimates.
-
-
- Experienced users often assign numbers (1, 2, 3, etc.) to the Package ID to simplify Package selection even further.
-
Comments – Allows the user to enter optional notes regarding the Package. These notes do not appear on produced (e.g. printed, exported, or emailed) Estimates.
Package Presets – Allows the user to select from preconfigured options for the Package. Each of the options will be explained in greater detail further down the help page.
Standard – Checks Include in Total and DOE (Display on Estimate).
Optional – Checks Display Price, DOE (Display on Estimate), and DAO (Display as Option).
Accepted – Checks Include in Total, DOE (Display on Estimate), DOJ (Display on Job Sheet), and DOC (Display on Cost Sheet).
Check All – Checks Display Price, Include in Total, DOE (Display on Estimate), DOJ (Display on Job Sheet), DOC (Display on Cost Sheet), and DAO (Display as Option).
Display Price – Determines whether each Package will display a subtotal for the line items that are part of the Package.
Include in Total – Determines whether the charges included in the Package will be added to the Total Charges on the Estimate. This box should be checked unless the Package is optional.
DOE (Display on Estimate) – Determines whether the Package will appear on the Estimate. Generally, this box should be checked.
DOJ (Display on Job Sheet) – Determines whether line items in the Package will be included on the material list for the Job. Material lists are referred to as Job Sheets in Allpro Insulator.
DOC (Display on Cost Sheet) – Determines whether the line items in the Package will be included in Job Costing function and reports.
DAO (Display as Option) – Determines whether the Package will be displayed as optional on the Estimate.
-
-
- Optional Packages should have Display Price checked, but should not be configured to appear on Job or Cost Sheets unless they have been accepted by the customer.
-
Sort – Allows the user to specify the order that the Packages should appear in on the Estimate, from the lowest to the highest Sort value.
-
-
- As Packages are added, they will automatically be assigned a sort order based on the order in which they were created.
-
Status – A customizable field that allows the user to specify a status for the Package. By default, users may choose from Awarded, Closed, In Progress, Not Awarded, and Pending.
-
-
- Job Status values can impact other functions related to the Job, particularly if the status is set to Closed.
-
When done configuring Packages, click Next to move on to the next step.
Step 4 – Summary
During this step, the user will be presented with a summary of information regarding the new Quick Insert Template. If any corrections are required, use the Previous button to go back and make the desired changes. All existing entries will be retained when using the Previous button, eliminating the need to reenter information.
The Summary Grid

The description and function of each field in Estimate Information grid is described below.
New/Existing Customer – Displays whether the Customer is a New Customer or an Existing Customer.
New/Existing Job – Displays whether the Job is a New Job or an Existing Job.
Customer/Job Name – Displays the Customer and Job names separated by a colon.
Estimate # – Displays the number assigned to the Estimate.
Estimate Date – Displays the date the Estimate was created.
Sales Rep – Displays the Sales Rep for the current Estimate.
Packages Created – Displays the name of Packages that will be part of the Estimate.
Comments – Displays any comments entered for the Package.
Package Status – Displays the status assigned to the Package.
When done making any necessary changes, or if no changes are needed, click Finish to complete the Estimate Wizard and open the newly generated Quick Insert Template.
Step 5 – The Estimate Form
The last step to creating a Quick Insert Template is performed on the Estimate form. Packages and line items will be managed in the same way as a normal Estimate: users will create line items by first selecting a Package, then selecting the Item Details entry for the desired material/work location and entering the square footage. For more help with the Estimate form, click here.
Once the Quick Insert Template is complete, it can be used as many times as needed. If changes to the materials or pricing are needed, the Plan Template can be edited and updated just like an Estimate. For help with applying a Quick Insert Template, click here.
Applying a Template

The process of applying Quick Insert and Plan Templates in the Estimate wizard starts out much the same as creating a normal Estimate, with users first entering Customer and Job information. The process after these initial steps varies somewhat between Plan Templates and Quick Insert Templates, and we’ll cover each separately below.
When applying a template, users are free to make modifications. That includes creating additional Packages and line items or modifying existing entries. Changes made when applying a template will not impact the original Plan or Quick Insert Template. In order to modify a template, it must be opened and edited on the Estimate form.
| Applying a Plan Template | Applying a Quick Insert Template |
Applying Plan Templates
Ideal for track housing, Plan Templates remove the need to enter the same Job repeatedly. Follow the steps below to apply a plan template.
Step 1 – Selecting Estimate
To start, users will need to open the Estimate Wizard from the top left of the Form Explorer.
In the first step of the Estimate Wizard, users will select whether to create a new Estimate, Plan Template, or Quick Insert Template. Click the Estimate button to start the process and move on to the next step.
Step 2 – Customer Information
During this step, users will select or create the customer for whom the Estimate will be generated.
Existing Customers – If the customer has already been entered or imported into Allpro Insulator, select the customer’s name from the dropdown to the right of “Select Existing Customer” option. Typing the first part of the customer’s name will help filter down to the desired Customer entry. Click Next to move on to the next step once the customer has been selected.
New Customers – If working with a new customer, select the Create New Customer option. Once selected, a grid will appear where the new customer’s contact details, sales terms, default sales rep, customer relationship management information, and any notes can be entered. Click Next when done entering customer information to move on to the next step.
- Carefully review the Customer name for accuracy when entering it in the Estimate Wizard. The Customer name is one of the few pieces of Customer information that cannot be easily changed, so it’s preferable to get it right the first time.
- Only the Customer Name is required during this step. The remaining customer information can be entered on the Customer form later if it is unavailable when creating the new Customer.
- Once entered in the Estimate Wizard, the Customer’s information will be saved in Allpro Insulator for future use and/or reference.
The Create New Customer Grid
The information below refers to the grid that appears when entering a new Customer in the Estimate Wizard. The description and function of each field in the grid is defined below.
Customer Name – Allows the user to enter the customer’s name. This field is required.
Contact Name – Allows the user to enter the name of their point of contact with the customer.
Address Line 1/Line2 – Allows the user to enter the street address for the customer.
Zip Code – Allows the user to enter the Zip Code portion of the Customer’s address.
-
-
- Note that the city and state will populate automatically when the Zip Code is entered. For more help with Zip Codes, click here.
-
City/State – Displays the City and State associated with the Customer address. These fields populate automatically when the Zip Code is entered.
Phone – Allows the user to enter the main phone number associated with the customer.
Alt. Phone – Allows the user to enter a second phone number associated with the customer.
Fax – Allows the user to associate a fax number with the customer.
Email – Allows the user to enter a primary email address for the customer.
Terms/Disc % – Allows the user to set sales terms using a dropdown menu, and allows the user to specify a default Discount Percentage for the customer.
Sales Rep – Allows the user to select a default Sales Rep for the customer. For more help with Sales Reps, click here.
Contact Type – Allows the user to specify if the contact is a Customer, Prospect, or Former Prospect; a Customer Relationship Management (CRM) feature.
Prospect Status – A customizable field that can be used to track the status of the customer as a sales prospect; a Customer Relationship Management (CRM) feature.
Prospect Source – A customizable field that allows the user to specify how the prospective customer was acquired; a Customer Relationship Management (CRM) feature.
Notes – Allows the user to enter internal notes regarding the customer. These notes do not appear on paperwork intended for the customer and are for internal use.
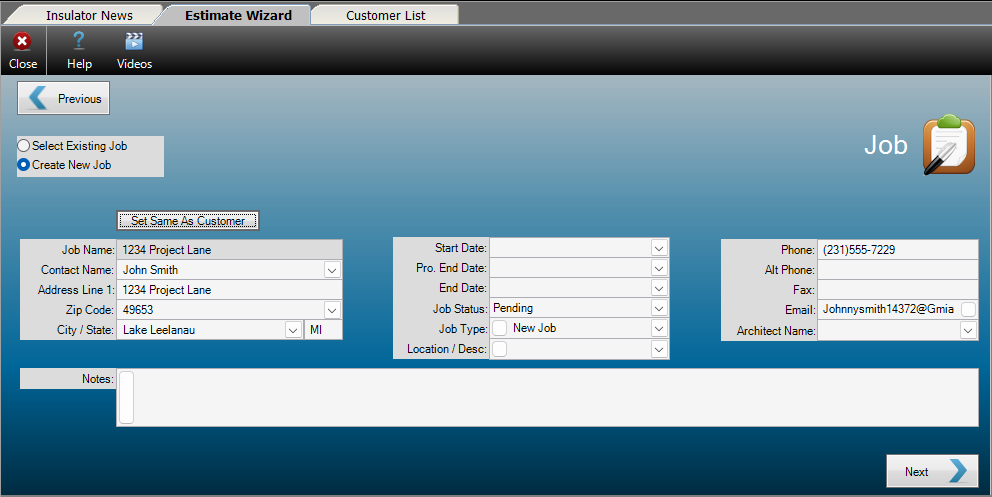
Step 3 – Job Information
During this step the user will create or select a Job to associate with the Customer from Step 2.
Existing Job – If you selected an existing Customer, you may want to select an existing Job. To do so, select the dropdown to the right of “Select Existing Job” and locate the Job entry. You can also start typing the Job name in the field provided to filter down to the desired entry. Click Next to move on to the next step once the Job has been selected.
New Job – If you are working with a new Customer or want to create a new Job for an existing Customer, select “Create New Job” and type the Job name in the field to the right. Click Continue when done entering the Job name.
- Carefully review the Job name for accuracy when entering it in the Wizard. The Job name is one of the few pieces of Job information that cannot be easily changed, so it’s preferable to get it right the first time.
- Only the Job Name is required for this step, other Job information can be entered later if it is unavailable when creating the new Job.
- If the Customer and Job information are the same, as in residential jobs, click the “Set Same As Customer” button near the top of the grid to automatically fill in the Job information.
The Create New Job Grid
After entering the new Job Name and clicking Continue, users will be provided with a grid to enter information about the Job. This includes the Job address, contact details, start and end dates, and other information.
The information below refers to the grid that appears when entering new Jobs in the Estimate Wizard. The description and function of each field in the grid is defined below.
Set Same as Customer – This button copies the contact information that was entered for the Customer and inserts it into the Job Information grid.
Job Name – Displays the Job Name entered by the user.
Contact Name – Allows the user to enter the name of the primary contact for the Job.
Address Line 1 – Allows the user to enter the street address of the job site.
Zip Code – Allows the user to enter the Zip Code portion of the job site address.
-
-
- Note that the city and state will populate automatically when the Zip Code is entered. For more help with Zip Codes, click here.
-
City/State – Displays the City and State associated with the Job address. These fields populate automatically when the Zip Code is entered.
Start Date – Allows the user to specify a start date for the Job.
-
-
- Note that the start date on Job Sheets and other paperwork is pulled from appointments in SchedulePro, Allpro Insulator’s internal calendar.
-
Pro. End Date – Allows the user to specify a projected end date for the Job.
End Date – Allows the user to specify the date on which the Job ends.
-
-
- Note that the End date on Job Sheets and other paperwork is pulled from appointments in SchedulePro, Allpro Insulator’s internal calendar.
-
Job Status – Allows the user to select the current status of the Job: Pending, Awarded, In Progress, Closed or Not Awarded. The default Job Status is Pending.
-
-
- Job Status values can impact other functions related to the Job, particularly if the status is set to Closed.
-
Job Type – This customizable dropdown menu allows the user to specify the type of job the estimate will be for. If subscribed to the Advanced Features Module (AFM), this value can be used in Tiered Pricing. For more information on AFM, click here.
Location/Desc. – This customizable dropdown menu allows the user to specify a location or description for the job. If subscribed to the Advanced Features Module (AFM), this value can be used in Tiered Pricing. For more information on AFM, click here.
Phone – Allows the user to enter a contact number for the Job.
Alt. Phone – Allows the user to enter a second phone number associated with the Job.
Fax – Allows the user to associate a fax number with the Job.
Email – Allows the user to enter a primary email address for the Job.
Architect Name – Allows the user to select an architect to associate with the Job.
-
-
- The list of Architects is managed on the Architects form. For help with the Architects form, click here.
-
Notes – Allows the user to enter internal notes regarding the Job. These notes do not appear on paperwork intended for the customer or job, and are for internal use.
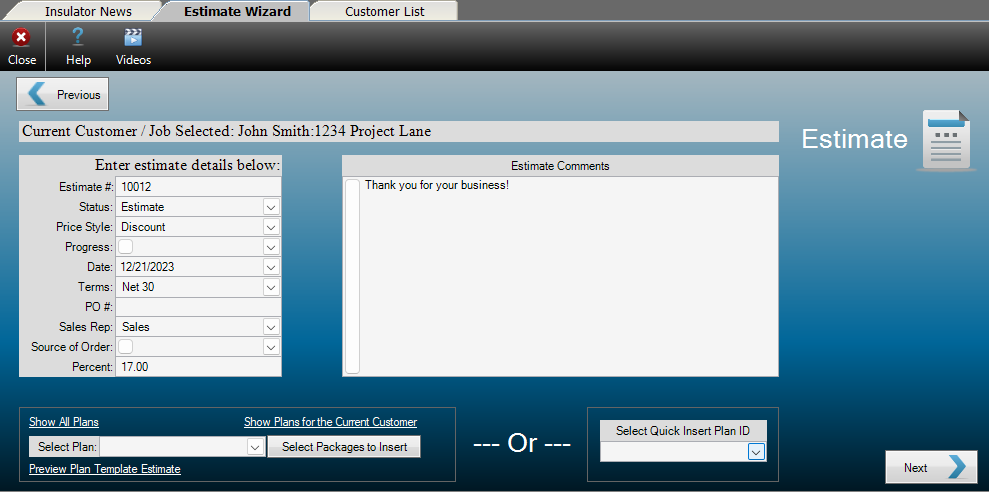
Step 4 – Estimate Information
With the customer and job information taken care of, this step provides the user with an opportunity to review the information and settings pertaining to the Estimate they are about to create. This is also where the Plan Template will be selected and applied.
- Use the previous button to go back and make any needed changes. All information the user has already entered will be retained, even if it’s necessary to use the Previous button to go back.
- Please note, the term Estimate in Allpro Insulator sometimes broadly refers to records that are managed on the Estimate form, and may mean template, estimate or invoice, depending on the context.
The Estimate Information Grid
The Estimate Information grid displays general information about the Estimate and allows the selection of a Plan Template. The description and function of each field in Estimate Information grid is described below.
Estimate # – Displays the number that will be assigned to the Estimate.
Status – Displays the status of the Estimate: Estimate, Invoice, Review or Plan Template.
Price Style – Displays the price style of the Estimate: Discount or Markup.
-
-
- Discount Price Style – Starting prices are set in Item Details and users can choose to discount them by a percentage value.
- Markup Price Style – Starting prices are set at the total cost and can then marked up by a percentage value.
-
Progress – A customizable field that allows users to specify the current stage of progress for the Estimate.
Date – Displays the estimate date, based on the date on which it was created. Users can manually adjust the date if needed.
Terms – Displays the sales terms for the Estimate.
-
-
- For Allpro Insulator Stand Alone and QuickBooks Online Edition users, sales terms are managed in Company Setup. For help with Company Setup, click here.
- For Allpro Insulator QuickBooks Desktop Edition users, sales terms are managed in QuickBooks and imported into Allpro Insulator. For help with importing terms from QuickBooks, click here.
-
PO # – Allows the user to enter a purchase order number for the Estimate, if applicable.
Sales Rep – Allows the user to select which Sales Rep is assigned to the Estimate.
-
-
- Sales Reps are created and managed on the Sales Reps form. For more help with Sales Reps, click here.
-
Source of Order – A customizable field that allows the user to specify how the order was acquired. Default values are Cold Call, Mailer, Referral, or Repeat Customer.
Percent – Allows the user to specify a discount or markup percentage for use with the selected Price Style.
Estimate Comments – Displays and allows the user to modify the estimate comments that will appear just above the signature line on produced (e.g. printed, emailed, or exported) Estimates.
-
-
- Estimate Comments are often used to specify terms and conditions and the default Comments can be modified in Company Setup. For help with Estimate comments, click here.
-
Show All Plans – Removes customer based filters for Plan Templates. By default, Plan Templates are filtered by Customer.
Show Plans for the Current Customer – Applies customer based filters to Plan and Quick Insert Templates. By default, Plan Templates are filtered by Customer.
Select Plan – Allows the user to select a Plan Template to apply to the current Estimate.
Preview Plan Template Estimate – Allows the user to view a preview of an Estimate with the selected Plan Template applied.
Select Quick Insert Plan ID – Allows the user to select a Quick Insert Template to apply to the current Estimate.
Step 5 – Selecting and Applying a Plan Template
Locate the “Select Plan” field near the bottom of Estimate Information grid, and select the desired Plan Template from the drop-down menu.
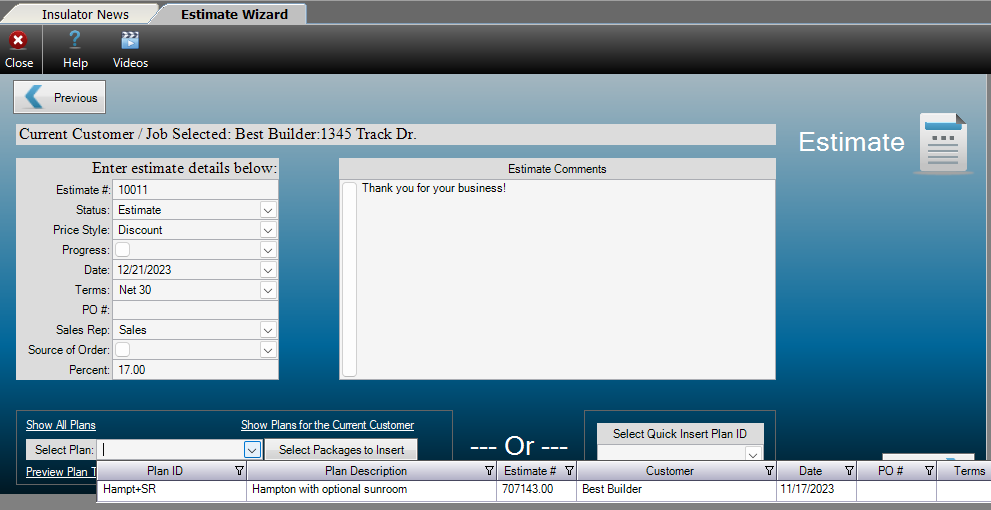
- If the desired Plan Template was created for another Customer, click Show All Plans to make it accessible in the dropdown menu.
Next click “Select Packages to Insert”. This will bring up a list of the Packages in the Plan Template, from which the user can select the Packages that apply to the current Estimate.
The Select Packages Interface
The top grid in the Select Packages interface displays each of the Packages in the Plan Template. When a Package is selected, the line items it contains will be displayed in the lower grid. This allows users to select only the packages needed for the current Estimate, including or excluding floor plan options as needed. At the bottom of the interface, the user will find a series of buttons to preview the Estimate, insert the selected Packages, or cancel the operation.

The Packages Grid
The topmost section of the Select Packages grid.

Include Package – Allows the user to flag Packages from the Plan Template to be included on the new Estimate by checking a box.
Package ID – Displays the Package ID as it was entered on the Plan Template.
Insert As Package ID – Allows the user to specify a different Package ID for the Package when it is inserted from the Plan Template.
Package Name – Displays the Package Name as it was entered on the Plan Template.
Insert As Package Name – Allows the user to specify a different Package Name for the Package when it is inserted from the Plan Template.
Comments – Displays any Package Comments that were entered on the Plan Template.
Package Total – Displays a subtotal for the Package.
Already Exists – Indicates whether the selected Package has already been added to the Estimate from the Plan Template.
The Line Items Grid
The middle section of the Select Packages Grid, this grid will remain empty until a Package is selected. Once a Package has been selected, it will display a list of the line items it contains.

Item ID – Displays the Item ID of the line item.
Description – Displays the description of the line item.
Qty – Displays the square footage for the line item.
Rate – Displays the price that will be charged per square foot for the line item.
Total – Displays the total charges associated with the line item, calculated as Qty multiplied by Rate
Crew 1/Crew 2 – Displays any crews associated with the related line item.
Select Packages Interface Buttons
The bottom section of the Select Packages grid.

Select a Different Plan Template – Allows the user to select a different Plan Template to work with.
Preview the Current Plan Template – Opens the Report Master (E) interface, which allows the user to select the desired Estimate report and preview the produced Estimate.
Insert Plan Template/Stay Here – Inserts the selected Packages and leaves the Select Packages interface open.
Insert Plan Template/Done – Inserts the selected Packages and closes the Select Packages interface.
Cancel – Cancels Package selection and returns the user to the Estimate Wizard.
When done selecting packages, click Insert Plan Template/Done then accept the Insert Plan Template verification dialogue .

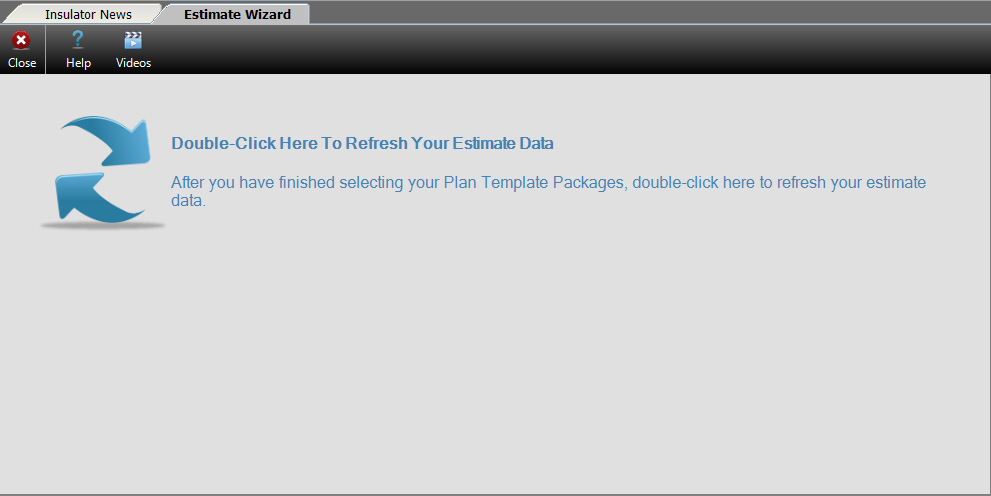
Double-click anywhere in the Estimate Wizard, then click Next to move on to the next step.
Step 6 – Packages
In this step of Estimate Wizard will review, configure, and/or add Packages. Any Packages inserted from the Plan template will be displayed, allowing users to reconfigure the Packages if needed. Users are also free to create additional Packages, even if they were not part of the Plan Template. Each Package represents a separate portion of the Estimate, and users can break it into as many Packages as desired.
Packages allow line items to be grouped together on the Estimate, and are often based on the physical location of the work to be performed. When the work is complete, Estimates can also be broken into multiple invoices based on Package.
Users will manage settings for how the Packages will be displayed on the Estimate, and which paperwork and processes each Package will be included in. These settings are all managed via a series of checkboxes, which will be covered in more detail below.
The Packages Grid
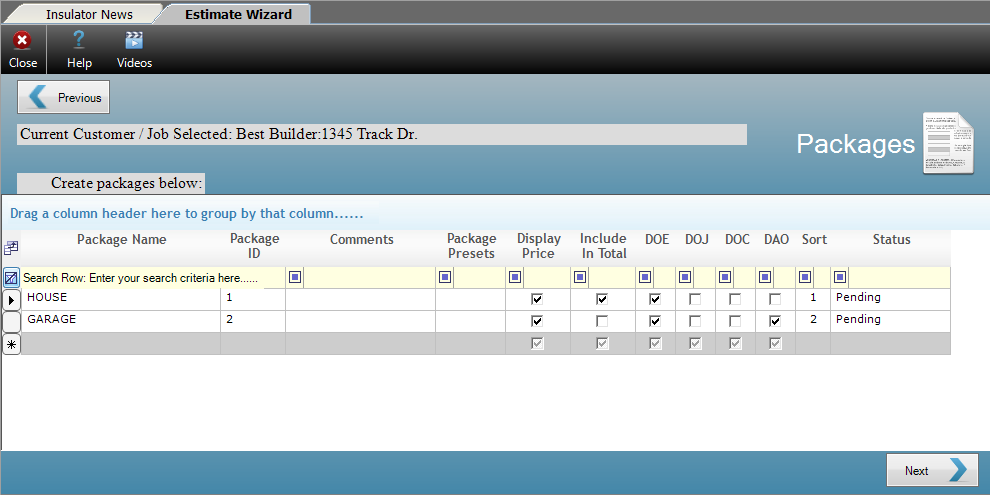
The Packages grid is used to create and manage Packages. The description and function of each field in the Packages grid can be found below.
Package Name – This customizable field allows the user to enter or select the name of the Package.
Package ID – Allows the user to specify an ID for the Package, often shorter than the Package Name. This value can help speed up Package selection when adding line items to Estimates.
-
-
- Experienced users often assign numbers (1, 2, 3, etc.) to the Package ID to simplify Package selection even further.
-
Comments – Allows the user to enter optional notes regarding the Package. These notes do not appear on produced (e.g. printed, exported, or emailed) Estimates.
Package Presets – Allows the user to select from preconfigured options for the Package. Each of the options will be explained in greater detail further down the help page.
Standard – Checks Include in Total and DOE (Display on Estimate).
Optional – Checks Display Price, DOE (Display on Estimate), and DAO (Display as Option).
Accepted – Checks Include in Total, DOE (Display on Estimate), DOJ (Display on Job Sheet), and DOC (Display on Cost Sheet).
Check All – Checks Display Price, Include in Total, DOE (Display on Estimate), DOJ (Display on Job Sheet), DOC (Display on Cost Sheet), and DAO (Display as Option).
Display Price – Determines whether each Package will display a subtotal for the line items that are part of the Package.
Include in Total – Determines whether the charges included in the Package will be added to the Total Charges on the Estimate. This box should be checked unless the Package is optional.
DOE (Display on Estimate) – Determines whether the Package will appear on the Estimate. Generally, this box should be checked.
DOJ (Display on Job Sheet) – Determines whether line items in the Package will be included on the material list for the Job. Material lists are referred to as Job Sheets in Allpro Insulator.
DOC (Display on Cost Sheet) – Determines whether the line items in the Package will be included in Job Costing function and reports.
DAO (Display as Option) – Determines whether the Package will be displayed as optional on the Estimate.
-
-
- Optional Packages should have Display Price checked, but should not be configured to appear on Job or Cost Sheets unless they have been accepted by the customer.
-
Sort – Allows the user to specify the order that the Packages should appear in on the Estimate, from the lowest to the highest Sort value.
-
-
- As Packages are added, they will automatically be assigned a sort order based on the order in which they were created.
-
Status – A customizable field that allows the user to specify a status for the Package. By default, users may choose from Awarded, Closed, In Progress, Not Awarded, and Pending.
-
-
- Job Status values can impact other functions related to the Job, particularly if the status is set to Closed.
-
When done configuring Packages, click Next to move to the next step and review a Summary of the new Estimate.
Step 7 – Summary
During the last step, the user will be presented with a summary of information regarding the new Estimate. If any corrections are required, use the Previous button to go back and make the desired changes. All existing entries will be retained when using the Previous button, eliminating the need to reenter information.
The Summary Grid
The description and function of each field in Summary grid is described below.
New/Existing Customer – Displays whether the Customer is a New Customer or an Existing Customer.
New/Existing Job – Displays whether the Job is a New Job or an Existing Job.
Customer/Job Name – Displays the Customer and Job names separated by a colon.
Estimate # – Displays the number assigned to the Estimate.
Estimate Date – Displays the date the Estimate was created.
Sales Rep – Displays the Sales Rep for the current Estimate.
Packages Created – Displays the name of Packages that will be part of the Estimate.
Comments – Displays any comments entered for the Package.
Status – Displays the Status assigned to the Package.
When done making any necessary changes, or if no changes are needed, click Finish to complete the Estimate Wizard and open the newly generated Estimate. For help with the Estimate form, click here.
Step 8 – The Estimate Form
The last step to creating the Estimate from a Plan Template is performed on the Estimate form. Packages and line items from the Plan Template will already be entered, but users are free to make changes or add additional Items and Packages as needed. Any changes to the Estimate will not modify the original Plan Template. For more help with the Estimate form, click here.
Applying a Quick Insert Template
Intended as a general-purpose template, Quick Insert Templates are there for jobs with similar materials and packages.
Step 1 – Selecting Estimate
To start, users will need to open the Estimate Wizard from the top left of the Form Explorer.
In the first step of the Estimate Wizard, users will select whether to create a new Estimate, Plan Template, or Quick Insert Template. Click the Estimate button to start the process and move on to the next step.
Step 2 – Customer Information
During this step, users will select or create the customer for whom the Estimate will be generated.
Existing Customers – If the customer has already been entered or imported into Allpro Insulator, select the customer’s name from the dropdown to the right of “Select Existing Customer” option. Typing the first part of the customer’s name will help filter down to the desired Customer entry. Click Next to move on to the next step once the customer has been selected.
New Customers – If working with a new customer, select the Create New Customer option. Once selected, a grid will appear where the new customer’s contact details, sales terms, default sales rep, customer relationship management information, and any notes can be entered. Click Next when done entering customer information to move on to the next step.
- Carefully review the Customer name for accuracy when entering it in the Estimate Wizard. The Customer name is one of the few pieces of Customer information that cannot be easily changed, so it’s preferable to get it right the first time.
- Only the Customer Name is required during this step. The remaining customer information can be entered on the Customer form later if it is unavailable when creating the new Customer.
- Once entered in the Estimate Wizard, the Customer’s information will be saved in Allpro Insulator for future use and/or reference.
The Create New Customer Grid
The information below refers to the grid that appears when entering a new Customer in the Estimate Wizard. The description and function of each field in the grid is defined below.
Customer Name – Allows the user to enter the customer’s name. This field is required.
Contact Name – Allows the user to enter the name of their point of contact with the customer.
Address Line 1/Line2 – Allows the user to enter the street address for the customer.
Zip Code – Allows the user to enter the Zip Code portion of the Customer’s address.
-
-
- Note that the city and state will populate automatically when the Zip Code is entered. For more help with Zip Codes, click here.
-
City/State – Displays the City and State associated with the Customer address. These fields populate automatically when the Zip Code is entered.
Phone – Allows the user to enter the main phone number associated with the customer.
Alt. Phone – Allows the user to enter a second phone number associated with the customer.
Fax – Allows the user to associate a fax number with the customer.
Email – Allows the user to enter a primary email address for the customer.
Terms/Disc % – Allows the user to set sales terms using a dropdown menu, and allows the user to specify a default Discount Percentage for the customer.
Sales Rep – Allows the user to select a default Sales Rep for the customer. For more help with Sales Reps, click here.
Contact Type – Allows the user to specify if the contact is a Customer, Prospect, or Former Prospect; a Customer Relationship Management (CRM) feature.
Prospect Status – A customizable field that can be used to track the status of the customer as a sales prospect; a Customer Relationship Management (CRM) feature.
Prospect Source – A customizable field that allows the user to specify how the prospective customer was acquired; a Customer Relationship Management (CRM) feature.
Notes – Allows the user to enter internal notes regarding the customer. These notes do not appear on paperwork intended for the customer and are for internal use.
Step 3 – Job Information
During this step the user will create or select a Job to associate with the Customer from Step 2.
Existing Job – If you selected an existing Customer, you may want to select an existing Job. To do so, select the dropdown to the right of “Select Existing Job” and locate the Job entry. You can also start typing the Job name in the field provided to filter down to the desired entry. Click Next to move on to the next step once the Job has been selected.
New Job – If you are working with a new Customer or want to create a new Job for an existing Customer, select “Create New Job” and type the Job name in the field to the right. Click Continue when done entering the Job name.
- Carefully review the Job name for accuracy when entering it in the Wizard. The Job name is one of the few pieces of Job information that cannot be easily changed, so it’s preferable to get it right the first time.
- Only the Job Name is required for this step, other Job information can be entered later if it is unavailable when creating the new Job.
- If the Customer and Job information are the same, as in residential jobs, click the “Set Same As Customer” button near the top of the grid to automatically fill in the Job information.
The Create New Job Grid
After entering the new Job Name and clicking Continue, users will be provided with a grid to enter information about the Job. This includes the Job address, contact details, start and end dates, and other information.
The information below refers to the grid that appears when entering new Jobs in the Estimate Wizard. The description and function of each field in the grid is defined below.
Set Same as Customer – This button copies the contact information that was entered for the Customer and inserts it into the Job Information grid.
Job Name – Displays the Job Name entered by the user.
Contact Name – Allows the user to enter the name of the primary contact for the Job.
Address Line 1 – Allows the user to enter the street address of the job site.
Zip Code – Allows the user to enter the Zip Code portion of the job site address.
-
-
- Note that the city and state will populate automatically when the Zip Code is entered. For more help with Zip Codes, click here.
-
City/State – Displays the City and State associated with the Job address. These fields populate automatically when the Zip Code is entered.
Start Date – Allows the user to specify a start date for the Job.
-
-
- Note that the start date on Job Sheets and other paperwork is pulled from appointments in SchedulePro, Allpro Insulator’s internal calendar.
-
Pro. End Date – Allows the user to specify a projected end date for the Job.
End Date – Allows the user to specify the date on which the Job ends.
-
-
- Note that the End date on Job Sheets and other paperwork is pulled from appointments in SchedulePro, Allpro Insulator’s internal calendar.
-
Job Status – Allows the user to select the current status of the Job: Pending, Awarded, In Progress, Closed or Not Awarded. The default Job Status is Pending.
-
-
- Job Status values can impact other functions related to the Job, particularly if the status is set to Closed.
-
Job Type – This customizable dropdown menu allows the user to specify the type of job the estimate will be for. If subscribed to the Advanced Features Module (AFM), this value can be used in Tiered Pricing. For more information on AFM, click here.
Location/Desc. – This customizable dropdown menu allows the user to specify a location or description for the job. If subscribed to the Advanced Features Module (AFM), this value can be used in Tiered Pricing. For more information on AFM, click here.
Phone – Allows the user to enter a contact number for the Job.
Alt. Phone – Allows the user to enter a second phone number associated with the Job.
Fax – Allows the user to associate a fax number with the Job.
Email – Allows the user to enter a primary email address for the Job.
Architect Name – Allows the user to select an architect to associate with the Job.
-
-
- The list of Architects is managed on the Architects form. For help with the Architects form, click here.
-
Notes – Allows the user to enter internal notes regarding the Job. These notes do not appear on paperwork intended for the customer or job, and are for internal use.
Step 4 – Estimate Information
With the customer and job information taken care of, this step provides the user with an opportunity to review the information and settings pertaining to the Estimate they are about to create. This is also where the Quick Insert Template will be selected and applied.
- Use the previous button to go back and make any needed changes. All information the user has already entered will be retained, even if it’s necessary to use the Previous button to go back.
The Estimate Information Grid
The Estimate Information grid displays general information about the Estimate and allows the selection of a Quick Insert Template. The description and function of each field in Estimate Information grid is described below.
Estimate # – Displays the number that will be assigned to the Estimate.
Status – Displays the status of the Estimate: Estimate, Invoice, Review or Plan Template.
Price Style – Displays the price style of the Estimate: Discount or Markup.
-
-
- Discount Price Style – Starting prices are set in Item Details and users can choose to discount them by a percentage value.
- Markup Price Style – Starting prices are set at the total cost and can then marked up by a percentage value.
-
Progress – A customizable field that allows users to specify the current stage of progress for the Estimate.
Date – Displays the estimate date, based on the date on which it was created. Users can manually adjust the date if needed.
Terms – Displays the sales terms for the Estimate.
-
-
- For Allpro Insulator Stand Alone and QuickBooks Online Edition users, sales terms are managed in Company Setup. For help with Company Setup, click here.
- For Allpro Insulator QuickBooks Desktop Edition users, sales terms are managed in QuickBooks and imported into Allpro Insulator. For help with importing terms from QuickBooks, click here.
-
PO # – Allows the user to enter a purchase order number for the Estimate, if applicable.
Sales Rep – Allows the user to select which Sales Rep is assigned to the Estimate.
-
-
- Sales Reps are created and managed on the Sales Reps form. For more help with Sales Reps, click here.
-
Source of Order – A customizable field that allows the user to specify how the order was acquired. Default values are Cold Call, Mailer, Referral, or Repeat Customer.
Percent – Allows the user to specify a discount or markup percentage for use with the selected Price Style.
Estimate Comments – Displays and allows the user to modify the estimate comments that will appear just above the signature line on produced (e.g. printed, emailed, or exported) Estimates.
-
-
- Estimate Comments are often used to specify terms and conditions and the default Comments can be modified in Company Setup. For help with Estimate comments, click here.
-
Show All Plans – Removes customer based filters for Plan Templates. By default, Plan Templates are filtered by Customer.
Show Plans for the Current Customer – Applies customer based filters to Plan and Quick Insert Templates. By default, Plan Templates are filtered by Customer.
Select Plan – Allows the user to select a Plan Template to apply to the current Estimate.
Preview Plan Template Estimate – Allows the user to view a preview of an Estimate with the selected Plan Template applied.
Select Quick Insert Plan ID – Allows the user to select a Quick Insert Template to apply to the current Estimate.
Step 5 – Selecting a Quick Insert Template

Locate the “Select Quick Insert Plan ID” field near the bottom of Estimate Information grid, and select the desired Quick Insert Template from the drop-down menu. Once selection is complete, click Next to move on to the next step.
- Unlike Plan Templates, users do not select individual Packages from the Quick Insert Template. Instead, the entire contents of the Quick Insert Template is added when it is applied.
- Users are free to add or remove Packages during the Estimate Wizard and can make other desired changes on the Estimate form once the wizard is completed.
Step 6 – Packages
In this step of Estimate Wizard will configure and/or add Packages. Any Packages inserted from the Quick Insert template will be displayed, allowing users to reconfigure the Packages if needed. Users are also free to create additional Packages, even if they were not part of the template. Each Package represents a separate portion of the Estimate, and users can break it into as many Packages as desired.
Packages allow line items to be grouped together on the Estimate, and are often based on the physical location of the work to be performed. When the work is complete, Estimates can also be broken into multiple invoices based on Package.
Users will manage settings for how the Packages will be displayed on the Estimate, and which paperwork and processes each Package will be included in. These settings are all managed via a series of checkboxes, which will be covered in more detail below.
The Packages Grid

The Packages grid is used to create and manage Packages. The description and function of each field in the Packages grid can be found below.
Package Name – This customizable field allows the user to enter or select the name of the Package.
Package ID – Allows the user to specify an ID for the Package, often shorter than the Package Name. This value can help speed up Package selection when adding line items to Estimates.
-
-
- Experienced users often assign numbers (1, 2, 3, etc.) to the Package ID to simplify Package selection even further.
-
Comments – Allows the user to enter optional notes regarding the Package. These notes do not appear on produced (e.g. printed, exported, or emailed) Estimates.
Package Presets – Allows the user to select from preconfigured options for the Package. Each of the options will be explained in greater detail further down the help page.
Standard – Checks Include in Total and DOE (Display on Estimate).
Optional – Checks Display Price, DOE (Display on Estimate), and DAO (Display as Option).
Accepted – Checks Include in Total, DOE (Display on Estimate), DOJ (Display on Job Sheet), and DOC (Display on Cost Sheet).
Check All – Checks Display Price, Include in Total, DOE (Display on Estimate), DOJ (Display on Job Sheet), DOC (Display on Cost Sheet), and DAO (Display as Option).
Display Price – Determines whether each Package will display a subtotal for the line items that are part of the Package.
Include in Total – Determines whether the charges included in the Package will be added to the Total Charges on the Estimate. This box should be checked unless the Package is optional.
DOE (Display on Estimate) – Determines whether the Package will appear on the Estimate. Generally, this box should be checked.
DOJ (Display on Job Sheet) – Determines whether line items in the Package will be included on the material list for the Job. Material lists are referred to as Job Sheets in Allpro Insulator.
DOC (Display on Cost Sheet) – Determines whether the line items in the Package will be included in Job Costing function and reports.
DAO (Display as Option) – Determines whether the Package will be displayed as optional on the Estimate.
-
-
- Optional Packages should have Display Price checked, but should not be configured to appear on Job or Cost Sheets unless they have been accepted by the customer.
-
Sort – Allows the user to specify the order that the Packages should appear in on the Estimate, from the lowest to the highest Sort value.
-
-
- As Packages are added, they will automatically be assigned a sort order based on the order in which they were created.
-
Status – A customizable field that allows the user to specify a status for the Package. By default, users may choose from Awarded, Closed, In Progress, Not Awarded, and Pending.
-
-
- Job Status values can impact other functions related to the Job, particularly if the status is set to Closed.
-
When done configuring Packages, click Next to move to the next step and review a Summary of the new Estimate.
Step 7 – Summary
During this step, the user will be presented with a summary of information regarding the new Estimate. If any corrections are required, use the Previous button to go back and make the desired changes. All existing entries will be retained when using the Previous button, eliminating the need to reenter information.
The Summary Grid
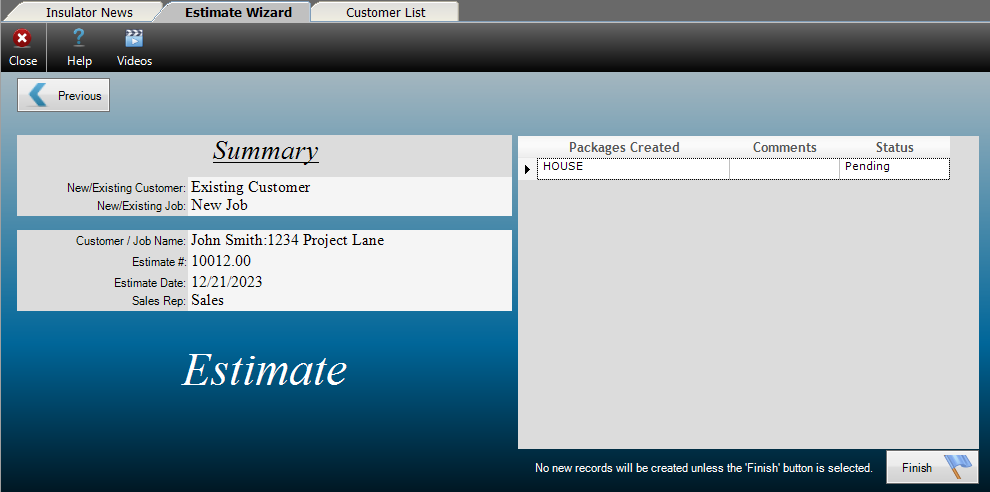
The description and function of each field in Estimate Information grid is described below.
New/Existing Customer – Displays whether the customer is a New Customer or an Existing Customer.
New/Existing Job – Displays whether the job is a New Job or an Existing Job.
Customer/Job Name – Displays the Customer and Job names separated by a colon.
Estimate # – Displays the number assigned to the Estimate.
Estimate Date – Displays the date the Estimate was created.
Sales Rep – Displays the Sales Rep for the current Estimate.
Packages Created – Displays the name of Packages that will be part of the Estimate.
Comments – Displays any comments entered for the Package.
Status – Displays the Status assigned to the Package.
When done making any necessary changes, or if no changes are needed, click Finish to complete the Estimate Wizard and open the newly generated Estimate. For help with the Estimate form, click here.
Step 8 – The Estimate Form
The last step to creating the new Estimate from a Quick Insert Template is performed on the Estimate form. Packages and line items from the Quick Insert Template will already be entered, but users are free to make changes or add additional Items and Packages as needed. Any changes to the Estimate will not modify the original Quick Insert Template. For more help with the Estimate form, click here.
