
Managing workflows and keeping everyone involved in a project on the same page can be a daunting and time-consuming task. Allpro Insulator 2022 (v15) with Allpro Alerts automates this process, helping ensure your entire team stays on point and up to date on the progress of their projects through notifications via email and internal messaging. Personalize your message and notification templates using Data Tokens to insert specific customer and job information from the related project. A complete log of all messages and notifications helps ensure transparency and accountability when needed.
Notifications can be triggered by a number of activities throughout Allpro Insulator. Currently, that includes Creating a customer or Prospect, assigning a Sales Rep other than yourself to a customer, sending a DSign proposal, scheduling a job in SchedulePro, rescheduling a job in SchedulePro, and Job Schedule Reminders, in addition to QuickBooks, Estimate, Package, and Job Status changes. You can determine which events trigger the notifications and maintain complete control over who receives them. Each time a notification is triggered, you are prompted to approve the notifications before they are sent. This helps ensure notifications aren’t sent accidentally and makes certain you are aware when they have been triggered.
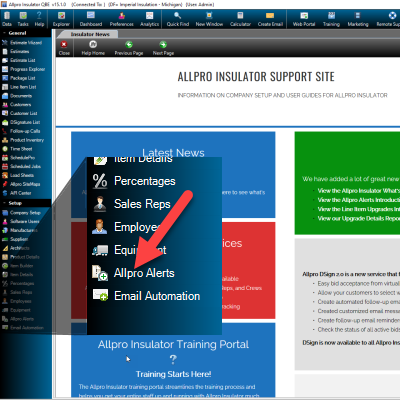
Let’s start at the Allpro Alerts form, which can be accessed from the lower left side of Allpro Insulator.
- Note that SMS Text Notifications can be used at no additional cost but require that users register their company for the services. Click here to register for services now.
Click one of the links below so skip to a particular section.
| Wizard | List View | Internal Messages |
| Allpro Alert TriggersInternal Notifications | Notification Templates | Email Notifications |
| Sending Notifications | Disabling Notifications | Notification Logs |
Allpro Alerts Form
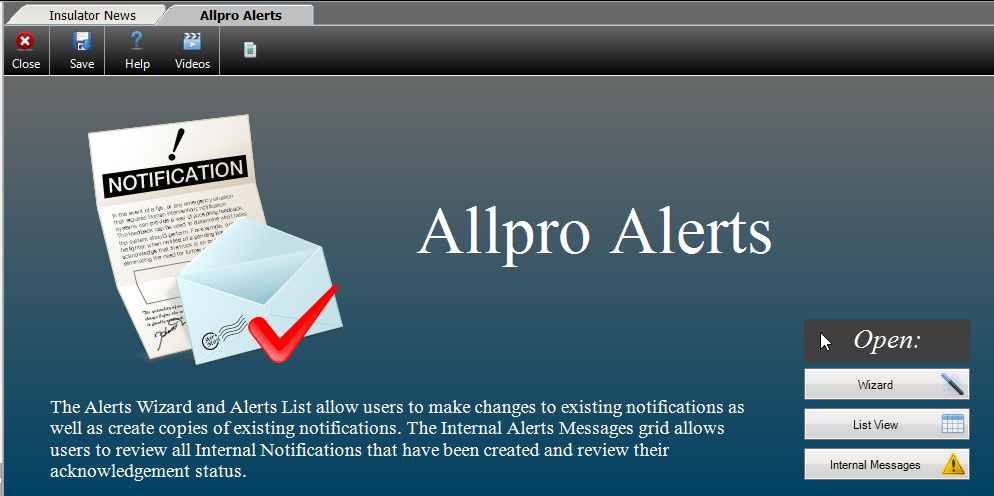
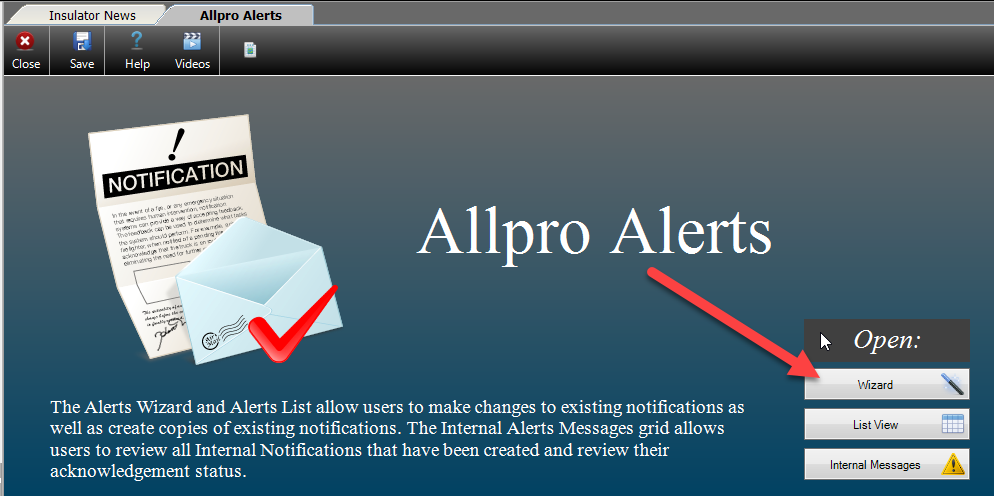
The Allpro Alerts form contains 3 menu items: Wizard, List View, and Internal Messages. We’ll cover the purpose of each before discussing how to use them in further detail.
The Allpro Alerts Wizard
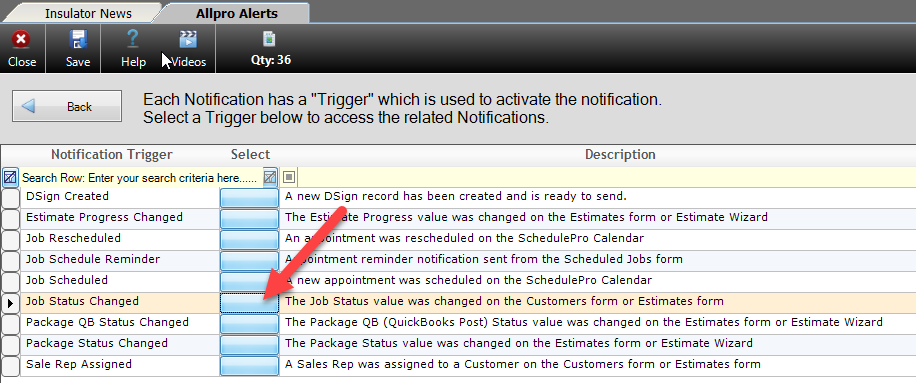
Select Wizard to open the Allpro Alerts Wizard, where you’re presented with a list of each of the available Notification Triggers in a grid. From there, you can view and modify the individual triggers and notifications. Note that trigger and notification configurations are companywide, not tied to an individual user, and that access to each Allpro Alerts feature is governed by permissions, allowing you to control access on a user-by-user basis.
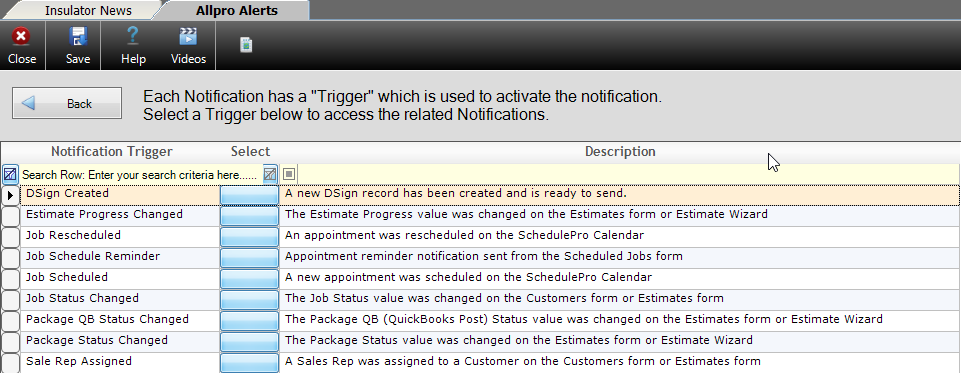
Looking at the Triggers grid, the field on the left contains the name of the trigger, based on the event that causes the notification(s) to be sent. To view or modify a notification trigger, click the blue “select” button to the immediate right of the Trigger name. The right-most field in the grid provides a more detailed description of the where and how the notifications are triggered.
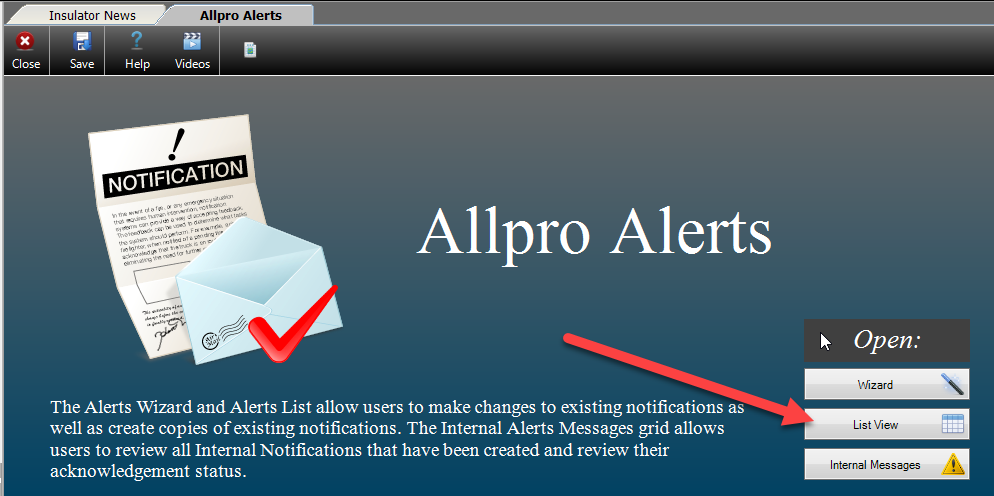
Allpro Alerts List View
The Allpro Alert List View provides a complete list of Notifications currently configured in Allpro Insulator. By default, only active notifications are displayed in the grid, but you can display inactive notifications as well by clicking Show All Notifications at the top of the form. You can return to viewing only active entries by clicking Show Active Notifications.

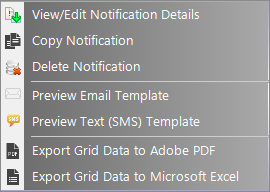
On the far left of each row, you’ll find the Launch button which opens the Launch Menu, allowing users to view or edit the notification details in the Notifier Panel, create a copy of the notification to customize, delete the notification, preview the email notifications, preview the SMS (text message) notification, or export the grid data. You will be unable to delete default notifications, but they can be set inactive or modified.
The fields to the right of the Launch button contain the name of the trigger for the notification, the name assigned to the notification, the associated Parameter 1 value (if applicable), sort order, and active checkboxes for email notification messages, text notification messages, and the overall notification itself. The last four fields to the right contain log data regarding when the entry was created or modified, and by whom. Outside of the log data, you are free to make changes to the entries in this grid.
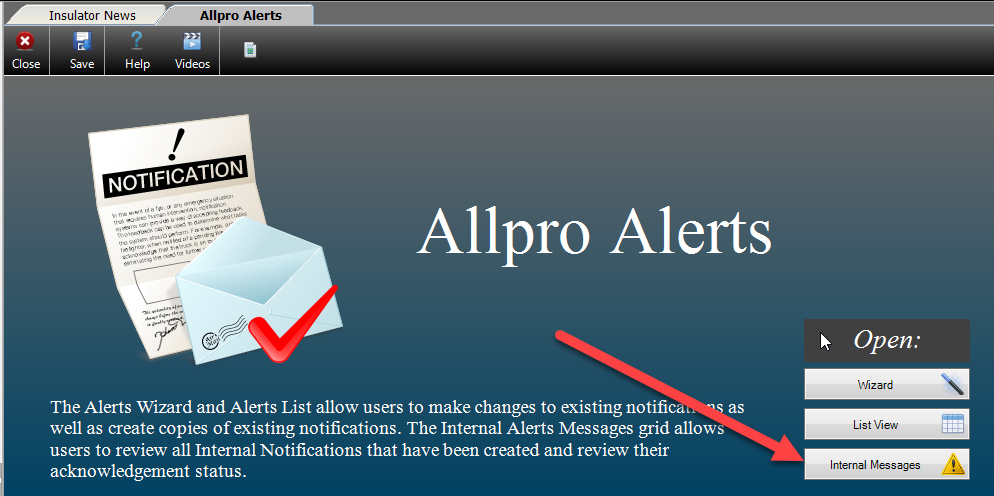
Allpro Alerts Internal Messages
The Internal Messages form provides you with a full log of both active and acknowledged Internal notifications sent by Allpro Alerts. This can help ensure accountability by pinpointing breakdowns in communication. By default, the form will load active internal notifications, but you can view acknowledged internal notifications as well by clicking Show All Notification Messages. Clicking Show Active Notification Messages will return you to the default filtering.
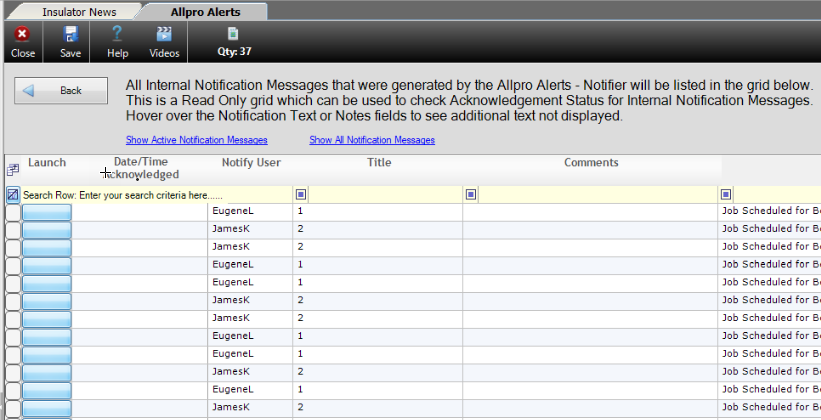
The first field in the grid contains a launch button from which you can export the grid data. To its right, the date the notification was acknowledged is displayed, if applicable. The title, comments, and user notes follow, with sort order and log data to their right. Note that you may not make changes to the entries in this grid, they are for the purpose of review only.
Allpro Alert Triggers
Triggers are the activities in Allpro Insulator that cause Allpro Alerts to send notifications. Users can view the list of available notification triggers by opening the Wizard or List View from the Allpro Alerts form, though List View will include each notification for every trigger. For this reason, it may be easier to configure notifications and the related templates from the Wizard, where the notifications are organized by their trigger. Note that users cannot add or remove triggers, though they can be customized or set to inactive. The triggers are DSign Created, Estimate Progress Changed, Job Rescheduled (SchedulePro), Job Schedule Reminder (SchedulePro), Job Scheduled (SchedulePro), Job Status Changed, Package QB Status Changed, Package Status Changed, and Sales Rep Assigned.
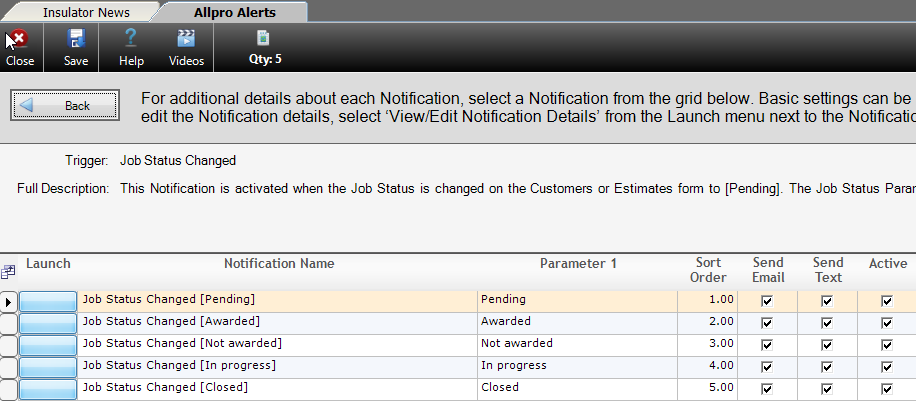
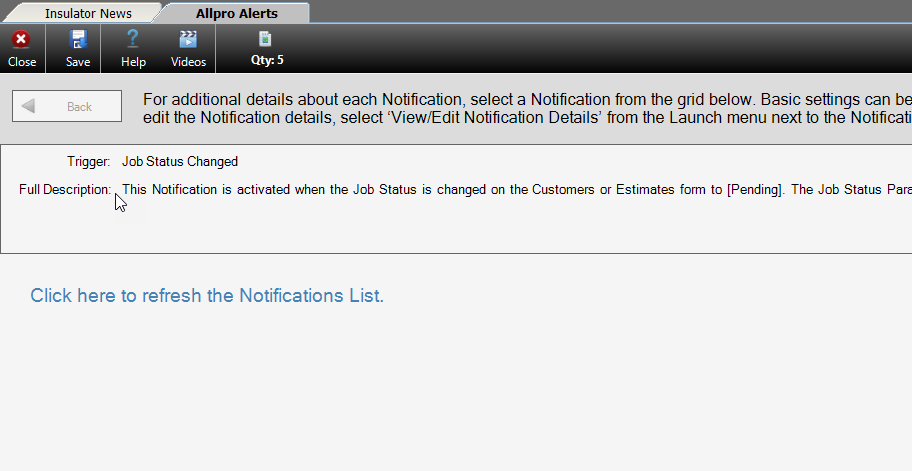
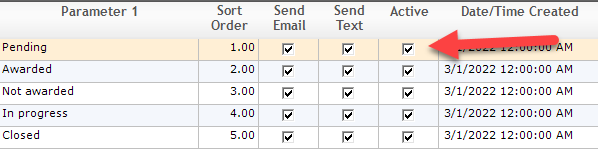
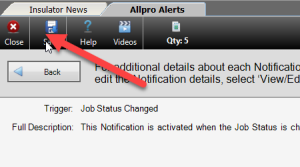
From the Allpro Alerts Wizard, click the blue Select button in the field next to the desired Trigger to open a full list of the associated notifications. Each trigger will have one or more notifications associated with it, depending on the number of possible Parameter 1 values and whether the user has created any customized notifications. Though not all triggers have a Parameter 1, it refers to a specific value associated with the trigger, such as “Closed” for the Package Status Changed trigger. This allows you to tailor who receives which notification and what it says depending on the Parameter 1 value. Notifications for the Job Status trigger are shown the image below:
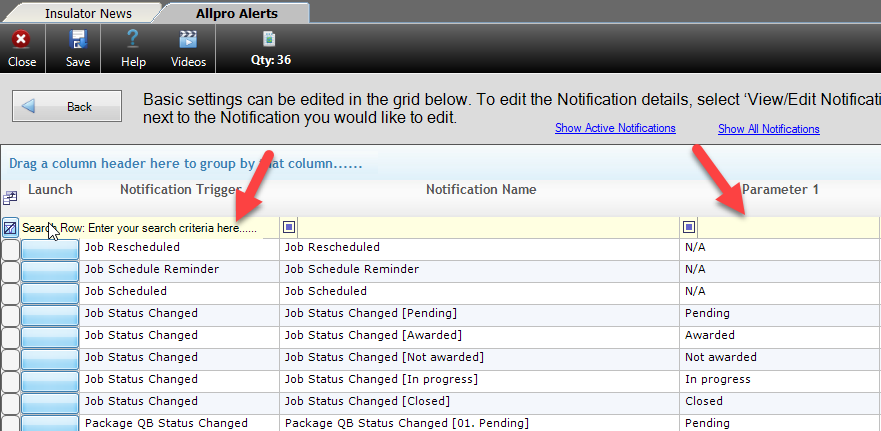
The image below shows how the same notifications appear on List View. Note that they are intermingled with other triggers and notifications, though the search row can be used to filter the contents of the grid.
Notification Templates
Each notification allows the user to create a customized set of templates from which notification messages are created when the notification is triggered. Users can create a separate template for Email and Internal notifications. Each type of notification can also be set to inactive on a case-by-case basis if that type of notification is not desired. Users can specify separate list of recipients for each type of message as well, allowing them to select the most effective form of communication for their contacts.
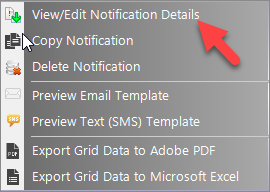
To modify notification templates, start by drilling down in to one of the Triggers in the Wizard form, then selecting View/Edit Notifications Details from the Launch menu. Alternatively, select Launch from the left of an entry in List View, then select View/Edit Notification Details. Once View/Edit Notification Details has been clicked, the Notifier panel will open, allowing changes to be made to the notification recipients and message templates.
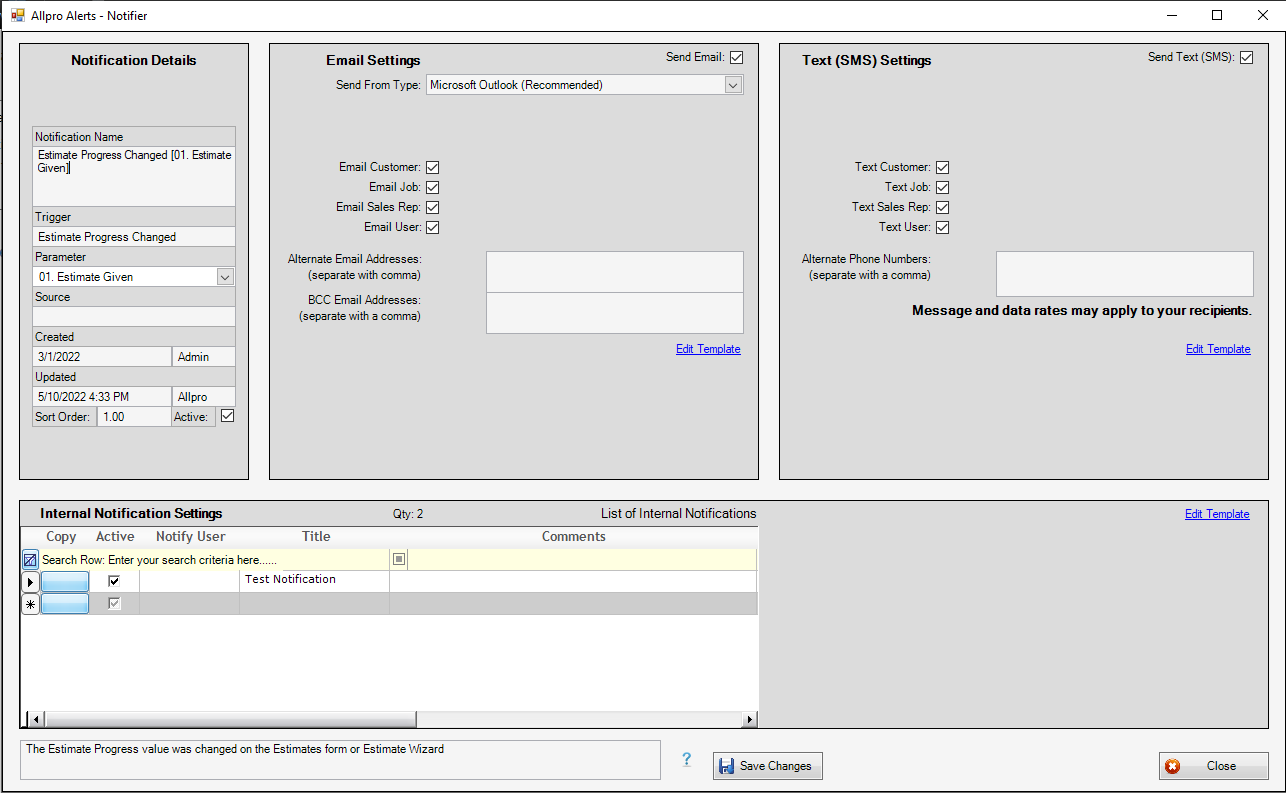
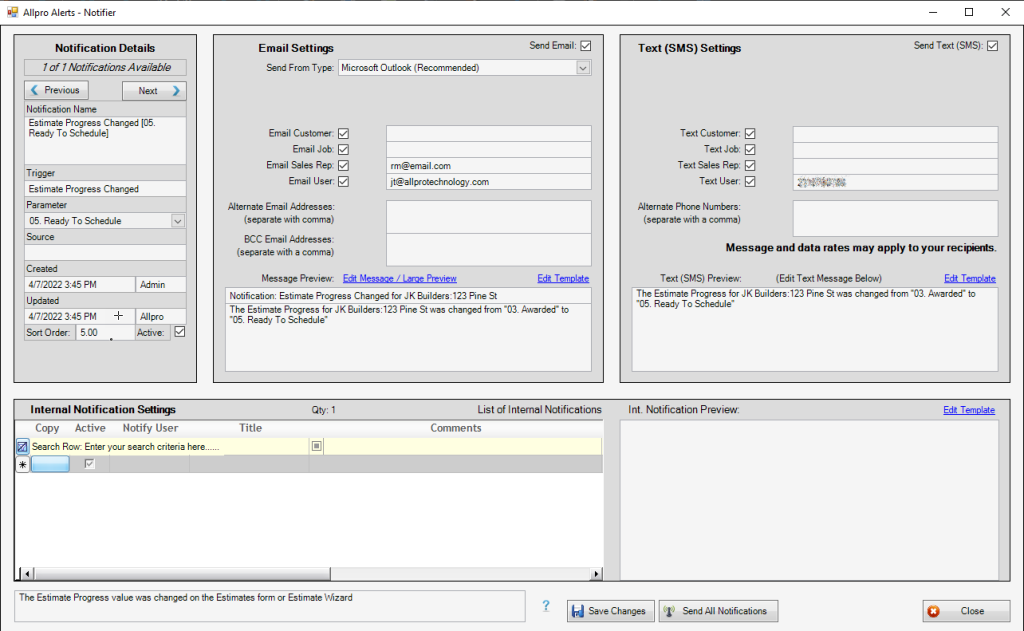
You’ll find the Notification Details section in the top left of the Notifier Panel. This section contains the same basic information as the Notifications grid entry, including the notification and trigger name. Entries in this section can be updated by the user, with the exception of log data. The notifier Panel will also allow you to select the desired recipients for notification messages. Email notifications can be sent to the customer contact, job contact, sales rep, the software user who triggered the notification, as well as a list of additional contacts separated by a comma. Internal notification can be sent to other Allpro Insulator software users. Remember to click the Save Changes button at the bottom of the Notifier Panel after making any modifications to the notification details or other settings.
.
Email Notifications
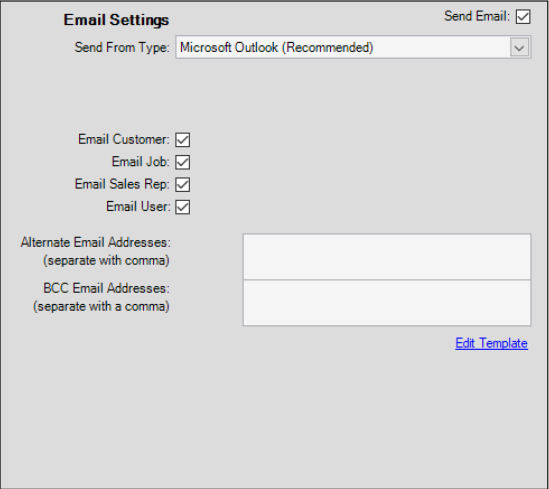
The section found at the top center of the notifier panel contains the settings for Email Notifications sent for the associated Allpro Alerts trigger. The check box found at the top of the Email Settings determines whether or not Email notification are active, and none will be sent for the selected trigger if this box is unchecked.
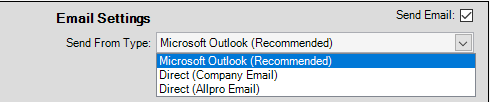
The “Send From Type” dropdown menu allows users to select whether the email notification will be mailed from Microsoft Outlook on your computer, direct mailed through your own email service provider using SMTP, or direct mailed from Allpro Insulator using our internal email service.
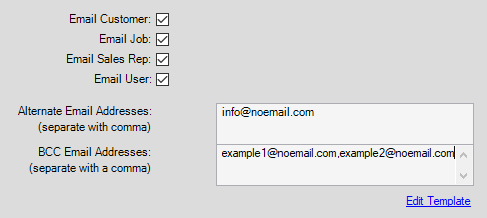
The row of checkboxes below the “Send From Type” dropdown determine to whom the email notification will be sent: the customer contact, job contact, sales rep, and/or the software user who triggered the notification. Multiple additional email recipients can be specified in the Alternate Email Addresses field and Blind Carbon Copy Email Addresses fields separated by a comma.
- Note that the email address found on the Sales Reps form will be used for sales reps, while users will be emailed at the address specified under preferences.
At the bottom of the Email Settings section, you’ll find the Edit Template option, which allows you to make changes to the email notification message itself. Each trigger and Parameter 1 value has its own email template, allowing users to tailor them as needed for the trigger event.
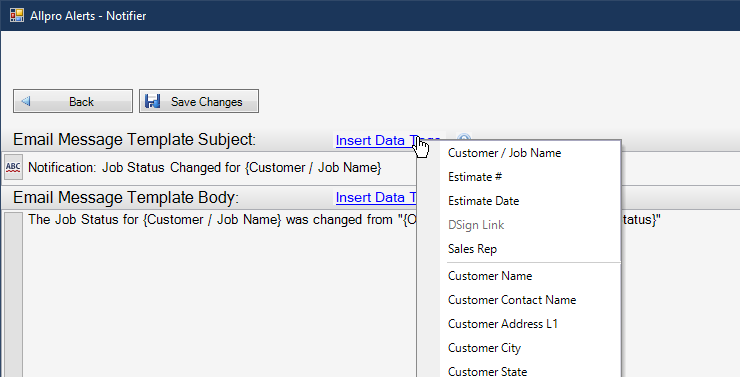
Users can specify a subject and body text for the email using data tags to add specific customer and job information when it’s sent. Until the notification is sent, the data tag simply appears as placeholder text enclosed in curly brackets. Remember to click Save changes in order to retain any modifications to the template and close the Notifier panel. Users will need to click in the area specified to return to the Trigger or List View form after making changes.
Text notification settings are found in the top right of the Notifier panel, and text message notifications can be disabled by unchecking the checkbox in the top right of the text setting section.
The Text message templatecan be modified by clicking Edit Template, and the template is separate for each notification. You can enter up to 120 characters in the text notification, though messages over 80 characters will be sent as two separate texts. You can include Data tokens that will be replaced with specific customer and job information when the notifications are sent. Remember to click Save Changes to retain any modifications to the template.
Internal Notifications

Internal notification settings are found in the lower portion of the notifier panel and allow you to configure notifications for software users from within Allpro Insulator itself. These notifications appear in the new notification panel near the top right of the Allpro Insulator, where you can review and acknowledge notifications you’ve received. Internal notifications can be enabled and disabled individually and are sent through Allpro Cloud Services Sync. All internal notifications and their acknowledgement status are logged.
- Note that only Allpro Insulator software users may be selected to receive internal notifications.
The Copy button is found in the first cell on the left of Internal Notification Settings grid and allows you to duplicate and modify an existing notification instead of starting each one from scratch. This can save time when an identical or similar notification needs to be sent to multiple software users.
The active checkbox is found in the next field on the right of the copy button. It allows individual notifications to be enabled or disabled independently, so you can temporarily disable a notification without deleting it.
To the right, you will find a dropdown from which you can select the software user to whom the notification will be sent. Each notification may be sent to just a single user but can be duplicated with the copy button and assigned to another user.
Next, the Title allows you to specify what the notification will be called in the recipient’s notification Panel.
Comments allow you to make a short note about the notification, which will be visible to the user to whom it is sent.

The remaining fields allow you specify a sort order for the entry and display log data regarding when the internal notification setting was created or modified, and by whom.
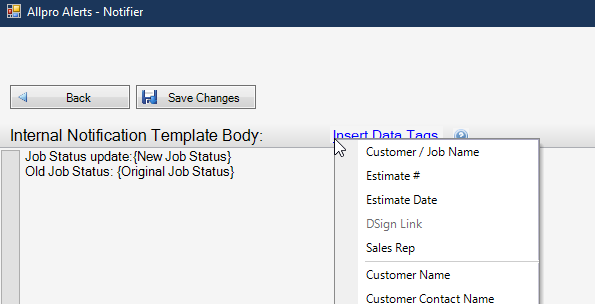
You can modify the internal notification message templates by selecting the desired internal notification message and clicking Edit Template on the upper right side of the Internal Notifications section. Each Internal notification message in the list can be assigned a separate message template, allowing you to tailor it to its recipient. Like other notification message templates, you may use Data Tags as place holders for specific customer and job information in your internal notification template. Remember to click Save Changes to retain any changes made to the message template.
Users will need to click in the area specified to return to the Trigger or List View form after making changes.
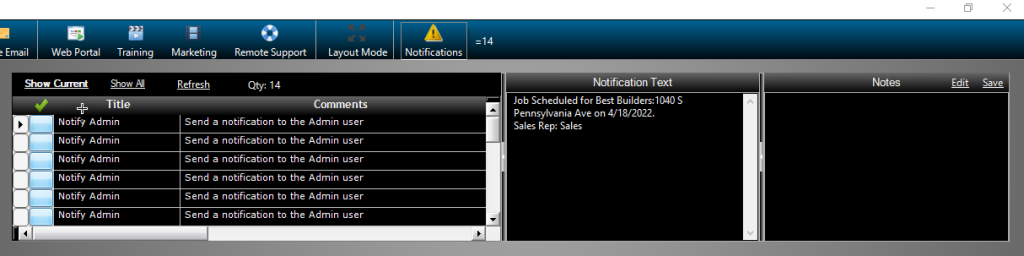
Internal Notifications can be accessed from any install of Allpro Insulator version 15 or newer with access to Allpro Cloud Services Sync. The Notifications Panel can be accessed from the top right of Allpro Insulator and displays the number of unacknowledged notifications next to its icon. From the Notifications Panel, users can add notes to the notifications they’ve received and acknowledge notifications to clear them. Acknowledged notifications can be viewed by clicking Show All, and users can check for new Internal Notifications by clicking Refresh.
Sending Notifications
To send notifications, a notification trigger event must first occur. These events are tied to activities related to normal use of the Allpro Insulator software, such as scheduling a job in SchedulePro or entering new customer information. When the trigger event occurs, the Notifier Panel (pictured above) 2will open.
Current triggers are:
- Job Scheduled
- Job Rescheduled
- Job Schedule Reminder (days before)
- Job Status Changed
- Estimate Progress Changed
- QB Status Changed
- Package Status Changed
- Prospect/Customer Created
- Sales Rep assigned to Customer (other than current user’s sales rep)
At the top left of the Notifier Panel, you’ll find information on the trigger that caused the notifications, as well as details on the notifications to be sent and their recipients. If more than one notification is pending, you can view the other notifications by clicking the Previous and Next buttons found in this section.
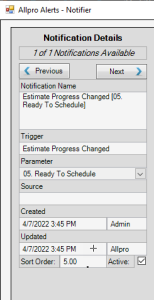
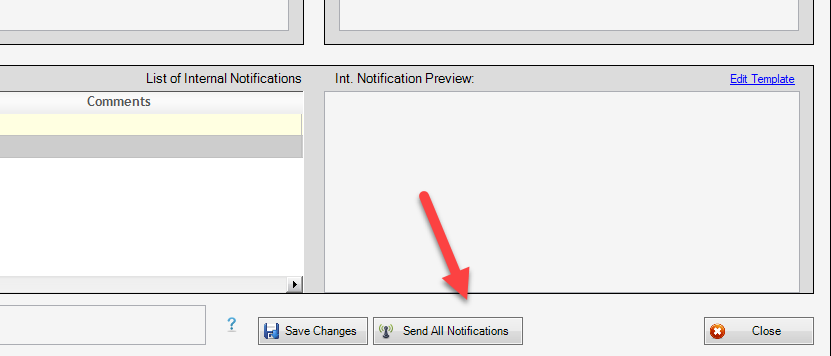
With proper permissions, you can modify notifications in the notifier panel to make any desired changes before sending them, otherwise clicking Send All notifications will send any email, text, and internal notifications included in the current notification settings. Clicking Close without clicking Send All Notifications will cancel notifications for the current trigger event.
Disabling Notifications
Triggering Allpro Alerts when you haven’t configured or aren’t using them can be disruptive but disabling them is quick and easy. We’ll start by opening the Allpro Alerts form from the lower left of the Form Explorer.
Individual triggers can be disabled from the List View or Wizard, but it may be easier to locate the notification you wish to disable from the Wizard.
- Although the instructions below will go through the Wizard to disable notifications, they can be disabled from the List View by unchecking the Active check box. It might be necessary to scroll to the right to locate the Active checkbox on the List View form, depending on the resolution of your display.
From the Wizard, locate the trigger for the notification or notifications you wish to disable, and click the light blue Select button.
Uncheck the Active checkbox next to the notification or notifications that you wish to disable.
Be sure to click Save at the top left of the form to retain your changes.
Sending Notifications
To send notifications, a notification trigger event must first occur; there is no way to send notifications directly. These events are tied to activities related to normal use of the software, such as scheduling a job in SchedulePro or entering new customer information. When the trigger event occurs, the Notifier Panel will open.
Current triggers are:
- DSign Created
- Job Scheduled
- Job Rescheduled
- Job Schedule Reminder (days before)
- Job Status Changed
- Estimate Progress Changed
- QB Status Changed
- Package Status Changed
- Prospect/Customer Created
- Sales Rep assigned to Customer (other than current user’s sales rep)
With proper permissions, you can modify notifications in the notifier panel to make any desired changes before sending them, otherwise clicking Send All notifications will send any email, text, and internal notifications included in the current notification settings. Clicking close without clicking send all notifications will cancel notifications for the current trigger event.
Allpro Alerts Logs
It might be necessary to pinpoint breakdowns in communication from time to time or assign accountability. For this reason, every notification sent from Allpro Alerts is logged. The logs are found in two locations. Internal Messages under Allpro Alerts contains full log of internal alerts, when they were sent and/or acknowledged. and by whom. Any notes added by Internal Alert recipient will also be displayed in the Internal Messages Log. For more information on the Internal Messages form, click here.
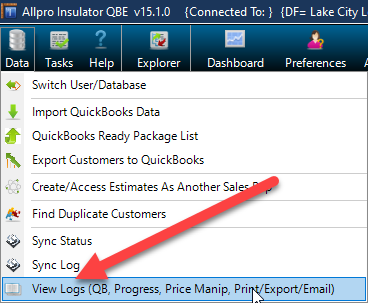
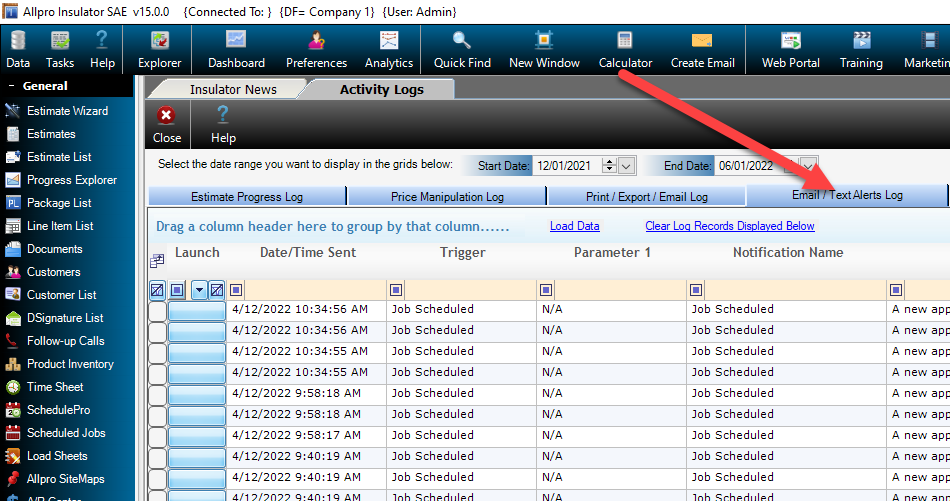
Logs for Email Notifications can be found in the Data Menu under View Logs. The fourth tab on the right labelled Email/Text Alerts Log, will list all Email notifications generated by the program, along with details regarding the sender and recipient. The log will also include the complete message sent in the Allpro Alerts Notification. For more help on the View Logs/Activity Logs, click here.
For more help or training on Allpro Alerts, please call (231) 839-7928 or email support@allprotehcnology.com.