
If you would like to view the jobs that you have scheduled in the past or in the future you just open the scheduled jobs form. On the left side of the screen in the explorer bar just click the Scheduled Jobs button like in the image below.
That will open the form as you see in the image below.
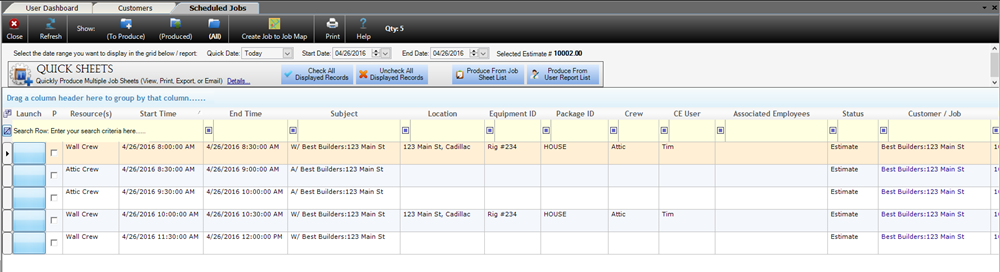
If you want to see what jobs are just scheduled for today in the Quick Date: drop-down box select Today The other options for the Quick Date: are
- Today – Shows scheduled jobs for today
- Tomorrow – Shows scheduled jobs for tomorrow
- This Moth – Shows scheduled jobs for this month
- This Year – Shows scheduled jobs for the entire year.
If you want to select a custom date range you can do this as well. All you have to do is select the date range that you want with the Start Date: and End Date. ![]()
As Job Sheets are printed from the Scheduled Jobs form, the Produced Date/Time Stamp will be updated and the Produced check box will be checked. This feature allows for the Scheduled Jobs form to be sorted by “To Produce”, “Produced” or All. The program default is All and a User Preference was added to manage this filter.
You can also show scheduled jobs for only certain locations, you must have your locations already setup and the customer/job must be set to that location for this to work. Just select the location from the drop down list then it will only show scheduled jobs for that location for the dates that you have decided to use.
You can also show scheduled jobs by Crew same as location you must have your crews properly setup and the line item must have a crew selected for this to function properly. Select the crew and date range and it will show you the scheduled jobs for that crew.
Filtering can be achieved in numerous ways within the Scheduled Jobs Form in order to make the form more useful. Some examples are resource, location, equipment, packages, crews, CE Users and any other field on the form. Once the filtering is achieved, reports can be ran, the grid can be exported using the right click menu, Quick Sheets can be used or Job-to-Job-to-Job Printing can be utilized. Please note, Quicksheets and Job-to-Job-to-Job Printing are part of the Advanced Features Module, for more information please click here.
Reports can be viewed, printed, exported or emailed based on groupings on the Scheduled Jobs Form as shown below:

Quick Sheets – Advanced Features Module Only
The Quick Sheets portion of the Scheduled Jobs Form is part of the Advanced Features Module and allows users to quickly and easily print Job Sheets or other reports for the scheduled appointments present within the Scheduled Jobs grid. The data within the grid can be filtered specifically by fields in order to achieve more specific Job Sheet printing. This feature allows users of Allpro Insulator to print Job Sheets for multiple jobs quickly and effectively.
In Allpro Insulator V11, Quick Sheets replaced Master Job Sheets within the Advanced Features Module.
To utilize the Quick Sheets form, filter data or leave form as is, and press “Check All Displayed Records” as shown below:

Once the records are checked for the specific appointments that need Job Sheets printed for, determine whether you would like to print from the Job Sheet List or from your customized User Report List as shown below:

Once the report is selected, the user can view, print, export or email the specific reports. If the Job Sheets are printed, all of them will be printed in order. If the Job Sheets are exported, they will all be exported to the chosen export path and if the Job Sheets are emailed they will be attached in an email for printing.
Once the Job Sheets are produced they will be marked as “Produced” with a Date/Time stamp that the Job Sheet was printed as shown below:

Quicksheets is part of the Advanced Features Module, for more information please click here.
Job-to-Job-to-Job Maps– Advanced Features Module Only
The usage of Job-to-Job-to-Job Maps is very similar to the printing using QuickSheets. The Job-to-Job-to-Job Maps allows users to create maps from a starting location, to multiple jobs and back to the starting location, effectively and with ease. The starting address needs to be setup within the User Preferences Form as shown below:

To create Job-to-Job-to-Job Maps simply filter data or leave form as is, and press “Create Job to Job Map” and press “Check All Displayed Records” as shown below:

The Map Sort can be set in order to determine the specific route that will need to be taken for the day. Numerical values can be entered into the Map Sort if a sort order is needed. Grid Filtering can also be applied to the Scheduled Jobs grid and the “Sort by Grid Order” button can be pressed to set the Map Sort Order to the Grid Sort Order.
Once the sort is determined and the records are checked, the “Generate Map” button can be pressed, the result is:

Job-to-Job Mapping is part of the Advanced Features Module, for more information please click here.