
The Estimate list is designed to help users find, manage and access Estimates, Invoices, and Templates. It is a comprehensive list of every record that has been generated, limited only by the Previous Days setting in Company Setup. From the Estimate List, users can open records, access job costing, access payroll splits and view a variety of data related to the Estimates and invoices in the list. Users can also perform batch updates, archive records, produce reports, and look for unbilled jobs. We’ll cover the layout of the form and how to use each function in this help page, or click one of the links below to navigate to a specific topic.
| Estimate List Reports | |
| Locating Unbilled Jobs | |
| Using the Automation Menu | The Estimate List Grid |
The Estimate List Toolbar
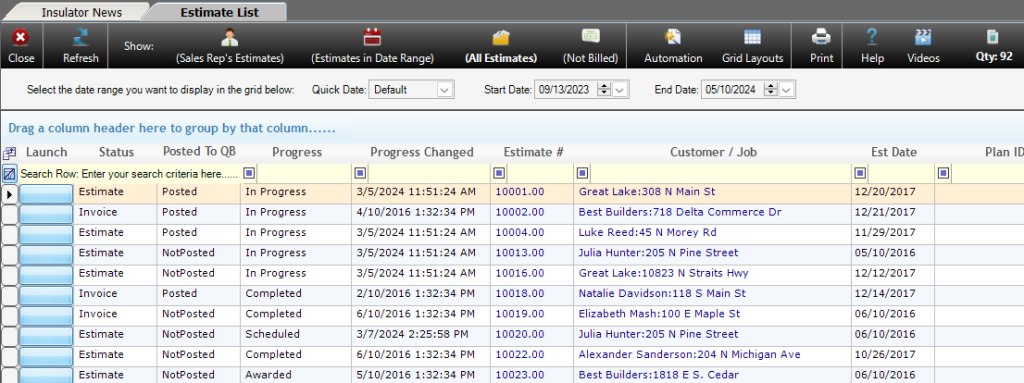
At the top of the Estimate List users will find several filtering options and functions, the Automation menu, customizable grid layout options, and reports. We’ll cover each of the items in the toolbar below.

Refresh – Updates the information in the Estimate List grid to include any changes made since the form was opened.
(Sales Reps Estimates) – This filter removes all estimates in the list not generated by the current user.
(Estimate Date Range) – Filters entries to only include those falling between the selected dates.
- Limited by the Previous Days setting in on the Options tab in Company Setup.
(All Estimates) – Displays all estimates with no filtering.
- Limited by the Previous Days setting in on the Options tab in Company Setup.
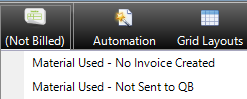
(Not Billed) – Lets the user choose between “Material Used – No Invoice Created” for Allpro Insulator Standalone Edition users and “Material Used – Not Sent to QB” for Allpro Insulator QuickBooks Edition users. When a selection is made, the list will display Jobs for which Material Usage was entered but no invoice was created, or no record was sent to QuickBooks.
Automation Menu – The Automation Menu allows access to batch functions, allowing numerous records to be updated simultaneously. It also contains batch email and postal mailing list functions. For instructions on how to use all of the functions in the Automation menu, click here.
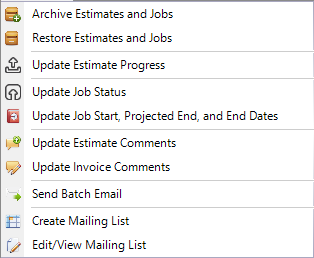
Archive Estimates and Jobs – (Advanced Features Module only) Allows the user to remove records from the Estimate List by archiving them. For help with the Archive function, click here.
Restore Estimates and Jobs – (Advanced Features Module only) Allows the user to remove Items from the Archive and restore them to the Estimate List. For help with the Restore function, click here.
Update Estimate Progress – Allows users to update Estimate Progress of multiple records in bulk. For help with updating estimate progresses in bulk, click here.
Update Job Status– Allows users to the update Job Status of multiple records in bulk. For help with updating job statuses in bulk, click here.
Update Job Start, Projected End, and End Dates – Allows users to update the Job Start dates, Projected End Dates, and End Dates in bulk. For help applying these updates, click here.
Update Estimate Comments – Allows the user to update the Comments field, often used to specify sales terms, on multiple Estimates. For help applying bulk Estimate Comment updates, click here.
Update Invoice Comments – Allows the user to update the Comments field, often used to specify sales terms and conditions, on multiple Invoices. For help applying bulk Invoice comments updates, click here.
Send Batch Email – Allows the user to select multiple Customer and/or Job email contacts to receive a bulk email message. For help with sending batch email, click here.
Create Mailing List – Allows the user to create a new list of customer’s and job’s postal addresses for marketing or other correspondence. For help creating mailing lists, click here.
Edit/View Mailing List – Allows the user to view and edit a selected postal mailing list. Users can also export the list or print address labels for direct mail marketing or other correspondence. For help managing, exporting, or printing mailing lists, click here.
Grid Layouts – Allows the user to modify and save 3 custom layouts for the Estimate List. Users can rearrange fields, hide fields, display hidden fields, change the sort order, and add filters to the filter row. Users can also restore the default grid layout from this menu. For help with customizing grid layouts, click here.
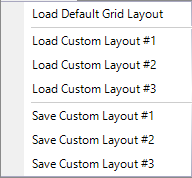
Load Default Layout – Restores the default grid layout.
Load Custom Layout #1 – Allows the user to load the grid layout saved to Custom Layout #1.
Load Custom Layout #2 – Allows the user to load the grid layout saved to Custom Layout #2.
Load Custom Layout #3 – Allows the user to load the grid layout saved to Custom Layout #3.
Save Custom Layout #1 – Saves the current grid layout to Custom Layout #1.
Save Custom Layout #2 – Saves the current grid layout to Custom Layout #2.
Save Custom Layout #3 – Saves the current grid layout to Custom Layout #3.
Print – Allows the user to select from the following reports:
Estimate List by Estimate Status/Estimate #
Estimate List by Estimate status/Estimate Date
Estimate List by Sales Rep/Estimate Status
Estimate List by Source/Estimate Status
Mobile Estimate List by Sales Rep
? (Help) – Opens this Estimate List help page.
Videos – Opens the Allpro Insulator Resource Portal to training videos related to the Estimate List.
QTY: – Displays the number of records currently found in the Estimate List grid.
The Estimate List Grid
The Estimate List grid displays all of the details about an Estimate including customer and job information. While some data fields are hidden by default, every related piece of information is there. The Estimate List grid is divided into 4 sections by vertical gray bars: Estimate information, Customer information, Job information, and logs. Users can leverage the ability to save 3 grid layouts to view just the desired fields and information. We’ll cover the fields that are displayed by default, with each field and its function defined below. For help with custom grid layouts, click here.

- For this help page, the term record is used to refer generically to Estimate, Invoice, Review, Archive and Template entries that can be found in the Estimate List
Estimate List Grid – Estimate Information
Launch – Opens the launch menu, which provides quick access to forms and functions related to the record, click here for further details.
Status – This field indicates the Status of the record: Estimate, Invoice, Review, Plan Template, or Archived.
Posted to QB – (QBE Only) Indicates whether the record has been sent to QuickBooks.
Progress – Displays the user-defined Progress of the selected record.
Progress Changed – Indicates the date and time that the record’s Progress was last changed.
Estimate # – This field displays the Estimate # of the selected record. Clicking the Estimate number will open the record on the Estimate form.
Customer / Job – This field displays the Customer and Job with which the entry is associated, or, in the case of Plan Templates, which Customer the entry it is associated with. Clicking on the Customer Job will open the Customer’s information on the Customer form.
Est Date – This field displays the date the Estimate was created.
Pan ID – If the entry is a Plan Template, this field displays the name of the plan. If the record was generated from a Plan Template, this field displays the name of the Plan Template that was applied.
Plan Description – If the entry is a Plan Template or was generated from a Plan Template, displays the description of the Plan Template.
PO # – If a purchase order was applied, displays the PO number that was entered on the Estimate form.
Terms – Displays the Sales Terms that were set for the record.
Sales Rep – Displays the name of the Sales Rep associated with the record. For help with Sales Reps, click here.
Source Of Order – Indicates how the job was acquired, examples might include advertising, referral, cold call, etc.
Global Access – Indicates if the record can be accessed by any Sales Rep or only the Sales Rep associated with it.
Subtotal – Displays the total charges before percentages, such as tax, are applied.
Total – The total charges for the record.
Total Paid – The amount that has been paid towards the total charges.
Total Due – The total charges currently due.
Minimum Payment – The minimum payment due, as specified on Invoices.
Due Date – The date that the next payment is due.
Estimate Category – Displays the user-defined Estimate Category of the Estimate the Package is part of. This field can be used to help further organize and sort Estimates and their associated Packages.
Estimate Class – Displays the user-defined Estimate Class of the Estimate the Package is a part of. This field can be used to help further organize and sort Estimates and their associated Packages.
Estimate List Grid – Customer Information
Customer Contact – Displays the name of the point of contact for the customer associated with the record.
Customer Address – Displays the mailing address for the customer associated with the record.
City – Displays the city portion of the mailing address for the customer associated with the record.
State – Displays the state portion of the mailing address for the customer associated with the record.
Zip – Displays the Zip Code portion of the mailing address for the customer associated with the record.
Phone – Displays the phone number for the customer associated with the record.
Alt Phone – Displays an alternate phone number for the customer associated with the record.
Fax – Displays the fax number for the customer associated with the record.
Email – Displays the email address for the customer associated with the record.
Send E – Opens a new email message and inserts the customer email address associated with the record. For help with email from Allpro Insulator, click here.
Customer Terms – Displays the default sales terms for the customer associated with the record.
Contact Type – Displays the contact type that was selected for the customer associated with the record: Customer, Prospect, or Former Prospect.
Prospect Status – Displays the user-defined prospect status for the customer associated with the record.
Prospect Source – Displays the user-defined source of the customer associated with the record.
Source Of Order – Displays a user-defined source for the job associated with the record. Examples might include advertising, referral, cold call, etc.
Customer Sales Rep – Displays the initial of the default Sales Rep for the customer.
Customer Architect – Displays the name of the default architect for the customer, if specified.
Estimate List Grid – Job Information
Job Status – Displays the current status of the Job: Pending, Awarded, In Progress, Closed, or Not Awarded.
- Note that setting the Job Status to Closed will impact other functions in the program.
Job Type – Allows the user to specify a user-defined type for the Job. This value can be used for Tiered Pricing, part of the Advanced Features Module. Click here for more information on the Advanced Features Module.
Job Location – Allows the user to specify a user-defined location for the job. This value can be used for Tiered Pricing, part of the Advanced Features Module. Click here for more information on the Advanced Features Module.
Job Contact – Displays the name of the point of contact for the job.
Job Address – Displays the street address of the Job.
City – Displays the city portion of the mailing address for the Job.
State – Displays the state portion of the mailing address for the Job.
Zip – Displays the Zip Code portion of the address for the Job.
Job Phone – Displays the phone number associated with the Job.
Job Alt Phone – Displays an alternative phone number for the Job.
Job Fax – Displays the fax number associated with the Job.
Job Email – Displays the email address associated with the Job.
Send E – Opens a new email message and inserts the email address associated with the Job. For help with email from Allpro Insulator, click here.
Job Architect – Displays the name of the architect associated with the job, if specified.
Estimate List Grid – Log Information
Manual % Comp – Displays the Manual Percentage Complete as specified on the Estimate form.
Auto % Comp – Displays how much of the Job has been completed based on Material Usage entries.
Date/Time Created – Displays the date and time that the record was created.
Date/Time Updated – Displays the date and time that the record was last modified.
Updated By – Displays the name of the Software User that last modified the record.
Modified On – Displays the form from which the record was last modified.
Totals – The Estimate List Grid also tabulates grand totals for the Subtotal, Total, Total Paid, Total Due, Min Pmt Due columns. The totals can be found at the bottom of the grid, below the specified columns.
The Launch Menu
The Launch Menu provides quick access to forms and data related to the selected record, as well as options to export grid data or correspond with customers and jobs. The Launch menu can be accessed using the dedicated button at the left of each row, but it can also be accessed by right-clicking anywhere in the grid.
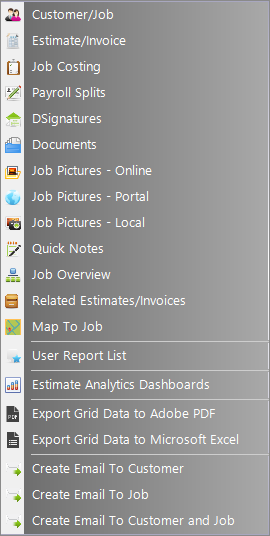
Customer/Job – Opens the Customer form to the customer entry for the selected record. For help with the Customer form, click here.
Estimate/Invoice – Opens the selected record on the Estimate form. For help with the Estimate form, click here.
Job Costing – Opens the Job Costing form for the selected record, allowing the user to assess profitability. For help with Job Costing, click here.
Payroll Splits – Opens Payroll Splits for the selected record, allowing the users to divide piecework pay among employees. For help with Payroll Splits, click here.
DSignatures – Opens the DSignatures form, where users can review any related DSign proposals. For help with sending DSign proposals, click here. For help with the DSignature list, click here.
Documents – Opens the Documents form and displays any documents related to the selected Estimate. This may include PDF, Word, and Excel files. For help with the Documents form, click here.
Job Pictures – Online – Allows the user to view and manage job pictures stored online. These pictures can be accessed from any system with Allpro Insulator installed or via the Allpro Insulator Online Web Portal. For help with Job Pictures Online, click here.
Job Pictures – Portal – Allows the user to view and manage pictures through the Allpro Insulator Online Web Portal. These pictures can be accessed from any system with Allpro Insulator installed or via the Allpro Insulator Online Web Portal.
Job Pictures – Local – Allows the user to view and manage job pictures saved to their own computer. These pictures can only be accessed at the computer from which they were added. For help with Job Pictures (Local), click here.
QuickNotes – Allows the user to add brief notes regarding the Customer, Job, or Estimate. For help with using QuickNotes, click here.
Job Overview – Loads the Job Overview form, allowing the user to see the overall progress of the Job.
Related Estimates/Invoices – Opens the Related Est/Inv form which displays financial figures for the record and any Estimates or Invoices related to it.
Map to Job – Opens a Google map in the user’s web browser displaying the route from the user’s business address to the related job site address. Uses the address information entered on the Company Info tab of Company Setup as the starting point.
User Report List – Opens report master E and allows the user to select and produce a report from a customized list of options. For more help with the User Report list, click here.
Estimate Analytics Dashboard – Displays a visual dash with information regarding the profitability, product usage, and crew data related to the selected record.
Export Grid Data to Adobe PDF – Allows the user to export the information currently displayed in the Estimate List grid to a PDF document.
Export Grid Data to Microsoft Excel – Allows the user to export the information currently displayed in the Estimate List grid to an Excel spreadsheet.
Create Email to Customer – Opens an email editor and inserts the customer’s email contact in the “to” field. For help with email from Allpro Insulator, click here.
Create Email to Job – Opens an email editor and inserts the job’s email contact in the “to” field. For help with email from Allpro Insulator, click here.
Create Email to Customer and Job – Opens an email editor and inserts the customer and jobs’ email contacts in the “to” field. For help with email from Allpro Insulator, click here.
Filtering and Grouping Records
The Estimate List will end up containing a lot of records, and manually searching for a specific record can be quite time consuming. To help locate records, users can enter criteria in the filter row, found in the beige, top row in the Estimate List grid . For example, entering the customer’s name in the Customer/Job filter will list only records associated with that customer.

Users can also apply more than one filter value to bring up a particular set of records. For instance, if the Status field filter is set to Invoice and a customer name is entered in the Customer/Job filter, the resulting view would display only invoices for the specified customer.
Users can also change the type of filter that will be applied by changing the Filter Type value, which is located to the left of each field in the first row of the grid. As pictured above, all of the columns are using the “Contains” Filter Type. This is the default Filter Type and will likely be used most of the time. To change the Filter Type, click the square at the left of filter field and select the desired filter type from the dropdown menu.
Filter criteria can be cleared using the Clear Filter button found at the right of each field in the Filter Row. Users can clear all filter criteria by clicking the Clear Filter button found at the far left of the filter row.
Users can also group records based on a given value. For instance, records can be grouped by Status. When grouped, the records are displayed as a tree with a “branch” for each estimate status: Estimate, Invoice, Review, Plan Template, and Archive. The branches can be expanded to view records with the same Status. Records can also be grouped by more than one value, creating subgroups in the tree. To group records, click one of the column labels and drag it into the light blue section just above the grid. To add subgroups, simply click and drag another column label into the blue section above the grid. To remove grouping, click and drag the grouping value from above the grid back down into the grid then release it.
Working with the Automation Menu
The Automation menu allows users to archive and restore records, perform batch updates, send batch email, and create and manage postal mailing lists. Note that only users with the Advanced Features Module can Archive and Restore records.
Select a function below to view instructions on how to use it.
| Sending Batch Email | |
| Creating a Postal Mailing List | |
| Batch Job Start, Projected End, & End Date Updates |
Archive Estimate and Jobs (Advanced Features Module only)
Over time, the number of entries in the Estimate List will grow as users generate new Estimates, Invoices, and other records. This can lead to the form becoming congested and even adversely impact the performance of your software. To help keep the Estimate List clean, older records and estimates that were not accepted can be removed from the Estimate List using the Archive Estimates and Jobs tool found in the Automation Menu. Records in the Estimate List must have a valid customer and job associated with them in order to be archived. When Archiving records from the Estimate List, users can also archive the related Jobs. This helps keep the Customer List clean, and can help keep customer entries from having unneeded clutter.
Archived Estimates are removed from the Estimate List and stored separately, but not deleted. Similarly, Archived Jobs are removed from the Customer List, but not deleted. Archived Estimates and Jobs will not be included in any reporting or other functions unless they are restored.

-
-
-
- Open the Automation menu and select Archive Estimates and Jobs
- If desired, check the Archive Associated Job checkbox to also archive the job(s) for the Archived Estimate(s).
- Using the checkboxes provided, select which records to archive from the Estimate List. Note that users can filter down to a set of records which they wish to archive, then select the Check All Displayed button to select all of the records at once.
- When done making selections, click Archive Selected Estimates.
- Select Yes in the confirmation dialogue, then click OK to accept the changes.
- Records will be archived, and the Action Status field will indicate whether the operation was completed successfully.
- When done archiving records, click done to return to the Estimate List.
-
-
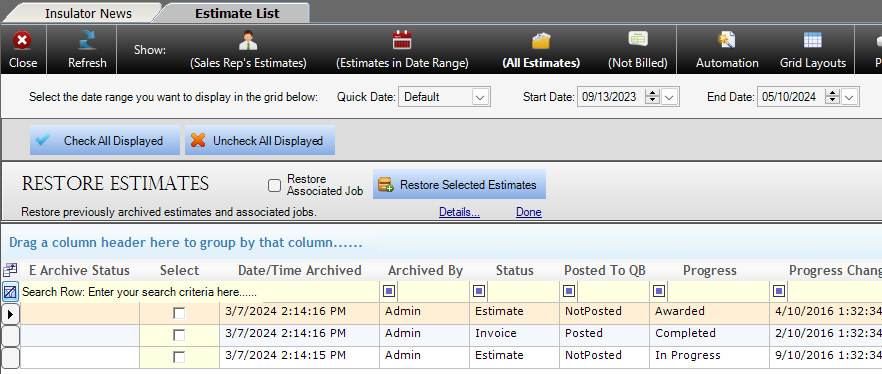
Restoring Archived Records (Advanced Features Module only)
For a variety of reasons, users may wish to move a record from the Archive back to the Estimate List. Perhaps an old Job was revived, or a mistake was made when archiving. Whatever the case, the Restore Estimate and Jobs function can help. Once restored, records will be included in reports and will appear in the Estimate List again. Note that only Estimates with a valid customer and job can be restored. and that if the Estimate and Job are archived, the Job must be restored in order to restore the Estimate.
-
-
-
- Open the Automation menu and select Restore Estimates and Jobs
- If needed, check the Restore Associated Job checkbox to also restore the job(s) for the Archived Estimate(s).
- Using the checkboxes provided, select which records to restore from the Archive. Note that users can filter down to a set of records which they wish to restore, then select the Check All Displayed button to select all of the records at once.
- When done making selections, click Restore Selected Estimates.
- Select Yes in the confirmation dialogue, then click OK to accept the changes.
- Records will be restored, and the Action Status field will indicate whether the operation was completed successfully.
- When done restoring records, click done to return to the Estimate List.
-
-
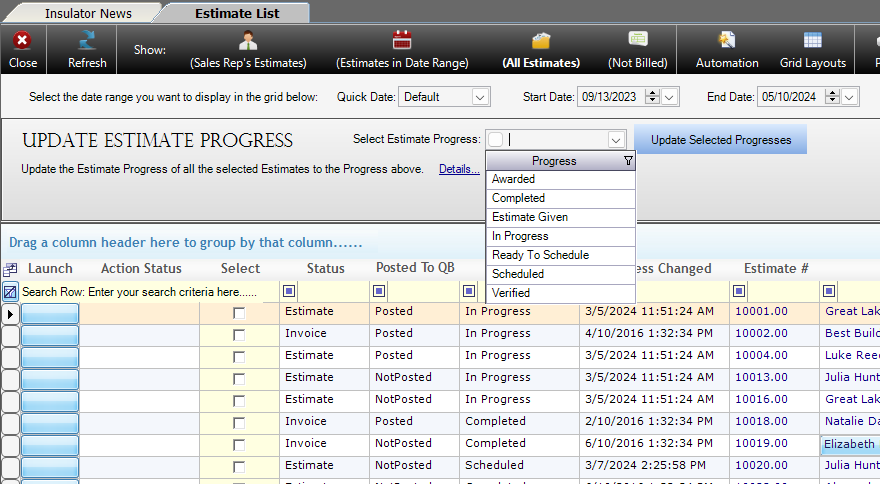
Update Estimate Progress
Estimate Progress can be an important metric used to track jobs as they move from proposal to, to in-progress, to invoice. The Update Estimate Progress function allows users to update multiple records simultaneously with just a few simple steps.
-
-
-
- Open the Automation Menu and select Update Estimate Progress.
- Use the Select Estimate Progress field to select or add a stage of progress.
- Using the checkboxes provided, select which records to update the Estimate Progress on. Note that users can filter down to a set of records which they wish to update, then select the Check All Displayed button to select all of the records at once.
- When done selecting records, click Update Selected Progresses.
- Select Yes in the confirmation dialogue, then click OK to accept the changes.
- The Estimate Progresses will be updated to the selected value, and the Action Status field will indicate whether the operation was completed successfully.
- When finished updating Estimate Progresses, click Done to return to the Estimate List.
-
-
Update Job Status
Job Status can be used to track the progress of a particular Job, and can impact other functions in the program. While it can be changed on the Estimate or Customer form, such updates must be done individually. The Update Job Status in the Estimate List Automation menu allows users to update numerous records at the same time.

-
-
- Open the Automation Menu and select Update Job Status.
- Use the Select Job Status field to select a new Job Status.
- Using the checkboxes provided, select which records to update the Job Status on. Note that users can filter down to a set of records which they wish to update, then select the Check All Displayed button to select all of the records at once.
- When done selecting records, click Update Job Status.
- Select Yes in the confirmation dialogue, then click OK to accept the changes.
- The Job Statuses will be updated to the selected value, and the Action Status field will indicate whether the operation was completed successfully.
- When finished updating Job Statuses, click Done to return to the Estimate List.
-
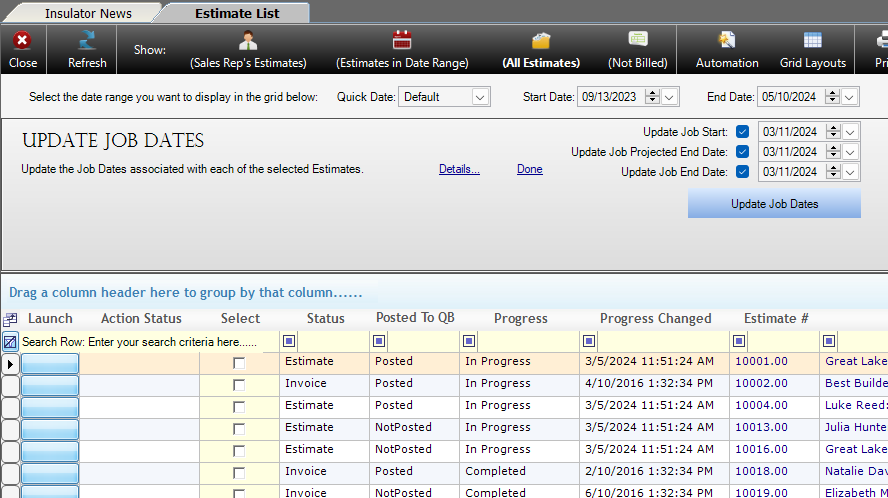
Update Job Start, Projected End, and End Dates
Keeping track of key job information, like when work was started and completed, is an important part of record keeping. While this information can be entered when generating the Estimate, accurate dates may be unavailable or can change after the fact. The Update Job Start, Projected End, and End Dates function allows users to quickly make changes to multiple Jobs.
-
-
- Open the Automation Menu and select Update Job Start, Projected End, and End Dates
- Use the 3 checkboxes at the top of the form to determine which values to update, Job Start Date, Projected End Date, and/or Job End Date.
- For any values selected in the previous step, assign the new date using the calendar field to the immediate right.
- Using the checkboxes provided, select which records to update the dates on. Note that users can filter down to a set of records which they wish to update, then select the Check All Displayed button to select all of the records at once.
- When done selecting records, click Update Job Dates.
- Select Yes in the confirmation dialogue, then click OK to accept the changes.
- The Job Dates will be updated to the selected values, and the Action Status field will indicate whether the operation was completed successfully.
- When finished updating Job Dates, click Done to return to the Estimate List.
-
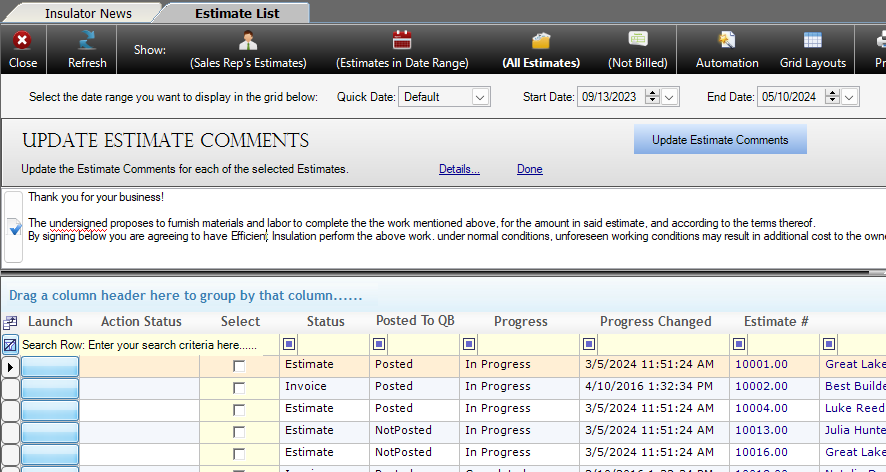
Update Estimate Comments
Estimate Comments are typically used for sales terms and disclaimers, and may require new verbiage from time to time. However, updating Estimates individually is quite inefficient and time consuming. The Update Estimate Comments function is here to help, allowing users to batch update Estimate Comments and any terms they contain.
-
-
- Open the Automation Menu and select Update Estimate Comments.
- Using the text field provided, make any desired changes to the existing Estimate Comments.
- The field will contain the current default Estimate Comments as specified in Company Setup, but users are free to modify or remove them.
- The button to the left of the field can be used to perform a spell check.
- Using the checkboxes provided, select which records to update the Estimate Comments on. Note that users can filter down to a set of records which they wish to update, then select the Check All Displayed button to select all of the records at once.
- When done selecting records, click Update Estimate Comments.
- Select Yes in the confirmation dialogue, then click OK to accept the changes.
- The Estimate Comments will be updated to the specified text, and the Action Status field will indicate whether the operation was completed successfully.
- When finished updating Estimate Comments, click Done to return to the Estimate List.
-
Update Invoice Comments
Invoice Comments are typically used for sales terms and disclaimers, and may require new verbiage from time to time. However, updating Invoices individually is quite inefficient and time consuming. The Update Invoices Comments function is here to help, allowing users to batch update Invoice Comments and any terms they contain.
-
-
- Open the Automation Menu and select Update Invoice Comments.
- Using the text field provided, make any desired changes to the existing Invoice Comments.
- The field will contain the current default Invoice Comments as specified in Company Setup, but users are free to modify or remove them.
- The button to the left of the field can be used to perform a spell check.
- Using the checkboxes provided, select which records to update the Invoice Comments on. Note that users can filter down to a set of records which they wish to update, then select the Check All Displayed button to select all of the records at once.
- When done selecting records, click Update Invoice Comments.
- Select Yes in the confirmation dialogue, then click OK to accept the changes.
- The Invoice Comments will be updated to the specified text, and the Action Status field will indicate whether the operation was completed successfully.
- When finished updating Invoice Comments, click Done to return to the Estimate List.
-
Send Batch Email
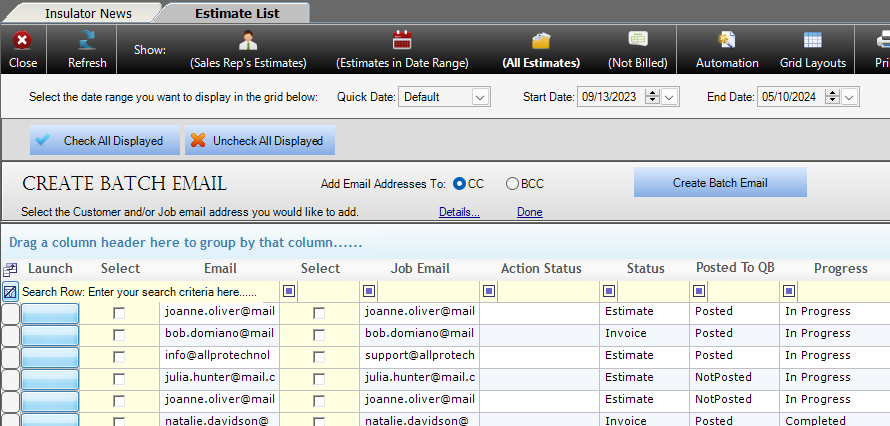
Whether to update current customers on the stage of work or as part of marketing, users may wish to send email messages to multiple customers. The Send Batch Email function is built expressly for this purpose. Users can select recipients, create their message in the provided editor, then send the messages through Allpro Insulator’s Microsoft Outlook Integration. Rather than generate numerous messages, the program creates a single message and adds additional contacts to the carbon copy (CC) or blind carbon copy (BCC) fields.
- Contacts added to the CC field will be visible to other recipients, whereas those added to the BCC field will not be visible.
-
-
- Open the Automation Menu and select Send Batch Email.
- Select whether to add addresses to the CC or BCC field using the radial menu.
- Select contacts by checking the boxes next to the customer and job email addresses associated with the records in the list.
- Click Create Batch Email to open the email editor.
- Select an Email Template or compose a subject and message.
-
-
-
-
- Note that Data Tokens used to include specific Customer and Job information will not work properly on a batch email.
-
-
-
-
- Click Email-O (Stay Here) to send the message and leave the email editor open, or select Email-O (Finished) to send the message.
- The new message will open in Microsoft Outlook, where the user can make further changes or send the message.
- When done creating batch emails, click Done to return to the Estimate List
-
-
-
-
- Note that users may need to reload the default grid layout from the Grid Layout menu or load their custom grid layout after creating batch email messages.
-
-
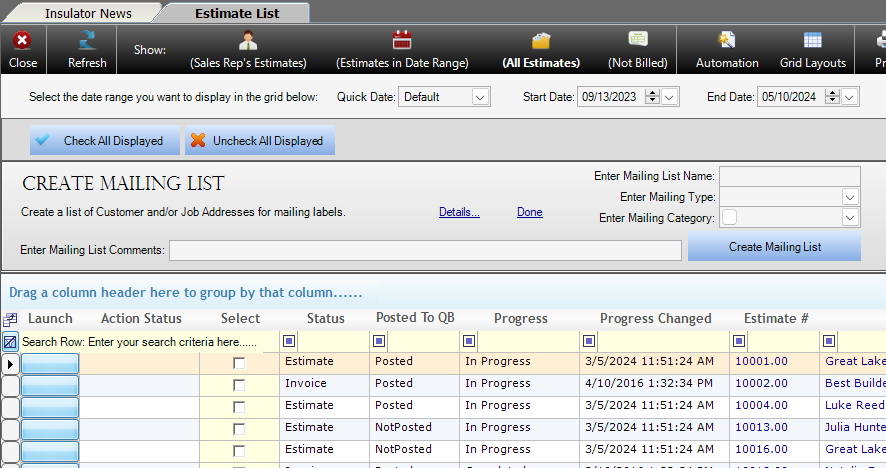
Create Mailing List
The Create Mailing List function is designed to facilitate postal mail to multiple customers. Users can select from customer or job mailing addresses and generate their list by selecting Estimate List records. Once the list is complete, users can view the list and print mailing labels with the Edit\View Mailing List function.
-
-
- Open the Automation Menu and select Create Mailing List
- Provide a name for the mail list in the Enter Mailing List Name field, this entry is required.
- Select a mailing list type from the Enter Mailing Type dropdown to determine whether to add the Customer’s Address or the Job’s Address; a selection is required.
- Create or assign an optional Category for the mailing list using the Enter Mailing List Category dropdown menu.
- Enter any optional Mailing List Comments.
- Using the checkboxes provided, select which records to include in the mailing list.
- Click Create Mailing List
- Select Yes in the confirmation dialogue.
- In the next dialogue, click Yes to view the mailing list or No to continue adding addresses.
-
-
-
-
- Click here for instructions on Viewing/Editing the mailing list.
-
-
-
-
- Click Done to return to the Estimate List when finished adding addresses.
-
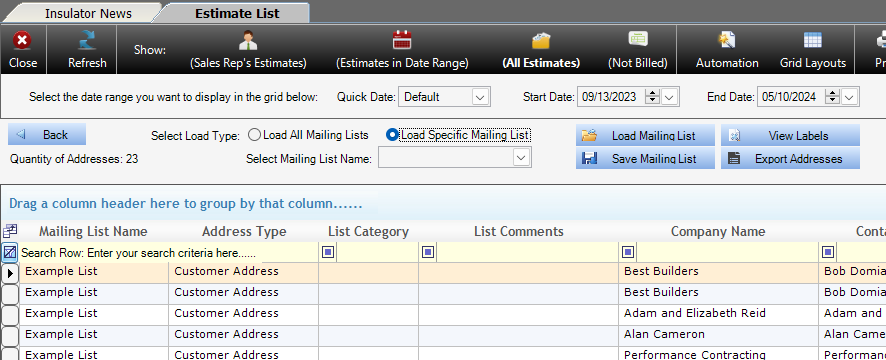
Edit/View Mailing List
The Edit/View Mailing List function allows users to view, edit or export mailing lists. Users can also view or print the address list in a format designed for use with standard address label printing stock.
-
-
- Open the Automation menu and select Edit/View Mailing List
- Select Load All Mailing Lists or Load Specific Mailing list from the radial menu.
- If loading a Specific Mailing Lists, select it from the Select Mailing List Name dropdown menu.
- Click Load Mailing List
- To delete entries from the mailing list, select the white cell at the far left of the entry and hit the delete key on your keyboard, then select Yes from the confirmation dialogue.
- To add addresses, Click the Back button to navigate to the Create Mailing List function.
-
-
-
-
- Click here for help with the Create Mailing List function.
-
-
-
-
- Click Save to retain changes to the mailing list.
- Click View Labels to view the address labels in a printable form in the Report Viewer.
-
-
-
-
- Click here for help with the Report Viewer.
-
-
-
-
- Click Export to export the address list to Excel.
- When done, click Back to return to the Create Mailing List function, then click Done to return to the Estimate List.
-