Allpro Insulator now has the ability to add pictures and notes on the pictures to the current job. You will find this useful if you would like to give a visual note to an installer or anyone else that can make use of this feature.
The first thing you need to do is figure out how you want to sync your pictures with employees that will need them. There are multiple ways you can do this. We will cover three different ways to do this on this help page,
| Local Shared Folder | Dropbox | OneDrive |
Add New Pictures
To add pictures to a Customer/Job you first need to open the estimate that it goes along with. Once that estimate is opened up you’ll need to click the Job Pictures button as you see in the image below.

Once that form is open you will have to click the Add New Pictures Button, then you will select how you want to get the pictures.
You can do so two different ways, The first way is to select a folder and have it bring in every picture in that folder or the second way is to select the files you want to open from a folder so you can pick and choose what pictures are loaded.

When you click the Insert All Pictures From Folder button it will bring up the following screen seen below as Image 1. Here you hit the dropdown button and find the folder that contains your pictures can be a phone, tablet or a folder on your computer.

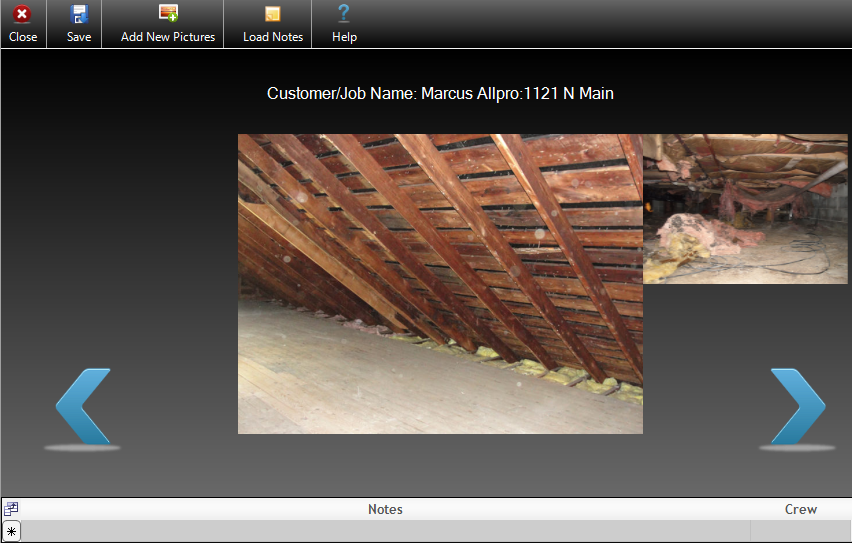
Once you hit the OK button or the Open button depending how you decided to import your photos it will make a copy of the select Folder/Files that you selected and copy them to the designated place that you setup earlier when you setup Dropbox or OneDrive. Once you have done this it will look like the image below.
Allpro Insulator does not move or delete the original files it only makes a copy of them and puts them in the proper file structure. If you would like to delete them you will have to do so manually.

To scroll through the pictures that you have imported to start off if you hit left it does nothing as the first picture is in the center, if you hit the right arrow it will proceed to scroll through the pictures you have imported. There will be images loaded on this screen left preview, center image and this is the one that you’re making notes on and can open the picture in your default picture viewer by clicking it, and the right preview.
If you would like to make a note on the picture you have to make sure that the center image is the picture you would like to write a note on. Just click in the note field and type a message that you would like attached to this picture. You have the option of assigning this to a crew so they will know to take notice of that picture. Customer Name, Job Name, File Name, Date/Time Created are all filled in by Allpro Insulator and cannot be edited. Date/Time Updated and Updated by are also filled in by Allpro Insulator but that’s at the time that the note has been edited so you can know who edited it and when.

Dropbox
Click here to downloadDropBox.
One of the ways you can share your files between people in your company is to use a cloud server program. This part of the help page we are going to cover using OneDrive. We will start with the Install of DropBox.
The one nice thing about using DropBox is you can have multiple users sharing a folder and syncing them all together. meaning your employees can have their personal dropbox folder and you can give them permission to sync the Job Pictures folder with them.
The downside to DropBox is that they only give you 2 Gigabytes of Data to start with for free and that will probably fill pretty fast. You do have the option of deleting or moving old pictures just be sure to do this only on the main account as when you remove it from that account that it removes it from all other accounts.
One of the ways you can share your files between people in your company is to use a cloud server program. This part of the help page we are going to cover using OneDrive. We This is the most secure way of doing things so if someone leaves your company you can remotely delete all the pictures off of their PC and stop them from receiving any more updates via the DropBox control panel.
One of the ways you can share your files between people in your company is to use a cloud server program. This part of the help page we are going to cover using OneDrive. We
Once the download has finished and now opened follow the onscreen instructions. Once Installed go to www.dropbox.com and login.

Right click anywhere on the blank white space and click Share a folder… if you have just created this account it will ask you to confirm your account please do this as it is the only way to share a folder. Be sure to check your junk folder as it may be picked up as spam. If you just created your account you’ll have to wait for your account to be confirmed then start over.
Once you get to the share a folder window select I’d like to create and share a new folder then hit next, on the next screen you’ll setup a folder name I would recommend you call it Allpro Insulator but you can call it anything you would like. Once you have named it hit the Next button. On this screen you will be able to invite people to share this folder with. To do this type in the email *Example: support@allprotechnology.com* then hit the “,” and it will let you continue adding emails just always have to hit “,” after the email to be able to keep adding. I would recommend taking the checkmark out of Allow editors to manage membership of this folder. so that only the main person can invite/suspend people that can view this shared folder, but I would make sure to leave the drop down atcan edit otherwise they wouldn’t be able to upload new pictures but they would still be able to download and see them in Allpro Insulator. Once you have added all the people you would like hit the Share Folder button.

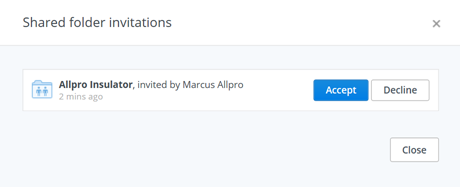
Once this is done it will send an email to everyone that you listed and once they click the link it will take them to dropbox.com and that will either let them login to their DropBox account or create an account. Once either of those is done they will come to a screen that looks like the image below.

Once they click the Accept button it will now be shared with them so whoever that folder is shared with can read/write to that shared folder.
Now as the main account holder you can add/remove people at any time so if someone leaves your company you can lock them out from receiving/changing anything in that folder. As long as someone has permission to that folder they can add/delete any file at any time.
OneDrive
Click here to download OneDrive
One of the ways you can share your files between people in your company is to use a cloud server program. This part of the help page we are going to cover using OneDrive. We will start with the Install of OneDrive.
- OneDrive starts you out with 15GB of storage space but you can not share files with other people the way you can with dropbox.
- If someone leaves the company only way to lock them out is to change the main username and password.
- Every OneDrive account has to use the same username and password
Once the download has finished and now opened click on the Get Started button, on the next screen that comes up if you have a Microsoft account for the business you can enter that info now, if you’re needing a Microsoft account you can click the Sign up now button.
Once you are signed in it will allow you to change where the OneDrive folder is located at on your computer, we recommend leave it where it is by default “User Profile/OneDrive” weather you decide to keep it where it is by default or change it you can hit the next button. This next screen allows you to select the folders that sync with your computer once again we recommend that you stick with the defaults and pick Sync all files and folder in my OneDrive. Once you have selected what one you would like hit next again. On this next screen we recommend unchecking Let me use OneDrive to fetch any of my files on this PC. Due to security reasons if you leave it checked that is up to you.
You will notice a Welcome to OneDrive in your taskbar that means it has been setup successfully.
Local Storage
If you don’t have internet or any devices that sync out of the office setting up a local shared folder may be the best way for you.
To do this log into the computer that is hosting the Allpro Insulator Database as an admin account.
Click on the Windows start button and click Computer.
Once that window is open we recommend that you put it on your “C:” Drive. so open the Local Disk (C:)

Once in there right click and hover over New then click the word Folder

Then name the folder anything you want but we recommend Allpro Insulator Pictures. Once that folder is created right click on that folder and go to properties.The next window that opens up you’ll want to click on the Sharing tab once here click the share button. If you are on a domain you can select the users that you want to have access to this folder by username, If you’re not on a domain you should just let everyone have access to it by typing in Everyone then hitting the add button. Then click on the dropdown that says read and select Read/Write.

Click the share button and this folder will now be shared. This computer must be turned on for people to access this shared folder. You may need to talk to someone with a networking background to get this setup properly.
Configuring Allpro Insulator to Use Cloud Storage
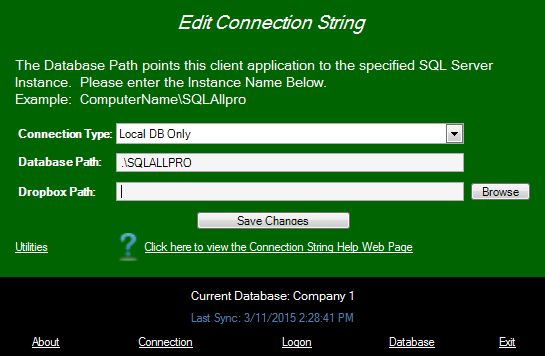
Now that you have Dropbox or OneDrive setup we have to tell Allpro Insulator where to access these files and where to copy our pictures to. If you currently have Allpro Insulator open please close it then reopen it and stay at the login screen and click the Connection button.

That will bring you to this screen where you select the Cloud Storage Folder. Click the Browse button and select the proper folder.
Where UserProfile is the local profile for the logged in user and Computer-Name is the computer that is sharing the pictures folder.
- OneDrive should be “C:\Users\UserProfile\OneDrive”
- Dropbox should be “C:\Users\UserProfile\Dropbox\Allpro Insulator” If you used the naming convention described in the how to setup DropBox
- Local (share) should be “\\Computer-Name\Allpro Insulator Pictures” If you used the naming convention described in the how to setup local shared folder

Once you select the folder you would like to copy the pictures to just click the Save Changes button and that will tell you that you need to restart Allpro Insulator and then close. Now open Allpro Insulator back up and login just as normal.
