
Line Item Splits
The Line Item Splits Tab of the Payroll Splits form is where any line items used in the estimate will be split for payment purposes. The top grid is the packages grid which will be explained in further detail in the packages section of this page. The bottom grid is the Line Item Splits Grid. This is where you will split all line items for payment purposes. This form will work together with the Job Costing Form.
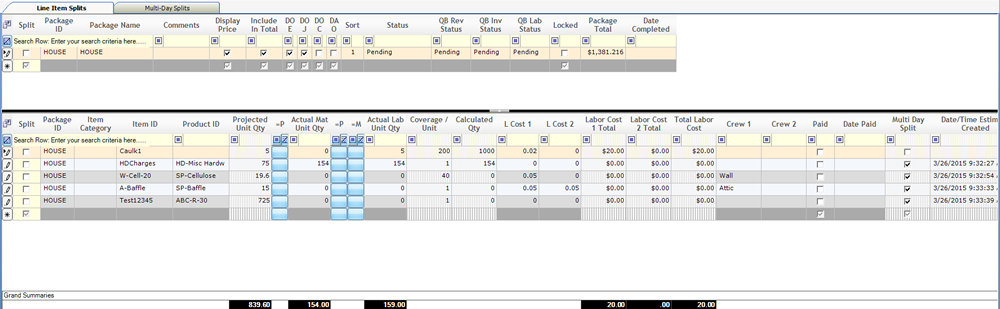
- Split – The Split checkbox informs users if the line item is being split.
- Package ID – Displays the Package ID for the line item
- Item Category – Displays the Item Category
- Item ID – Displays the ID of the item that is being split
- Product ID – Displays the Product ID of the item that is being split
- Projected Unit Quantity – Displays the projected quantity of units that will be needed to finish the current job. This Field is calculated by taking the quantity from the estimate and dividing it by the coverage per unit. This allows the user to view how many units of a specific item will be needed to complete the job, based on the quantity entered in the estimate.
- =P – The First =P button will insert the Projected Unit Quantity into the Actual Material Unit Quantity Column.
- Actual Material Unit Quantity – This Column allows the user to enter the Actual Material Units used of the line item. It is important to understand that Actual Material Unit Quantity does not have to match the Projected Unit Quantity. The Amount entered into this field will be the quantity of units removed from inventory if Allpro Insulator is being used to track inventory.
- =P – The second =P button, when clicked, inserts the Projected Unit Quantity into the Actual Labor Unit Quantity Column.
- =M – The =M button sets the Actual Labor Unit Quantity to equal the Actual Material Unit Quantity
- Actual Labor Unit Quantity – This Field allows the user to enter the Actual Quantity of Labor Units used for this line item. This Field can be entered manually or by clicking the second =P or the =M button. This Field will be the amount of material that is being applied for payroll splits purposes. This quantity will be the quantity used in calculating payroll splits using the time sheet enteries and split percents. This allows employees to be paid on the amount of material they should have used and not the amount actually used.
- Coverage Per Unit – The Coverage Per Unit Field displays the coverage per unit of the item. An example of Coverage Per Unit would be, if you averaged 70 Square Feet of coverage per bag of insulation, the coverage per unit would be 70.
- Calculated Quantity – The Calculated Quantity Field is calculated automatically by taking the projected Quantity (x) and multiplying that by the coverage per unit (y). So X * Y = Calculated Quantity.
- Labor Cost 1 (2) – The Labor Cost(s) fields display the raw labor coverage per unit cost for the current line item
- Labor Cost 1 (2)Total – The Labor Cost Total Field is calculated automatically Fields are calculated by taking the Labor Cost 1 or 2 Field and multiplying that by the Calculated Quantity.
- Total Labor Cost – Total Labor Cost is calculated by adding Labor Cost 1 Total and Labor Cost 2 Total.
- Crew1 (2) – Displays the Crew that is working with the current line item
- Paid – The Paid checkbox allows the user to select if the line item has been paid for. A checked checkbox means that it has been paid
- Date Paid – Displays the Date that the line item was paid
- Multi Day Split – The Multi Day Split Checkbox indicates if the line item will be involved with a multi day split. This information comes from the job costing form.
Multi-Day Splits
The Multi-Day Splits is where the user will enter any payroll splits information that had multi day job costing. This Tab is very similar to the Line Item Splits tab with a few distinct differences.
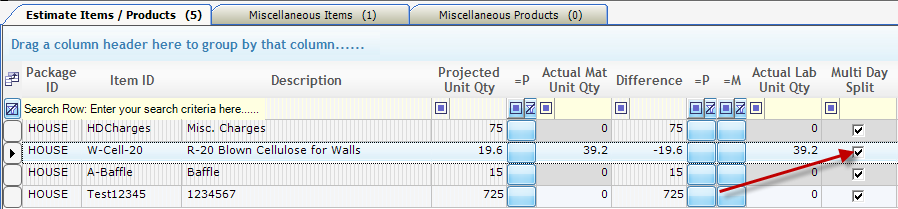
To begin Multi Day Payroll Splits you must first start on the Job Costing Form. For the line item that you are splitting you must check the Multi Day Split checkbox.
From this point you must fill out the information on the bottom grid of the Job Costing Form.

Now after these steps are completed you are ready to go back to the payroll splits form. First click on the Multi Day splits tab. On this tab you will see the information that was entered on the Job Costing form.

- Split – The split checkbox displays if there is a split being performed.
- Work Date – The work date field displays the date that the work being paid for was performed.
- Equipment ID – The Equipment ID Field the piece of Equipment that was used for the Multi Day Split.
- Item ID – The Item ID field displays the ID of the line item that is involved with the multi day split.
- Product ID – Displays the ID of the product that is involved in the multi day split.
- Projected Unit Quantity – Displays the projected quantity of units that will be needed to finish the current job. This Field is calculated by taking the quantity from the estimate and dividing it by the coverage per unit. This allows the user to view how many units of a specific item will be needed to complete the job, based on the quantity entered in the estimate. This information is pulled directly from the Job Costing Form.
- Actual Material Unit Quantity – This Field displays the Actual amount of Material units that were used to complete this job. This information is pulled directly from the Job Costing form and cannot be edited on the Payroll Splits form.
- =P – The =P button, when clicked, inserts the Projected Unit Quantity into the Actual Labor Unit Quantity Column.
- =M – The =M button sets the Actual Labor Unit Quantity to equal the Actual Material Unit Quantity
- Actual Labor Unit Quantity – This Field allows the user to enter the Actual Quantity of Labor Units used for this line item. This Field can be entered manually or by clicking the =P or the =M button. This Field will be the amount of material that is being applied for payroll splits purposes. This quantity will be the quantity used in calculating payroll splits using the time sheet enteries and split percents. This allows employees to be paid on the amount of material they should have used and not the amount actually used.
- Coverage Per Unit – The Coverage Per Unit Field displays the coverage per unit of the item. An example of Coverage Per Unit would be, if you averaged 70 Square Feet of coverage per bag of insulation, the coverage per unit would be 70
For every other column on this form you can refer back to the Line Item Splits section of this help page.
Packages
The Packages section of the Payroll Splits form displays information about the packages in the current estimate. This grid is nearly the same grid that exists on the package tab of theEstimates Form. When the Split checkbox is checked on the Package Grid it will select every line item in the package for a split.

Time Sheet
The Time Sheet Grid of the Payroll Splits for is where the actual payment of employees is calculated. Laid out below is what each column does while calculating payroll splits.

- Manual Duration (MD) – The Manual Duration Checkbox allows the user to manually enter the length of time the employee spent working on the job. This is sometimes easier than filling in a start time and end time.
- Date – This is the date that the employee is being paid for.
- Package ID – Displays the ID of the package that the employee(s) are being paid for.
- Employee – Displays the name of the employee that is being paid.
- Crew – Displays the crew that the employee involved in the Split is a part of.
- Task – Displays the task task that the employee was assigned to accomplish.
- Start Time – Displays the time that employee started working.
- End Time – Displays the time the employee ended work.
- Duration – Displays the total amount of time the employee worked. This column is either calculated automatically using the start and end times or can be entered manually by checking the MD (Manual Duration) checkbox.
- Rate –Displays the Employees hourly pay rate.
- Hourly Pay Total – Displays the hourly pay total for the current job. This field is calculated automatically by muliplying the duration by rate.
- Percent(%) Split – The Percent Split Field displays the percentage split the employee will get paid if being paid piece rate.
- Split Pay Total – Displays the total amount of money the employee is to bge paid if splits are being used. This field is calculated automatically (but can be changed) by taking the Calculated Quantity and multiplying by the coverage per unit and then multiplying that total by the percent split set up for the employee.
- Total – Displays the total amount the employee will be paid.
- Date Calculated –Displays the date that the payroll split was calculated.
- Locked – The Locked checkbox displays if the employee has been paid.
Once you have your job costing figured out, you can now calculate your payroll splits. On the Job Costing form we had set up the R-19 Blown Cell Insulation to be split up and used on two seperate days. Now we have to pay the employees for those two days that were worked. From the Payroll Splits Formwe will be able to set up our employees to be paid correctly.

On the Top Grid of the Multi-Day Splits tab of the Payroll Splits form you can pick the items that we split earlier on the Job Costing form. We will check the Split checkbox next to those items. This will open a new grid at the bottom of this page. As you can see in the Equipment column, the piece of equipment where your product is, is listed.

On this new grid you can split your pay that the employees will receive. As you can see we are using the same two employees for each day that the job was worked on. These employees are being paid piece rate, and normally Aaron Rodgers would get 60% and Ben Rothlisberger would receive 40%. However since we are paying for labor over a period of two days, Aaron is currently being paid 30% for each job and Ben is being paid 20%. It is important to note that if your labor percent total is greater than 100% a warning will pop up.
Using Payroll Splits
Once you have done your estimate and completed the Job Costing Form, it is now time to figure out what your employees will be paid for the job that was just completed. To do this you must go to the Payroll Splits form in Allpro Insulator. To get there you can either click on the Payroll Splits button on the Estimate Toolbar, or click on the action menu button and then click Payroll Splits form.

Once the Payroll Splits form opens, you will initially be concerned with the top two grids on the Line Item Splits Tab of the Form.

Now to pay an employee, you must first click in the Split Checkbox on the left side of the grid. This will allow the rates for that line item to be carried over to the very bottom grid (the payroll grid).

It is important to remember that when you click preview Labor Totals, it will calculate any line where the split checkbox was checked. It is also important to note that Labor Totals are calculated by taking the Calculated Quantity and multiplying that by the Labor Cost 1. As far as splits go, if you are paying 3 employees for the same line item, you could set up one employee (the crew leader) to receive a 40% split and other 2 employees to each receive a 30% split.