The Documents Form
Documents
The Documents form in Allpro Insulator removes the need to rely on third party applications to store, sync, and access PDF documents, Word documents, Excel spreadsheets and pictures related to your estimates. Rather than using Dropbox or OneDrive, the documents are stored directly in your Allpro Insulator database and synced through Allpro Cloud Services. From there, users can view the documents locally using a PDF viewer or the appropriate Microsoft app, then modify and re-upload the Document if needed. Like the rest of your database, these files are backed up daily and retained for a year.
The Documents form can be accessed from the Estimate Form, Customer Form, Estimate List, Customer List, Package List, Line Item List, DSignature List and from the Form Explorer in the main user interface. Reports, including Estimates, Invoices, and Job sheets (among others), can also be added to Documents directly from the Report Master.
Documents can be associated with Customers, Jobs, Estimates or unassociated, depending on how the Documents form was opened. When opened from the Action menu on the Estimate form or from the Launch menu of the Estimate list, Line Item List, DSignature List, and Package List forms, the Document will be associated with the related Estimate. If opened from a Job Entry on the Customer list, or the Job Tab of the Customer form, the documents will be associated with the Job. If opened from a Customer entry in the Customer List or the Customer information section of the Customer form, the Document will be associated with the Customer. This will be covered in further detail later in this help page.
-
- Although managed and accessed from different forms, Global Attachments, User Attachments, and Product Spec sheets are also now stored in the database and synced through Allpro Cloud Services.
- If new entries for the Document form are synced through Allpro Cloud Services while the form is open, they will not appear until the user refreshes the data using the Refresh button at the top of the form
The process of adding files to the Documents form is identical when adding files from several different places in Allpro Insulator. For brevity, these instructions are condensed. On the Estimate List, Package List, Line Item List, Customer List, and DSignature List, users will open the Launch Menu using the blue button at the left side of the grid, then select Documents. The procedure only differs on the Estimate form and Customers form.
Access to Files Stored in the Documents Form
Access to files added to the Documents form is governed by any applicable restrictions configured under User Permission or Sales Reps. That means Reports the user doesn’t have permission to access elsewhere in the software will not be viewable if added to the Documents form. Similarly, if a Sales Rep is restricted to Personal Estimates Only on the Sales Reps form, they won’t be able to view files associated with the Estimates of other Sales Reps. This helps ensure that the Documents form can’t be used to access information the user is otherwise restricted from.
For help with User Permissions click, here. For help with Sales Reps, click here.
Each method of opening the Documents form, adding files, and managing entries is covered below, click one the links to skip to a particular section or keep reading.
THE NAVIGATION MENU
Allpro Insulator Online Web Portal Integration
Files added to the Documents form will also be accessible from the Documents form in the Allpro Insulator Online Web portal, including Job Sheets and other reports. Like other portions of the web portal, Crew Edition users will only have access to documents regarding the Jobs they are assigned in SchedulePro. For Full Feature web portal users, Access to Documents and other portions of the web portal can be managed through User Permissions for the Software User. For help with Software users, click here.
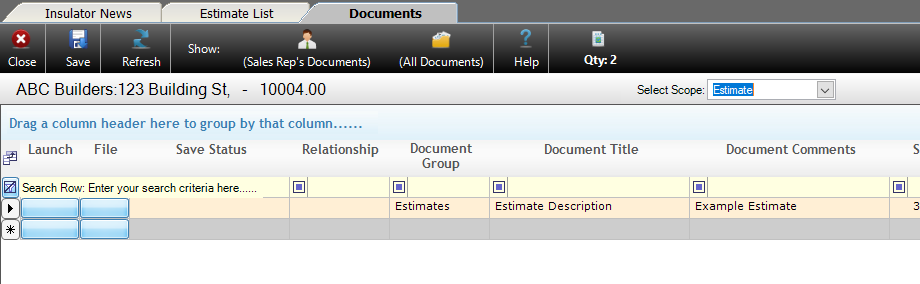
The Documents Form and Grid

The Documents grid displays a detailed list of documents accessible by the current user. It can be used to view, modify, and add new documents to the database. As previously mentioned, how the documents form was accessed will determine whether there is a Customer, Job or Estimate association when adding new documents. Many of the fields will be populated automatically and cannot be modified by the user. We’ll cover each field in the Documents grid from left to right, and you may need to scroll to view the fields on the right side.
-
- Not all fields will necessarily be relevant for every entry on the Documents form, and fields that do not apply or allow user entry will be blank.
Save – Allows users to save changes to fields which allow user entry. These are limited to Document Title, Document Comments, Sort, and the Notes field at the bottom of the form.
Refresh – If new entries have been added or synced through Allpro Cloud services since the Documents form was opened, the Refresh button will update the form with any changes.
Sales Rep’s Documents/All Documents filters – Determines whether the grid on the Documents form will display only Document entries added by the current Sales Rep or all entries.
Qty – Displays the number of records found in the Documents grid, including the entry row found at the bottom of the grid.
Select Scope – This field only appears when accessing the Documents form from another form (Estimate List, Customer List, Customer form, etc.), and allows the user to select whether the files will be associated with a Customer, Job, or Estimate. When the Documents form is opened from Form Explorer, this field will not appear.
-
- Options will be limited depending on the form from which Documents form was opened. When opened from Estimate entries, the scope can be changed from Estimate to Customer or Job. When Opened from Job Entries, the scope can be changed from Job to Customer. When opened from Customer entries, the scope cannot be changed.
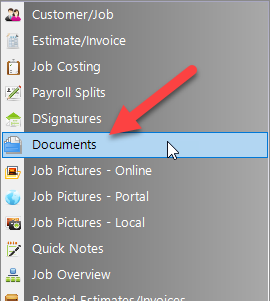
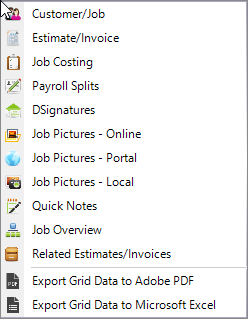
Launch – The Launch button opens the Document form’s Launch menu, providing navigation shortcuts to related forms and functions in Allpro Insulator. From the menu, users have the option to view the associated Customer/Job, Estimate/Invoice, Job Costing, Payroll Splits, DSignatures, Job Pictures – Online, Job Pictures – Portal, Job Pictures – Local, Quick Notes, Job Overview, Related Estimates/Invoices, user-defined User Report List, or the option to Export Grid Data to a PDF file or Microsoft Excel spreadsheet.
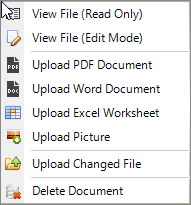
File – Allows the user to perform actions with a document file, see descriptions below.
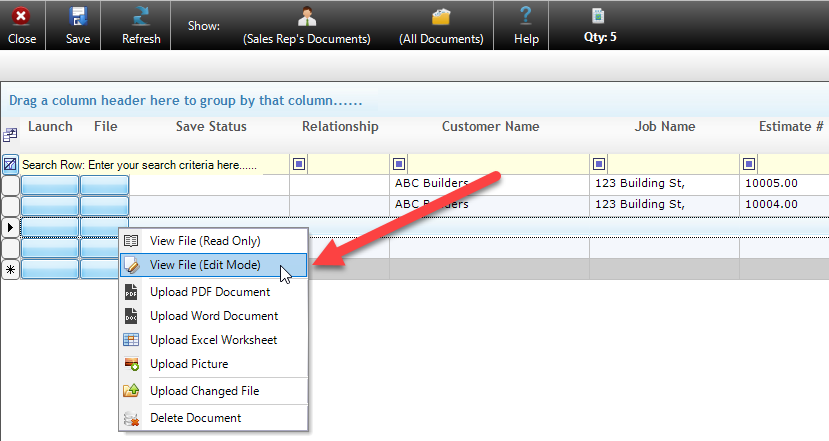
View File (Read Only) Opens the file in a read only mode when changes won’t be made.
View File (Edit Mode) Opens the file and allows the user to make changes before re-uploading the file. Note that PDF’s may not be edited, only viewed or replaced with an updated version of the report form which they were created.
Upload PDF – Allows the user to select a file PDF document to upload to Documents.
Upload Word Document – Allows the user to select a local Word document to upload to Documents.
Upload Excel Worksheet – Allows the user to select a local Excel Worksheet to upload to Documents.
Upload Pictures – Allows the user to select a picture file to upload to Documents.
Upload Changed File – Allows the user to re-upload a file after making changes with View File (Edit Mode).
Delete Document – Allows the user to delete old or unneeded documents.
Save Status – When a file has been viewed in Edit Mode, this field indicates if the updated file has been re-uploaded.
Relationship – Indicates whether the document is associated with a Customer, Job, or Estimate. Note that Estimates always have a Customer and Job associated with them, and Jobs will always have a Customer associated with them. Depending on how they are added, entries may not have an association to display in this field.
Customer Name – Displays the name of the customer for documents associated with Customers, Jobs, and Estimates.
Job Name – Displays the name of the Job for documents associated with Jobs and Estimates.
Estimate # – Displays the Estimate or Invoice number for documents associated with an Estimate or Invoice.
Document Group – Indicates how the file was added to Documents.
Document Title – Allows a title to be specified for the document, separate from filename. The title is only used for identifying the document in the Documents from.
Document Comments – Allows the entry of a brief internal note regarding the file.
Sort – Allows the user to specify the order they would like records to appear in by assigning a numeric value. Records with the lowest sort order value will be displayed at the top of the grid.
File Type – Displays the type of file the document is.

Document Status – Indicates whether the file replaced an existing version when it was added to the Documents form.
Report ID – Displays the ID number of the related report if the Document was generated in an Allpro Insulator report master.
Document Source Title – Displays the name of the report from which the document was generated if the document was generated in an Allpro Insulator report master.
Sales Rep – Indicates the Sales Rep related to the document, where relevant.
Permission Object Name – Specifies the applicable User Permission in Allpro Insulator if access to the related report is governed by a permission.
Document File Name – Displays the name of the file from which the document was uploaded.
Date/Time File Uploaded – Displays the date and time that the file first uploaded.
Contains Notes – Indicates whether notes were entered for the document. The notes section is the large entry field at the bottom of the Documents form.
Date/Time Created – Indicates when the file was created.
Created By – Indicates which software user added the file to Documents.
Date/Time Updated – Indicates when the file was last modified.
Updated By – Indicates which software user that last modified the Document.
Notes – The large notes field found at the bottom of the Documents form provides a place for users to add or view longer notes or messages associated with an entry.

Adding to Documents from the Documents Form
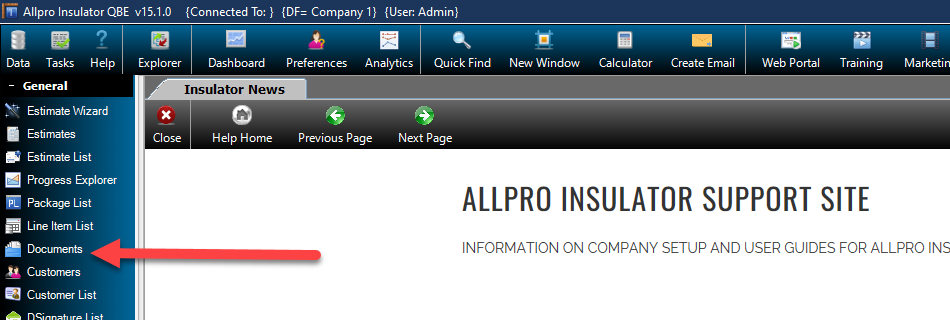
To add documents or pictures that aren’t associated with a particular Customer, Job, or Estimate, open the Documents from the upper left side of Form Explorer. This might include general contracts or other documents not tied to any particular job yet, or blank form templates that will be modified later and assigned to a specific Customer, Job or Estimate. Let’s go over how to add new documents. All Software Users with access to the Documents form will have access to any files added in this manner
- Open the Documents form at the top left of the Form Explorer
- Click the File button and select the appropriate upload option from the menu based on the type of file you want to add: PDF(.pdf), Excel (.xls, .xlsx), Word (.doc, .docx) or Picture (.jpg, .jpeg, or .png)
- Browse to the location of the file on your computer and select the desired file. Note that your selection will be limited to the upload type you selected from the File Menu.
- Click Open to upload the file.
- Add a Document Title, Document Comments, Notes, and a Sort value if desired.
- Click Save at the top left of the form.
Adding to Documents from a Report Master Dialogue

Users can add reports from any of the Report Master dialogues (including Estimates, Invoices, and Job Sheets) to the Documents form directly from the Report Master. The files will be associated with the Estimate, Customer, Job, or unassociated, depending on which form the Report Master dialogue was opened from and which report is selected.
If access to the selected report is governed by a User Permission or Sales Rep settings, Software Users with No Access will not be able to view the report from the Documents form or Report Master. Click here for help with User Permissions.
- Start by opening the Report master and selecting the desired report. In this example, Estimate – Details is selected, so the report will be associated with the Estimate from which it’s produced.
- At the bottom of the Document Action section, select “Add/Replace Existing” or “Add/Keep Existing”. If a previous version of the report was added to the Documents form, “Add/Keep Existing” will create a new copy of the report on the Documents form, while “Add/Replace Existing” will overwrite the existing copy.
- Complete your desired Document Action (Print, Email Etc.) or select “To Documents (only)” to add a PDF copy of the report to the Documents form.
- The report will be automatically added to the Documents form according to your selections with any relevant Customer, Job and Estimate information.
Note that a default setting for “Don’t Add”, “Add/Replace Existing “or “Add/Keep Existing” in the Report Masters can be set or modified in User Preferences. Click here for help with User Preferences.
Adding to Documents from the Estimate List, Package List, Line Item List, or DSignature List
Adding files to the Documents form from the Estimate List, Package List, Line Item List, and DSignature List will all follow the same procedure. Files added to the Documents form from any of them will be associated with a Customer, Job, and Estimate, because the entries are all pulled from the Estimates or Invoices. Users will have the option to modify the scope of the file’s association (Estimate, Job, or Customer) when making selections on the Documents form.
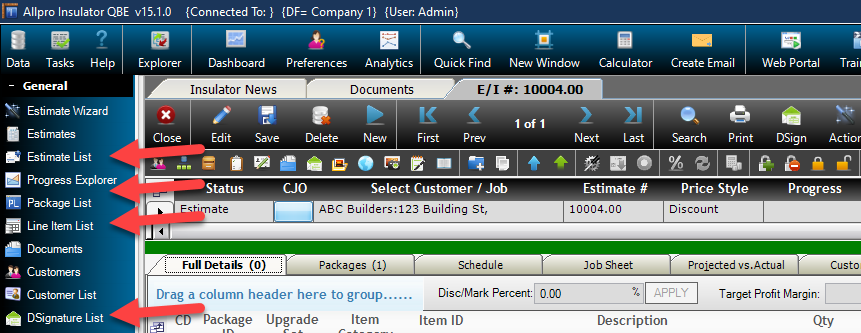
- Locate the desired entry in the Estimate List, Package List, DSign List, or Line Item List, using the filter row to locate the record if needed.
- From the Estimate List, Package List or Line Item List, click the blue Launch button to the left of the desired entry and select Documents to open the Documents form. Alternatively, the Launch menu can be opened by right-clicking anywhere in an entry.
- Click the File button and select the appropriate upload option from the menu, based on the type of file you want to upload: PDF (.pdf), Excel (.xls, .xlsx), Word (.doc, .docx) or Picture (.jpg, .jpeg, or.png)
- Browse to the location of the file on your computer and select it. Note that your selection will be limited to the upload type you selected from the File Menu.
- Click Open to upload the file.
- The Customer, Job, and Estimate association will populate automatically based on the record from which the Documents form was opened.
- If desired, use the dropdown menu found near the top center of the Documents form to change the Scope of the file’s association between Estimate, Job, and Customer.
- Add a Document Title, Document Comments, Notes, and a Sort value if desired.
- Click Save at the top left of the form.
Note that Sales Reps configured with Personal Estimates Only access will not be able to access Documents form entries tied to Estimates created by other Sales Reps.
Adding to Documents from the Customer List
Document files added from the customer list will have a Customer or Customer and Job associated with them, since the Customer list contains entries for both Jobs and Customers. Users can filter the list to display one or the other to ensure files added to the Documents form are associated in the desired manner. Customer entries can be differentiated from Job entries by checking the Job Name field, which will be the same as the Customer Name in Customer entries. Customer entries will also lack other information typically associated with Jobs, such as Job Status, Job Address and so forth.
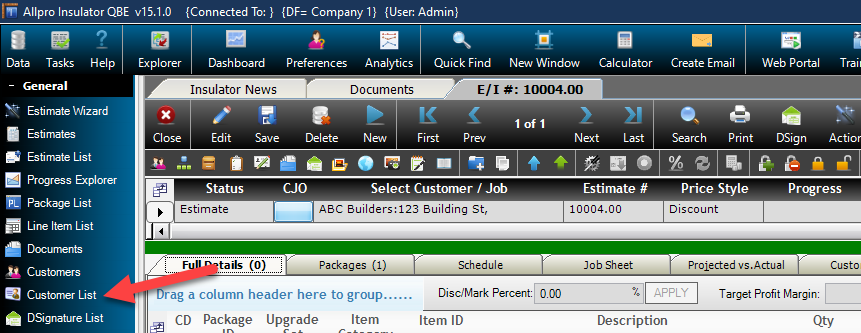
- In the Customer List, locate the desired Customer or Job Entry. Recall that Job entries will contain customer information, but will also include Job information, and the entries can be filtered at the top of the Customer List to display just Customer or just Jobs.
- On the Customer List, click the blue Launch button to the left of the desired entry and select Documents to open the Documents form. Alternatively, the Launch menu can be opened by right-clicking anywhere in an entry.
- Click the File button and select the appropriate upload option from the menu, based on the type of file you want to upload: PDF(.pdf), Excel (.xls, .xlsx), Word (.doc, .docx) or Picture (.jpg, .jpeg, or.png)
- Browse to the location of the file on your computer and select it. Note that your selection will be limited to the upload type you selected from the File Menu.
- Click Open to upload the file.
- The Customer or Customer and Job association will populate automatically based on the record from which the Documents form was opened in the Customer List.
- If the Documents form was opened from a Job entry in the Customer list, the Select Scope dropdown menu found near the top center of the Documents form can be used to change the Scope of the file association between Job and Customer.
- Add a Document Title, Document Comments, Notes, and a Sort value if desired.
- Click Save at the top left of the form.
Adding to Documents from the Estimate Form

Document files added to the Documents form from the Estimate form will have a Customer, Job, and Estimate associated with them, because each Estimate does. Users will have the option to modify the scope of the file’s association (Estimate/Job/Customer) when making selections on the Documents form. The steps below apply0 whether working with an estimate or invoice status on the Estimate form.
- Open the Estimate for which you would like to add files to the Documents form.
- Open the Action menu from near the center of the Estimate form main toolbar.
- Select View Documents from the Action menu. Alternatively, the small blue folder icon below the Save button will open the Documents form as well.
- Click the File button and select the appropriate upload option from the menu, based on the type of file you want to upload: PDF(.pdf), Excel (.xls, .xlsx), Word (.doc, .docx) or Picture (.jpg, .jpeg, or.png)
- Browse to the location of the file on your computer and select it. Note that your selection will be limited to the upload type you selected from the File Menu.
- Click Open to upload the file.
- The Customer, Job, and Estimate association will populate automatically based on the record from which the Documents form was opened.
- If desired, use the Select Scope dropdown menu found near the top center of the Documents form to change the Scope of the file’s association between Estimate, Job, and Customer.
- Add a Document Title, Document Comments, Notes, and a Sort value if desired.
- Click Save at the top left of the form.
Note that Sales Reps configured with Personal Estimates Only access will not be able to access Documents form entries tied to Estimates created by other Sales Reps.
Adding to Documents from the Customers Form
Like the Customer List, users can add documents that are associated with a Customer or a Customer and Job, though the process here is different. With Customer information at the top and Job information at the bottom, which section the Documents form is opened from will determine how it is associated.
Adding Documents Associated with the Customer from the Customers Form
-
- Open the Customers form and locate the desired Customer entry using Search if needed.
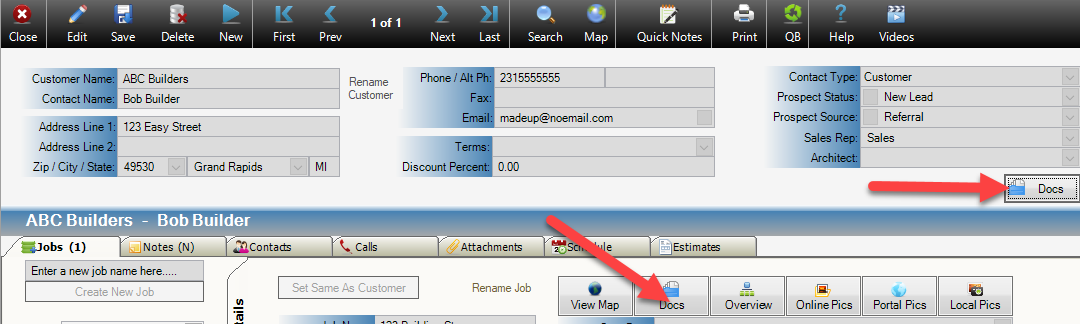
- From the top section of the form click the Docs buttons located just below the Architect field on the right side to open the Documents form.
- Click the File button and select the appropriate upload option from the menu, based on the type of file you want to upload: PDF(.pdf), Excel (.xls, .xlsx), Word (.doc, .docx) or Picture (.jpg, .jpeg, or.png)
- Browse to the location of the file on your computer and select it. Note that your selection will be limited to the upload type you selected from the File Menu.
- Click Open to upload the file.
- The Customer association will populate automatically based on the record from which the Documents form was opened. The Scope cannot be changed from Customer.
- Add a Document Title, Document Comments, Notes, and a Sort value if desired.
- Click Save at the top left of the form.
Adding Documents Associated with a Job from the Customers Form
-
- Open the Customers form and locate the desired Customer entry using Search if needed.
- In the lower left portion of the Customer form, locate the desired Job in the Job Name list and select it.
- Ensure the vertical Details tab is selected.
- Click the Docs button located directly below the Estimates tab, to the right of Rename Job and View Map.
- Click the File button and select the appropriate upload option from the menu, based on the type of file you want to upload: PDF(.pdf), Excel (.xls, .xlsx), Word (.doc, .docx) or Picture (.jpg, .jpeg, or.png)
- Browse to the location of the file on your computer and select it. Note that your selection will be limited to the upload type you selected from the File Menu.
- Click Open to upload the file.
- The Customer and Job association will populate automatically.
- If needed, use the dropdown menu found near the top center of the Documents form to change the Scope of the file’s association between Estimate, Job, and Customer.
- Add a Document Title, Document Comments, Notes, and a Sort value if desired.
- Click Save at the top left of the form.
Modifying Files on the Documents Form
Excel worksheets and Word documents saved in the Documents form can be modified by users and the changes uploaded to the cloud. This allows forms to be filled out or updated, and other changes to be made. PDF documents and Pictures added to the table cannot be edited directly but can be replaced with an updated or new version of the file.
Note that users will need licensed Microsoft 365 (Office) apps to edit Word and Excel files. If you require licensing, we can help! Allpro Technology is an official Microsoft Partner and can help provide and manage Microsoft 365 (Office) licensing for you. Call and request a quote today! (231) 839-7928
- Open the Documents form and locate the desired Word (.doc, .docx) or Excel (.xls, .xlsx) file in the Documents grid.
- In the File Menu, select “View File (Edit Mode)”
- The Save Status will update to “Changes NOT Uploaded” until the file is uploaded again, even if no changes are made.
- A local copy of the file will be downloaded automatically and opened in the appropriate Microsoft app.
- Make the desired changes and save the file in Word or Excel as normal when finished. Ctrl + S will save your work in most Microsoft apps.
- Close Excel or Word if done editing.
- Return to the Documents form in Allpro Insulator.
- Locate the entry that was modified, Save Status will indicate Changes NOT Uploaded
- Open the File menu
- Select Upload Changed File from the menu.
- Update the Document Title, Document Comments, Notes, and a Sort value if needed.
- Click Save to retain any changes.
- Save Status should indicate Changes Uploaded.
Deleting Files on the Documents Form
Removing outdated or unneeded records from the Documents form will be more important the more it is utilized. Most of the files stored on the form won’t be very large, but in large numbers they can start to add up quickly. Over time, this can cause the size of your database files to grow significantly, resulting in longer sync times and full hard drives. So, let’s cover how to clean up.
- Open the Documents form and locate the record or records to be deleted. The filter row at the top can be used to locate individual files or groups of files using key words, such as the customer’s name.
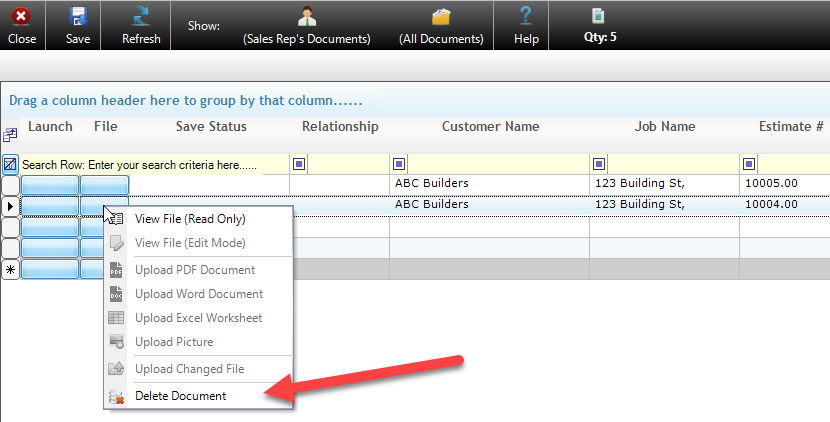
- Click the File button next to the record to be deleted.
- Select Delete Document from the File menu
- Select Yes from the confirmation dialogue.
- The entry will be deleted.
Adding Reports from Allpro Insulator to the Documents Form Automatically
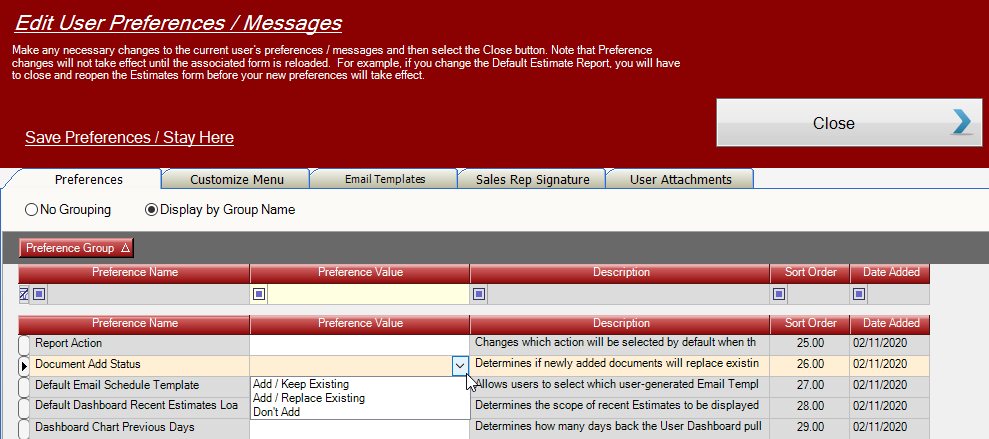
Invoices, Estimates, Job Sheets and other reports can be configured to be added to the Documents form as a PDF document automatically from User Preferences, but caution should be exercised in the use of this setting. If not managed carefully, adding reports to the database automatically can cause the database to balloon in size rapidly. For this reason, the recommended preference settings are “Don’t Add”, or “Add/Replace Existing”.